Showing posts with label Microsoft. Show all posts

Tuesday, 17 October 2017

Understanding – Time to First Byte


Introduction


I faced slow website loading in a project and I am sure many of you must have faced the same. Now-a-days, people are worried about responsiveness of web server and speed of their websites. There are many reasons as to why your website might be slow! Typically, the most common reasons are inappropriate hardware configuration, incorrect coding practises, slow internet connection and so on. Apart from these, there is an overlooked but highly important factor that degrades the performance of your site and that is TTFB - Time to First Byte.


What is TTFB?


TTFB – Time To First Byte, is a metric to measure responsiveness of web server and speed of website. In simpler words, it is the time any browser has to wait for the first byte to be received. TTFB is not the only metric to measure the speed of your site. In spite of this it cannot be overlooked.

Organizations make use of TTFB to identify the weak points like speed of their website when they make http request. By identifying the weak points, they know whether it is a server configuration issue or an application issue etc.

Following is the illustration of TTFB seen in Chrome Developer Tools. There are also various other components in the image below starting sequentially is Request Sent, TTFB and Content Download of the website.

The Request sent to the server took 0.16 ms which is acceptable. Then there is a waiting time for the content to be downloaded. This waiting time is TTFB where we receive the first byte of the response. So TTFB is the first thing that we have received before the content is downloaded and TTFB for current site request is 2.85 seconds which is huge. Finally, the content of website like CSS, images and scripts and so on, are downloaded in 8.55 ms which is also acceptable. So we can easily understand from the image below that TTFB is the first byte that we receive even before the content is downloaded.


Tools for Testing TTFB


There are various tools available online to test the performance of your site. Testing the performance of your site is indirectly, nothing but measuring TTFB. Following are the free tools you can use to measure TTFB of your site:-
  1. WebPageTest
  2. Google Chrome – Developer Tools (this is recommended as it is default integrated with Google Chrome Browser)
  3. Pingdom
  4. KeyCDN

TTFB Impacted by/Causes of High TTFB


TTFB is impacted by many factors, there are reasons as to why your TTFB is high. Following are some of those reasons:-

1. Server Configuration
The first thing that hits us is inappropriate server configuration. Off course, inappropriate server configuration is one of the major reasons to high TTFB. If your server configuration is inappropriate it will affect the performance of your site. It can make the processing of any request slow which will in turn result in high TTFB and the performance of your site will degrade.

2. High CPU Usage
Even if your server configuration is good your site might perform slow. Reasons to high TTFB are innumerable, one of which is High CPU Usage. If the CPU usage of your server is high it might degrade the performance of your site. Your server will not be able to process your requests quickly.


3. Slow Database Request
Slow Database Request is also one main reason for slow performance of your site. If your database is not structured well(indexes) or your query is not well-formed, then it will for sure add some delay in execution and will result in slower performance of your site.

4. Inefficient code on server
One of the main reason for slow performance of your site is inefficient code. Inefficient code will slow down the execution of your application and also will ultimately increase the CPU usage which will result in slow performance of your site. So, it is recommended that you always use best coding practises for your application.


Effect of TTFB

TTFB strongly affects the search ranking of your site. If TTFB of your site is high then it will affect the ranking of your site by not listing it at the top when searched. So the ranking of your site is directly linked to TTFB of your site. Though TTFB is not the only metric of low ranking of your site, however, it plays a major role in ranking of your site.

Improving TTFB


Improving TTFB can greatly help you increase the performance and speed of your site. Improving TTFB is nothing but reducing the TTFB number i.e. if the TTFB of your site is 4 seconds then you can improve TTFB of your site to 1 second. Following are the ways you can improve TTFB of your site:-

1. Improve your server configuration
Good server configuration can ultimately increase the speed of your site. It will automatically perform faster in serving end user’s request and also can speed your database queries and application processing. You can add a load balancer to improve the performance of your site. Load balancer balances the requests received by end user when actual server is running out of memory. Your load balancer server will just perform like your actual server.

2. Implementing CDN
A CDN is a spread over network which delivers html pages and other web contents from the server to end user based on their geographical locations, the origin of the web page and content delivery server. Implementing a CDN is a really good idea to improvise the performance of your site. Fetching everything from your hosting server over the network can cause latency and will reduce the performance of your site. Thus implementing a CDN will really be helpful if the request is from where the CDN server is present and will not cause any network latency. Ultimately improving the performance of your site.

3. Caching 
Caching is a process of temporarily storing the data you request in cache. For example, the files you automatically request by looking at a Web page are stored on your hard disk in a cache subdirectory under the directory for your browser. When you return to a page you've recently looked at, the browser can get those files from the cache rather than the original server, saving you time and saving the network the burden of additional traffic. Caching is a good technique to increase the performance of your site. It is mainly used for static content of your site. It will also reduce the network latency of your requests, thus increasing the speed and performance of the website.


Conclusion

TTFB is an important metric in measuring the performance of your site. Above mentioned measures to improve TTFB are fairly simple to implement. A TTFB time of 500 ms or less is recommended.


Written by Rohit Sevaramani, Tech Lead (MCP) at Eternus Solutions
Read More »

Monday, 11 July 2016

Generate OAuth Authorization Token using OWIN with SharePoint

As a SharePoint developer, you are aware that SharePoint provides OAuth Authorization services to generate access token from SharePoint using its own prerequisites. However, this approach has its own limitations. We can generate same token without using OAuth Authorization provided by SharePoint. In this blog, I will take you through the process of generation of Bearer Token for a custom third party client application to authenticate and authorize with SharePoint and perform operations on SharePoint data using the generated access token.

Let's first know how a SharePoint token works

When a user signs in to SharePoint, the user's security token is validated. The token is issued by an identity provider. SharePoint supports several kinds of user authentication.  For more information on this, see Authentication, authorization, and security in SharePoint 2013.

In SharePoint 2013, we can create apps using SharePoint Add–Ins. These Add-Ins are also required to be authenticated and authorized with SharePoint. These Add-ins can be authenticated and authorized in several different ways. For more information on this, see Three authorization systems for SharePoint Add-ins.

As mentioned, for all the given authorization systems to get access tokens for logged in user, either we need to create a high trust using certificates or we need to register with Microsoft Azure Access Control Service (ACS). In both these scenarios, our custom site requires to be configured with secure access i.e. HTTPS protocol with high trust certificates.

So, the workaround to create access tokens from SharePoint site other than the options provided by Microsoft is creating a custom ASP.Net Web API using OWIN.

What is OWIN

OWIN is an Open Web Interface for .Net which acts as a middleware OAuth 2.0 authorization server between SharePoint site and a third party client application. OWIN defines a standard interface between .NET web servers and web applications.

Using ASP.Net Web API and OWIN, we can authenticate and authorize users with SharePoint site and generate access token for this user, and further use this access token for CRUD operations on SharePoint site using SharePoint REST API's by passing the "Bearer" access token in the headers of the query.

Authorization Methods in SharePoint

To perform CRUD operations on SharePoint content using SharePoint REST APIs, there are different ways to pass authorization:
  1. System.Net.CredentialCache.DefaultCredentials:
    The DefaultCredentials property applies only to NTLM, negotiate, and Kerberos-based authentication.

    DefaultCredentials represents the system credentials for the current security context in which the application is running. For a client-side application, these are usually the Windows credentials (username, password, and domain) of the user running the application. For ASP.NET applications, the default credentials are the user credentials of the logged-in user, or the user being impersonated.
  2. System.Net.NetworkCredential(username, password, domain):
    The NetworkCredential class is a base class that supplies credentials in password-based authentication schemes such as basic, digest, NTLM, and Kerberos.

    This class does not support public key-based authentication methods such as Secure Sockets Layer (SSL) client authentication.
  3. Bearer Token:
    Tokens are issued to clients by an authorization server with the approval of the resource owner. The client uses the access token to access the protected resources hosted by the resource server. This specification describes how to make protected resource requests when the OAuth access token is a bearer token.
The First option stated above cannot be used in a custom third party client application as it does not understand the default credentials. The Second option stated above passes username, password and the domain in which the user needs to be authorized, which will cause a security threat as the client application will need to store user's password and send it whenever required.

SharePoint 2013 uses OAuth 2.0 Authorization framework for Bearer Token usage in SharePoint Add-Ins. Once the access token is generated, the custom application can use this token to perform CRUD operations on SharePoint 2013 content using SharePoint REST APIs. This token is sent through headers from the code that is running on a browser client. You will not need access token if you are making this call from a SharePoint hosted app add-in.

In a similar way, we can generate access token in ASP.Net Web API and OWIN by passing in the username and password for the first time. Once the access token is generated, we can use this token for CRUD operation for SharePoint REST APIs.

How to Generate Access Token using OWIN

Below are the steps to generate access token using OWIN
  1. Create a new empty ASP.Net Web Application Project. Select "Web API" check box under "Add folders for core references for" tab. In the Authentication, select "No Authentication".

  2. Create a class "Startup.cs" in the project at root level which will be required for OWIN.
  3. Install the required OWIN components in the solution using Nuget Package
    • Install-Package Microsoft.Owin.Host.SystemWeb
    • Install-Package Microsoft.Owin.Security
    • Install-Package Microsoft.AspNet.Identity.Owin
    The above commands will install the OWIN Hosting infrastructure as shown below

  4. Every OWIN Application has a startup class where you specify components for the application pipeline. There are different ways you can connect your startup class with the runtime, depending on the hosting model you choose (OwinHost, IIS, and IIS-Express).

    OwinStartup Attribute: This is the approach most developers will take to specify the startup class. The following attribute will set the startup class to the TestStartup class in the StartupDemo namespace.
  5. Add Configuration method with IAppBuilder parameter
  6. Configure OAuth Authorization for application which will be authenticated and authorized with a SharePoint site and Domain.
  7. Now override the methods ValidateClientAuthentication and GrantResourceOwnerCredentials as per our requirements as shown below to authenticate and authorize user from SharePoint site with User Information list in the SharePoint site.
  8. Now build and test the application by calling the GeToken method and passing "UserName" and "Password" parameters. The method will return the bearer token including token and expiry date time. This token can now be used to perform CRUD operations in SharePoint REST APIs.
Wasn’t that simple? Do try this approach and let me know how it goes for you.


Written by Mahesh Nagawade, Sharepoint Expert at Eternus Solutions
Read More »

Tuesday, 21 June 2016

Grid formatting in Microsoft Dynamics CRM Online

One of the most common enhancement requests that we receive from our MS Dynamics CRM customers is changing the look and feel of the default UI / UX. A case in consideration is the default UX of the grid. It is completely unreadable, considering it has no alternative row styling or for that matter, even row separators.

Users these days are spoilt for choices and in such a scenario, an unfriendly UI may lead to customer dissatisfaction in an otherwise perfect implementation. What is even more appalling is that there is no straightforward way of implementing this simplistic feature which is de facto for more than a decade now.

However, inspired by  Bohnnie Maity’s blog on conditional formatting for CRM 2013 sp1/2015 grids using actions, I have made changes in the code to make the grid a little captivating.

This is the standard grid available in Dynamics CRM 2015/2016

Standard grid in MS Dynamics CRM – 2015/2016


After modifying the CSS classes in JavaScript, the Grid looks a tad different, more attractive and easier to analyze records in the associated rows.

Grid with gray colored alternative rows


For achieving this output, use the following JavaScript code,


Pro-Tip


You can call this JavaScript function by simply creating a hidden button on every (Global) entity form as a web resource. For your ease, kindly use ribbon workbench tool inside MS Dynamics CRM solution.


Written by Pramod Dhokane, Microsoft Dynamics Expert at Eternus Solutions

Read More »

Friday, 17 June 2016

MS Dynamics – not just CRM but xRM


Microsoft has really put its weight behind the development of the CRM platform and its success is pretty evident with the fact that the platform has evolved exceptionally over time. Now that the Microsoft’s development team has delivered and done one heck of a job at that, it’s time for the marketing team to match that level.


They can simply start by re-branding the product as xRM. Confused? Read on.

The product is still marketed primarily as a CRM tool. Customer Relationship Management (CRM) is an approach for managing a company's interaction with its existing and prospective customers.

When you look at the current features of the platform, CRM is almost a misnomer, since it is capable of so much more!  It is now ready to be used as a fully functional, independent development platform, quite justifiably so.
  • Highly scalable, secure and robust architecture
  • Extremely flexible security model
  • Highly customizable user interface development using web resources
  • Powerful built-in workflow engine for business process automation
  • Ability to expose and consume web services for programmatic manipulation of data and integration with legacy systems
  • Seamless integration with SharePoint, Outlook, MS productivity suite, MS Social Insights, ADX Studios portal
  • Availability of a large number of third-party components
  • Multiple deployment options, including On-Premise, Online, and Partner Hosted

The possibilities that this platform comes up with are endless with its capabilities. However, in order to completely utilize the power of this platform, it would be wise if it is used to do what it already does best- MANAGE RELATIONS.

If you have been to a B-school, you will know and agree that those countless case studies eventually boil down to ONE thing- Managing and nurturing BUSINESS RELATIONS, not  just with your customers, but suppliers, employees, stakeholders, general public. Great businesses are built on leveraging their knowledge of customers, suppliers, stakeholders, and exerting their influence on them. The faster you are able to analyze their sentiment, the faster you will be able to act on it and gain an edge over your competitors.

Unfortunately, there isn’t a complete solution out there which lets you manage relations. Granted, there are name sake modules for those in ERP but they are more transactional in nature and are grossly incapable for the intended purpose.

MS Dynamics CRM can easily be extended into xRM. An xRM should be a generic relationship management solution which should have a 360 degree approach in managing customers, suppliers, public relations, and just about any relationships the company wishes to manage.


Let’s explore a few use cases where standard CRM functionality can be easily extended to xRM.


Public Relations Management

Public Relations Management is extremely crucial in today’s era and United Airlines sure can vouch for it. A PR disaster cost them a whopping 180 million dollars (look up ‘united breaks guitars case’). People’s satisfaction level doesn’t reach you directly anymore, they broadcast it on social media.

Social Insights from Microsoft Social Engagement allows businesses to analyze and measure their brand’s perception using social media trends. The tool also provides granularity and allows users to drill down into the data and see what the users have said. By consolidating the details from Dynamics CRM or Dynamics Marketing, you can find out what you’re doing right, and address potential issues before bigger problems arise.

Supply Chain - Forecasting

One problem plaguing the manufacturing sector is not being able to manage its supply chain optimally. Raw materials usually have a usually long lead time while the orders are placed / modified at a moment’s notice. This can translate to either of these scenarios:
  • You over stock raw materials, which is very risky in a volatile price market
  • You lose out on orders because you cannot fulfill them

This problem is only compounded further due to the lack of right talent / knowledge.  Employees responsible for ordering / managing supply chain are barely proficient in advanced forecasting models and tools.

One solution to this problem is to utilize the rich information in CRM of the expected pipeline; which when combined with brilliant analytical capabilities of the platform can be used to build automated forecasting models.

Donor Management (NGO / NPO)

It’s intriguing to see how the requirements for NGOs and NPOs can be mapped to standard CRM OOB (Out of the box) entities.
  • ‘Donor profile management’ maps to ‘Customer Profile Management’.
  • ‘Donation management’ maps to Leads and ‘Opportunities Management’.
  • ‘Campaign / fund raising management’ maps to ‘Campaign Management’.
  • If there is even further additional information that you need to capture then they can be easily built using custom entities and web resources.


Recruitment Management

You can provide a portal to publish job openings and accept applications using ADX Studios portal. ADX Studios was recently acquired by Microsoft and has seamless integration and access to all CRM entities.

Each application can then be mapped to the standard sales and opportunities processes of verification, multi stage qualification, multi stage evaluation and quotation (offers).

These were just a few examples of what can be achieved using MS Dynamics CRM platform. Move over CRM, xRM is here!


Written by Prasad Udupi, Microsoft Dynamics Expert at Eternus Solutions

Read More »

Wednesday, 15 June 2016

Office 365 – A new collaboration Platform for Non-profits..!! Are you ready to move to Cloud?

Do you want to free yourself from the hassles of maintaining an in-house Exchange Server? Is your staff spread across several locations? Do you have budget constraints for IT support like installations and upgrades? Then Microsoft Office 365 Nonprofit may be right for you!


Even today, many Non-profit organizations have been buying various software’s to fulfill their requirements. Furthermore this strategy also involves Infrastructure costs, Application Maintenance, Data management and a full-fledged IT staff to help them maintain these products. Heretofore, Microsoft has offered free or low-cost cloud-based office services that non-profit organizations are uniquely qualified for.

It is no longer the case that the best in class technology solutions are only offered to the organizations with huge budgets. Office 365 Nonprofit, makes enterprise-level technology affordable for non-profits in over 130 countries including India.

What is office 365 for Non-profits?

As part of "Technology for Good" program, Microsoft donates its cloud-based Office service (Office 365) to all qualifying non-profit organizations.

Office 365 Non-Profit is the core cloud service that offers significant benefits to non-profits which includes free email, online document editing and storage, video conferencing, instant messaging, and Yammer site, you can bring teams together from around the world.

Empower your business to succeed with Office 365 non-profit

Office 365 allows organizations to spend less time on IT maintenance by providing email maintenance, software upgrades, and security. This will help you run nonprofit more efficiently, securely, and less expensively. Non-profits can focus more on accomplishing their mission.

Compelling reasons why an Office 365 subscription is the choice for non-profits:
  • Global Access
    Access on the go from anywhere, anytime and from any device. With Office Web Apps, you can open, view, and edit office documents right from your browser giving the flexibility to work wherever and whenever you need to.
  • Brand your organization
    Market your business with online website using your own domain name, without needing a designer or paying hosting fees
  • End User Adoption
    End-user adoption is the key factor to all successful cloud services decisions. With office 365 Non-Profit, end users are provided with the latest version of traditional Office suite that your staff is already familiar with.
  • Business class email and calendaring
    With Microsoft Exchange Online, you don’t have to manage an in-house Exchange server or rely upon third party email tool. Office 365 provides users with 50GB of mailbox storage with attachments up to 25MB each.
  • Online conferencing
    Showcase your business and impress your target audience by utilizing online HD video conferencing and screen sharing features. Office 365 offers powerful communication tools like Lync Online, audio and video conferencing online making collaboration easier. You can even invite people or volunteers outside of your organization to join.
  • Secure File Sharing
    With Office 365, you get 1 TB of space for OneDrive for business. Share, store and Collaborate on information with volunteers or co-workers securely with OneDrive for business.
  • Best Productivity and Better collaboration
    Work together and smarter. Share Documents online with real time collaboration and coauthoring. You can edit documents simultaneously with co-workers, improving productivity and saving you precious time.

Non-Profit success with Office 365

  • Raise more and bigger donations
  • Connect staff, volunteers and listeners 24/7
  • Encourage creativity and collaboration
  • Transition seamlessly between devices, and Expand beyond geographic boundaries
  • Double their outside funding
  • Collaborate on important documents and reports
  • Create a more efficient workflow
  • Created work for more volunteers and increased their productivity
  • Increased productivity
  • Effective communication with stakeholders from anywhere

What we offer to Non-profits?

Choosing the right cloud solution increases your organization's efficiency, saves on technology costs, and fosters your best collaboration
    - Microsoft for Office 365 Donation initiative.


Eternus Solutions offers you its vast experience of Office 365 non-profits and helps you to accomplish adoption as well as the implementation to ensure and maximize the value obtained by providing the professional assistance you need. We can help your organization evaluate the costs and benefits of Office 365 to determine if it is the best solution for your business. We think that the cloud based solutions are most cost-effective and sustainable for non-profits.
We will work with you to ensure that you are benefited by the best discounts you’re entitled to.

Our services for Non-Profit include:
  1. Assessment and Planning
  2. Office 365 Implementation & Migration
  3. CRM for non-profits

For more information on Office 365 Non-profits visit Microsoft Office 365 Nonprofit site and sign-up for the free trial to get started.


Written by Aradhana Chindhade, Microsoft Technologies Expert at Eternus Solutions
Read More »

Tuesday, 6 October 2015

Data Import from SQL to MS Dynamics CRM


If you have worked with MS Dynamics CRM, you would have certainly needed to import data from your SQL databases. Integration with different servers come with their own challenges. In this blog, I will take you through a simple procedure of importing data from your SQL databases into your MS Dynamics CRM instance.

Before You Get Started

You will need to have a basic idea about how to create SQL queries and decent hands-on experience of MS Dynamics CRM.

Our Target

I needed to get all the entities and entity attributes from my MS Dynamics CRM and create a dynamic table for the selected entity and its attributes as table columns in the database. I also needed to insert multiple records into the table and finally import the same table into MS Dynamics CRM to get multiple entity record in a single click.

Solution

With the help of .net framework & Microsoft Dynamics CRM SDK, I developed a mapping tool for my requirement. This would essentially take care of the following scenarios:
  1. Export & import with MS Dynamics CRM
  2. Creating a dynamic table in our local database
Let's take a look at the screenshots:

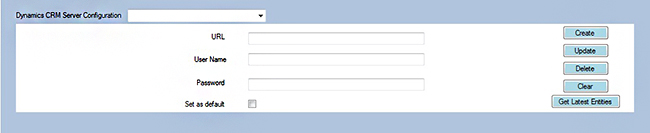
Figure 1: Accept URL, Username, Password of the respective MS Dynamics CRM portal


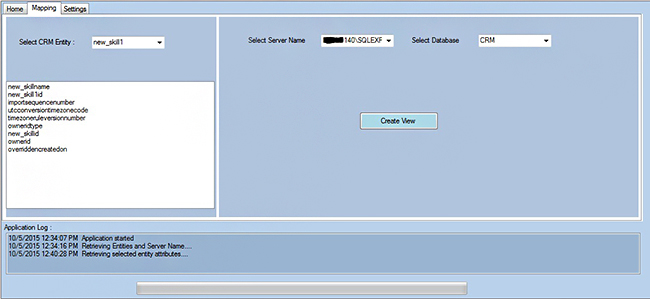
Figure 2: The mapping screen will contain Entities, Entity attributes, SQL server
name and databases of selected server and a button which will create a dynamic table on selected database


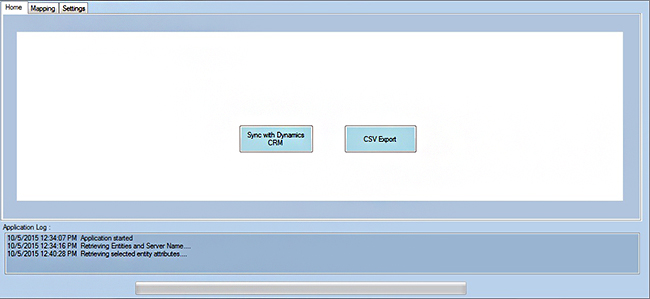
Figure 3: Sync with Dynamics CRM button will import table records into Dynamics CRM


How I built my Rome


Step 1
The very first thing we need as per Figure 1 is a Dynamics CRM URL, Username and Password to connect with CRM. I have used IOrganizationService. With the help of this service, we can access data and meta data of the particular organization.

NOTE: For interaction purpose with Dynamics CRM, you need to add the following references:


Clicking on the button will give you the credential and you need to parse the credential by using Parse method of CRM connection class to pass it to IOrganizationService. CRM Connection is a class which is present inside Microsoft.Xrm.Client namespace.

Step 2
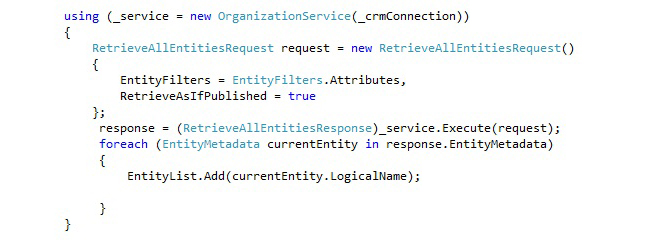
As per Figure 2, once we get the credentials, we just need to pass it to IOrganizationService to get all the entities of a particular organization. We can use the following code:


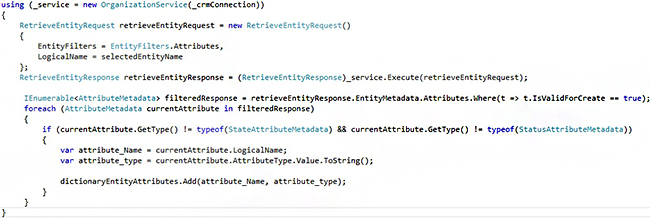
To get the entity attributes, we can use the Attribute Meta data class as shown below. Once we get all the attribute & its types, we can create a dynamic table inside the database with the help of this class.


Step 3
To get SQL server name and databases, we can use SQL server management object(SMO).

NOTE: Add following references to use the SMO:


To get instances of all available SQL Servers, use the following code:


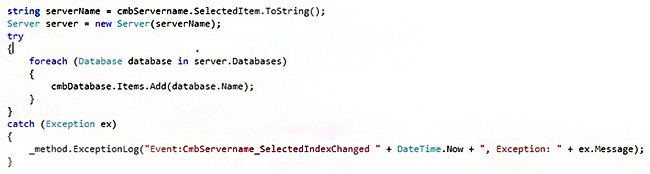
As per figure 2, on selection of the server, we need to get a list of databases which are present on that particular server. For the same, use the following code as shown below:


Step 4
We are ready with our Entities, Entity attributes, Server name and Database. Now we need to create a table for the selected entity dynamically. For that purpose, we need to pass selected server and database name to SMO server and database class respectively. Then we need to create an object of table class, pass column name and data type to the table object and finally call the Create method of table object.

NOTE: Since MS Dynamics CRM attribute data types & SQL data types are different, we must replace CRM data type with SQL data type.

Step 5
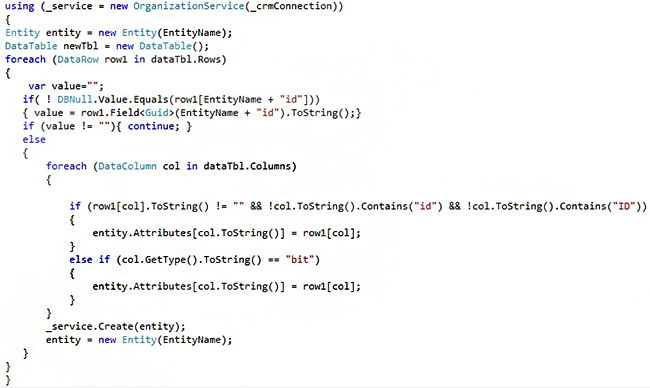
Finally we are ready with our dynamic table. Now, we need to insert bulk of record into the table. To import data into CRM, we need to make a request to ExecuteMultipleRequest class and send the list of records to it.

I have used the following code for the same:


And we are done! I ended up creating a reusable component, which provides enough capability to import data from SQL to Dynamics CRM. My migration team loves me to the core!


Written by Neethuanna Matthew,  Microsoft Dynamics CRM Champion at Eternus Solutions
Read More »

Wednesday, 23 September 2015

Activity Reminders on Dashboard For Microsoft Dynamics CRM


Interactions with customers through phone call, emails and recording the same form a vital part of any CRM application. As a Microsoft Dynamics CRM user, you can create phone call, tasks, emails, fax and letters through Activities which appear on an entity record or you will find your records in the activity entity.

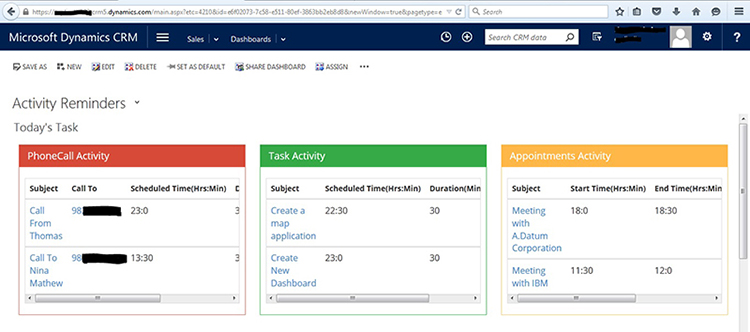
But what if I wanted the due date of my Activities to appear on the dashboard like reminders? For a recent requirement, I needed to do just that. One of my favorite clients wanted his activities to show up as reminders as per their due dates. For this, I decided to create a new dashboard, as shown below.


Customizing Activity Reminders


The dashboard needed some customization for creating activity reminders.

Step 1: Create Dependency Files

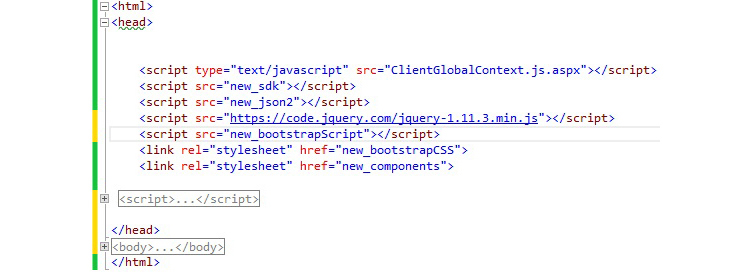
Create a web resourse, say, RestSDK and browse to your respective directory to find the SDK.REST.js. I have used some bootstrap CDNs for my page, however, you can download bootstrap files from http://getbootstrap.com/ and create web resources of bootstrap.min.js, bootstrap.min.css and bootstrap-theme.min.css respectively and add them into your html file.

You also need to download the latest jquery.js and json and add them to your file. Alternatively, a CDN of jquery will also suffice. I have used my own .css file for the purpose of customization. Likewise, you can add your own .css files, as per your requirement

You will find the SDK.REST.js file in Microsoft Dynamics CRM SDK 2015, usually downloaded from https://www.microsoft.com/en-in/download/details.aspx?id=44567


Step 2: Create a .html Web resource for Phone Call,Appointment and Task


The preview page of PhoneCall.html looks like:


You need to create a grid or an HTML table which will display your record.


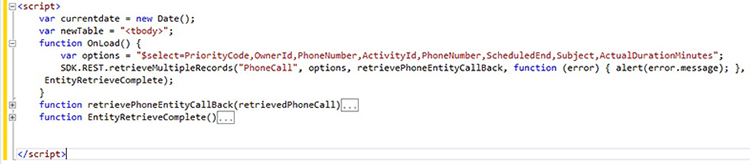
On load of your page, you need to write a function as shown below to retrieve the phone call entity record. Here, SDK.REST.retrievemultiple() retrieves the phone call entity record.


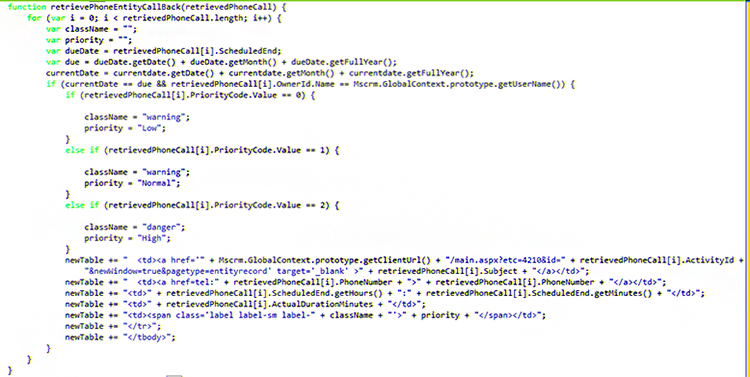
Next, you need to add rows to the table that you have created. With the help of clientglobalcontext.js, it is quite easy to access the Logged-In User. I have used Mscrm.GlobalContext.prototype.getUserName() to filter and retrieve the records I need. You can also click on the record to view the entire information using  Mscrm.GlobalContext.prototype.getClientUrl() which gives the application URL and entity type code of the entity.


Finally, the rows are added to the created table using the EntityRetrieveComplete() function.


Likewise, you can create the appointment.html and task.html in the same way.

The preview of  appointment.html is shown below.


The preview of task.html is shown below.


Step 3: Creating Activity Reminder Dashboard


I have created a 3-Column overview Dashboard wherein I need to insert into each column the web resource I have created .

There! Your Activity Reminder Dashboard is created!


So what’s the big deal about Activity Reminder Dashboard?

The best thing about an Activity Reminder Dashboard is that the next time you are assigned a task, a phone call or an appointment, you just need to login to view your reminder dashboard which will provide you with necessary details, like scheduled time and priority of the activity.If you do not have your outlook integrated with your CRM, this is almost God-send! So goodbye missing out on important appointments! Hello, Activity Reminder dashboard!


Written by Neethuanna Matthew,  Microsoft Dynamics CRM Champion at Eternus Solutions
Read More »

Monday, 27 July 2015

Forms Based Authentication with External ADDS


Hello SharePoint Administrators!

Tired of Searching for Form-based Authentication (FBA) with external ADDS? Look no further!

As a SharePoint Administrator, you are likely to face a lot of issues while configuring FBA. You might get a lot of information over the internet for configuring and troubleshooting the FBA with SQL as well as ADFS, but you are unlikely to gather any information about External ADDS. Considering all the hardships that I faced during my project, I thought of sharing my knowledge about FBA with external ADDS.

Before we proceed any further, let’s quickly recap what FBA is and when can it be used.

FBA in SharePoint

Form Based Authentication (FBA) provides us a mechanism to use our own authentication method using a web form. A large number of organizations use FBA as a way of extending a site for non-Active Directory (AD) users.

FBA is a claims-based identity management system based on ASP.NET membership and role provider authentication. It can be used in different scenarios where credentials are stored in an authentication provider, such as:
  • Active Directory Domain Service (ADDS)
  • SQL Server database
  • Lightweight Directory Access Protocol (LDAP)
  • Data store such as Novell eDirectory
  • Novell Directory Services (NDS), or Sun ONE

How I Conquered My Rome

In my case, the SharePoint site was supposed to be accessible for both internal as well as external users. External users were not supposed to have access to any internal resource and could access the site only through custom login procedure.

Here’s how I implemented it:
  • We had an External AD (Domain B) and an internal AD (Domain A).
  • The internal domain users were using Windows Authentication. For External domain users, we needed to configure Form Based Authentication.
  • As external users would have access to the Internal farm Extended Web application only (no other resources should be available), SQL with FBA was not appropriate for the above requirement.

Farm Design

  • Two Zones (Default, Internet)
  • Default Zone – Windows Authentication Internal ADDS
  • Internet Zone – FBA with External ADDS.
  • 3-tier Architecture.


Figure: Farm Design

Farm Components

  • Application Server/Internal web front end (WFE) server

    Role: Acts as an application server to run and manage multiple service applications. In the current farm structure, Application Server was also configured as internal Web Front End.
  • External web front end server

    Role: Handles web page requests from External users.
  • SQL Server
    Role: Stores content and configuration databases for all the sites and service application.
  • Internal ADDS(Domain A)

    Role: Active Directory for the internal users.
  • External ADDS(Domain B)

    Role: Active Directory for the External users.

As you can see in the above diagram, all the farm components except External ADDS were in Domain A which was created on Internal ADDS.

Now we needed to configure the Web application for FBA authentication.
  • Using Central Administration, we created a web application with windows authentication enabled in default zone.
  • As the next step, I needed to extend the web application to the internet zone. Once the Web application was extended, I then needed to change the authentication provider for the Internet Zone from Windows to Forms Based Authentication.

Since the site was ready for external users, we proceeded with the FBA configuration!

Configuration of the FBA


Enable FBA from Central Administration

As the first step, I enabled the FBA through the following 5-step process:
  • Go to central administration and select your application
  • Click on Authentication link, you will see two zones: Default and Internet
  • In order to enable FBA, click on Internet zone and click the checkbox next to it
  • Once the FBA is enabled, you need to add the membership Provider name and Role manager name as shown in the following figure

I have used MembershipP for membership provider and RolesP for roles provider. You can provide the names as per your choice.

Note*: Please make a note of the provider names given by you as we would be using these names in the Connection string for external ADDS.


Figure: Farm Design

Great! You have successfully enabled FBA on the internet zone! Now you need to check the accessibility of Domain B from External WFE.

To check this,
  1. Go to the external WFE and open the command prompt
  2. Try to ping the external ADDS
  3. If you get a reply from Domain B, you are just a few steps away from completing the configuration!

Note*: In this configuration, we are going to make some changes in the web.config file of our web application on Application server and Web front end server.

A recommended practice is to take a backup of the original web.config file before making any changes in it so that they can be reverted, if needed.

Changes to Web.config File on the WFE Server

Follow the steps listed below to make changes in the web.config file on the WFE Server. You need to be very careful with the following changes, as even a single comma or space in the web.config can create problems.

Step 1

  • On Web Front End Server, Open IIS site - > Right Click on the extended Web application and Click on Explore
  • Open the web.config file of our web application and search for <membership> tag
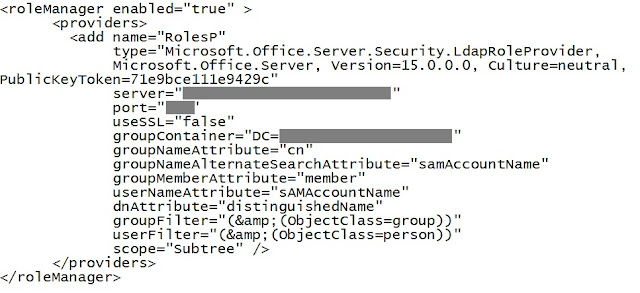
  • Add membership provider and role manager connection strings as shown below:


  • Now, search the PeoplePickerWildCards tag and add the below entry so that People Picker is able to find other domain users


  • Save and close the web.config file

Step 2

  • Open the web.config file of Security Token Service application
  • Add membership provider and roles manager connection string as shown below:


Done! We have completed the web.config changes on WFE Server.

Changes to Web.config File on Application Server

Follow the steps listed below to make changes in web.config file on Application Server.
  • Go to application server and open the web.config file of Central Administration application
  • Add membership provider and roles manager in the web.config file


  • Now, search the <PeoplePickerWildCards> tag and add the entry as shown below:


Note : The provider’s connection string should match as shown in the image above

The configurations are now complete.

Now cross your fingers and start the testing

Testing

  • Go to the WFE server and browse your web application
  • For multiple authentication, a dropdown is displayed to select the authentication type for login as shown below:


  • Select Forms authentication and enter Domain B user’s credentials

You might get a message that the Site is not shared with you, which means that the Domain B\user has been successfully authenticated but the user does not have the permissions to access the site.

In this case, the Site Administrator can add the external users (Domain B\user) to the site by using Central Administration.
  • Go to Central Administration and select your web application
  • Click on User Policy from the top ribbon and Add the Users


And…we are done! I hope next time you need FBA, you won’t need to tear out your hair in despair!


Written by Shrikant Mane,  SharePoint Champion at Eternus Solutions

Read More »

Wednesday, 1 April 2015

Bing Map for Microsoft Dynamics CRM using an HTML Web Resource

Thanks to its readymade SDK, Silverlight was considered as the best option to display maps on Microsoft Dynamics CRM for a very long time. However, owing to plug-ins requirement and limitations with device compatibility, developers round the globe like me were forced to look for an alternative, more suitable option. And we struck gold...with HTML5! In this post, I am going to demonstrate how to build a simple map component in MS Dynamics CRM with nothing more than HTML5 and JavaScript!

Before we get started…

You will need to have a basic idea about how to use Bing maps in HTML and decent hands-on experience of customizing MS Dynamics CRM. You will also require to add latitude and longitude fields under the Address field in Account, Contact and Lead entities.

So let’s get rolling!

Our Target

We are going to build a map for three of the most-used entities in MS Dynamics CRM: namely Account, Lead & Contact. We need to display all the records for these entities within our map.

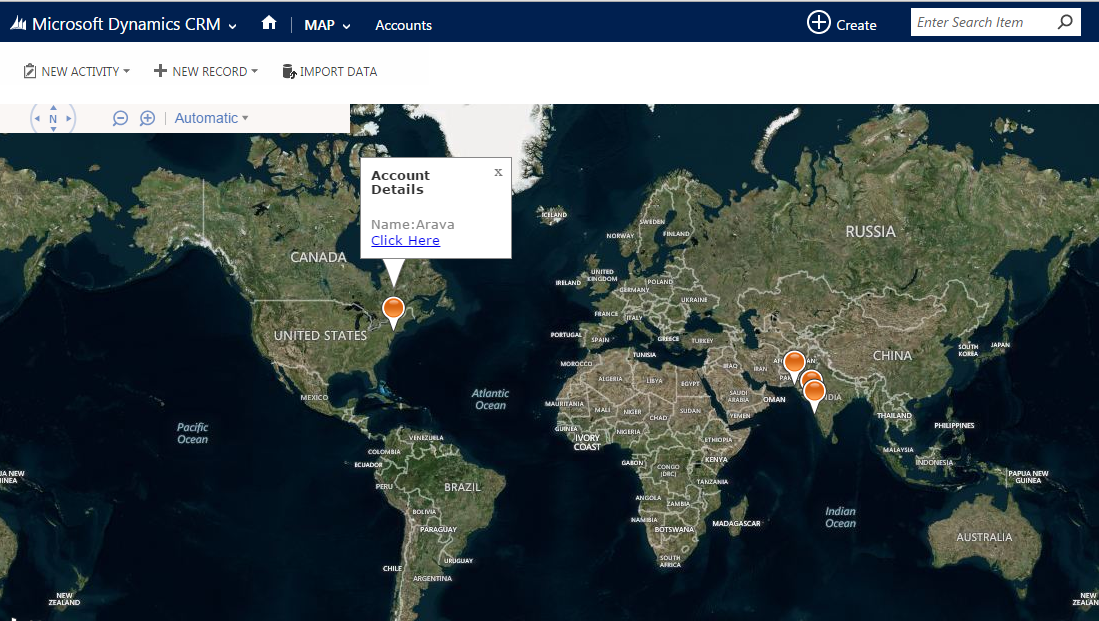
Take a look at the image shown below where all accounts are displayed on the map in the form of Bing map pushpins, accompanied by a hover effect, which provides more details of the selected account.


This is a 6-step process:

Step 1.

Get the base URL for accessing the application data, as shown below.


Step 2.

Next, you need to create the request query for accessing the latitude and longitude of all Accounts, from the Account entity itself. I used the following Query:


Step 3.

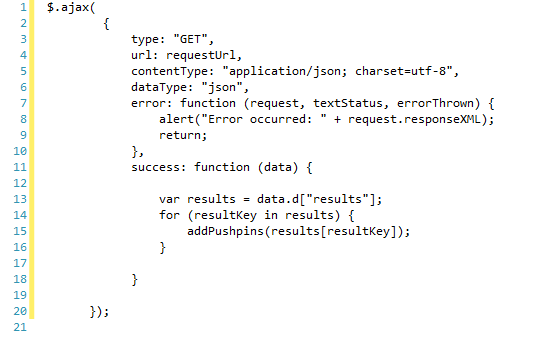
Once you have created the request query ad demonstrated above, you need to make an Ajax call to get the actual data from MS Dynamics CRM with the help of requestUrl used in step 2 above. Pass on this result to another JavaScript function to add the pushpins on the map as shown here.


Step 4.

Once you get the data from the Ajax call, you can proceed to adding the pushpins on the map. However, bear in mind that before you start this, you must have initialized the map component on the HTML page. I have demonstrated the same below.


In the code snippet shown above, the click event is added dynamically to perform the click operation for opening the corresponding Account page directly, while the mouseover event is added dynamically to see the details of selected account.

Step 5.

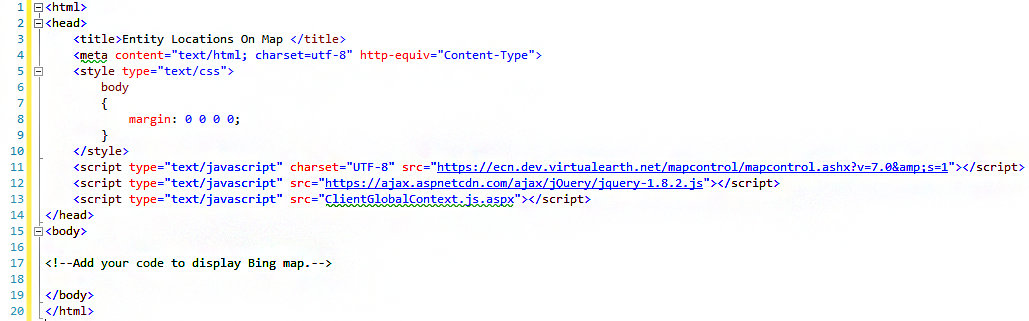
Once this is done, add your all Java Script code to your HTML page, within the body tag.


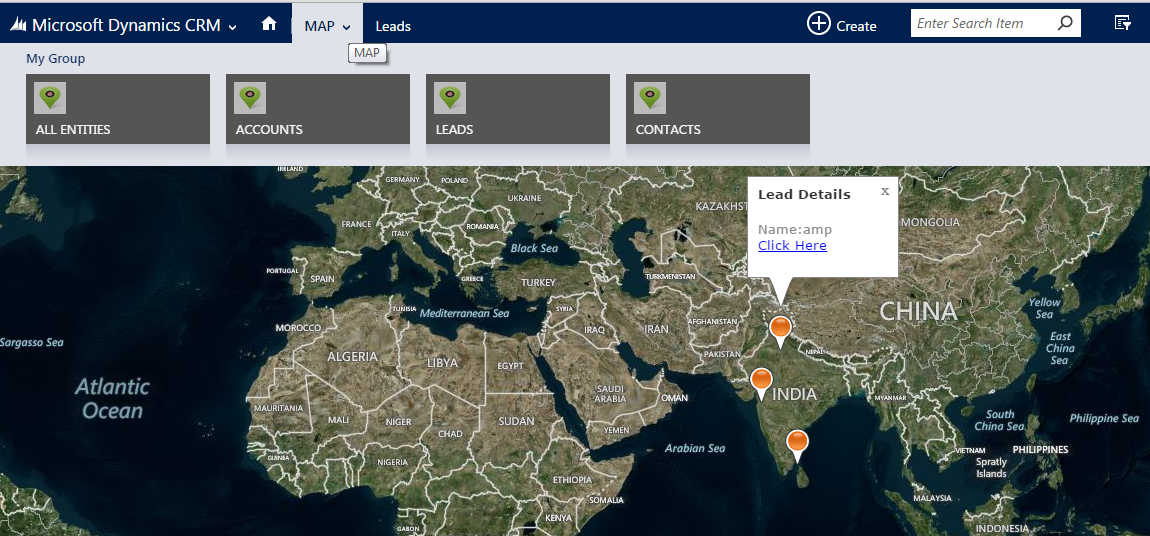
As you can see above, we have added a simple HTML web resource for the map in MS Dynamics CRM. Now you need to upload the web resource to the MS Dynamics CRM and customize the ribbon, in order to access the map resource on the MS Dynamics CRM page.


Step 6.

Finally, you need to modify Step 2 for performing the same operation on Contact and Lead entities.
You can change this customization to provide a Heat map simply by just changing the map type. You can also use additional Bing map APIs to get direction or route to different entities in MS Dynamics CRM.

Use HTML Web Resources instead of Silverlight because…

  • Silverlight web resources cannot be viewed in the 64-bit version of Microsoft Office Outlook
  • Silverlight web resources remain supported in Microsoft Dynamics CR 2015 and Microsoft Dynamics CRM Online 2015 updates for backward compatibility. However, Microsoft recommends using HTML web resources with HTML5 instead of Silverlight for components that will be able to be presented on all clients.
  • HTML5 is the preferred client technology for the web over web plug-ins like Silverlight and Flash. HTML5 can be consumed from any device, be it your PC, tablet, smartphone and much more, and heavily uses JavaScript and its powerful libraries like jQuery and CSS.

For more information, you can refer to https://msdn.microsoft.com/en-us/library/gg328358.aspx


Written by Pramod Dhokane,  .Net Champion at Eternus Solutions

Read More »