Sunday, 29 March 2015

Salesforce to Amazon Integration Using Signature Version 4: Part 1

If you are using Salesforce and are in need to store large sets of data, you may want to consider Amazon’s cost-effective storage as an alternative. Amazon provides access to its broad spectrum of AWS services by leveraging different versions of a signature such as version 1, version 2 and version 4.

What’s in a Signature?

Moving away from the bookish definitions, a signature is simply a computed alpha numeric value of a certain length that acts as a mechanism to verify the identity of the requester and protect the data in transit, in a service based communication model.

Amazon Signature version 4 is the protocol for authenticating inbound API requests to Amazon Web Services. It is considerably more secured than its version 2 variant and is supported in all geographical regions. In fact, any new regions after January 30, 2014 will only support Signature Version 4. In this two-post series, I will elucidate how to integrate Amazon with Salesforce by generating a signed request using Signature Version 4. While the first part would primarily deal with the creation of a canonical request, the second post will detail the calculation of a signature and creation of a signed request and conclude the integration process.

To sign a request using signature version 4, we need to calculate a signature that's based on a combination of information in the request (For example, AWS service, region, action, time stamp, mode, access key and secret key). After calculating the signature, we need to add it to the request as a parameter, either in the header of the request or as a query-string parameter.
Integrating Amazon to Salesforce using Signature Version 4 is essentially a 2-step process:

  1. Calculating a Signature
    • Creating a Canonical Request
    • Creating a String to Sign
    • Calculating the Signature
  2. Creating a Signed Request


A. Calculating a Signature


Step 1: Creating a Canonical Request

The first step for calculating a Signature is to create a Canonical request. You need to arrange the content of your request into a standard canonical form and then create a Hash (digest) of the canonical request, add it to the canonical request and then create a digest of the updated canonical request. This is illustrated in the code snippet given below.


  • HTTPMethod is our request mode (GET, POST)
  • CanonicalizedResourcepath is the URI, i.e. everything in the URL from the HTTP host to the question mark character ("?") that begins the query string parameters (if any). For this, we simply encode our endpoint using EncodingUtil.urlEncode method.
  • Query parameters contain algorithm used, credentials, date and sign headers. All these query parameters are canonicalized using the function given below and are then used in forming a canonical request.


  • HeaderNames will include the Names of header like host, date and content-type(if any).To create the signed headers list, you need to convert all header names to lowercase, sort them by character code, and then use a semicolon to separate the header names. Canonical HeaderNames will be calculated as shown below:


  • Headers will include the Header name along with their values for request. You need to follow the same procedure for creating canonicalized headers that you used for creating canonicalizedHeaderNames. The function shown below gives an idea about how it is achieved:


  • Finally using a hash (digest) function like SHA256, you need to create a hashed value from the payload in the body of the HTTP or HTTPS request. If the payload is empty, use the empty string as the input to the hash function. A typical hash function is as shown below.


Once you have completed all these steps, your canonical request will look like:


In my next post, I will take you through the process of creation of a string to sign, and the process to calculate the signature and finally, the creation of a signed request. So be ready with your canonical request!


Written by Tejashree Chavan,  Salesforce Developer at Eternus Solutions


Salesforce to Amazon Integration Using Signature Version 4: Part 2


Read More »

Friday, 27 March 2015

A Beginner’s Guide to GoClipse Installation

GoClipse is an Eclipse plugin that adds Eclipse’s IDE functionality to Google’s Go programming language. The purpose of GoClipse is to create an environment in which development using Go is easy for a rookie user. Often, rookie Go developers like you and me, truly struggle to install GoClipse in any of the Eclipse versions, and it is this effort which inspired me to write this post. Here, I have listed down a step-by-step procedure to install GoClipse easily and run your first Go program for Google App Engine.

Prerequisites on your machine

Before you get started, you need to ensure you have the following installed on your machine.
  • Eclipse 3.6 or later
  • Java 1.6 or later
  • Python 2.7.5 or later.(For running Google AppEngine simulator)
  • You can download the latest Google appengine SDK from the internet. I used https://cloud.google.com/appengine/downloads to download the SDK. Along with the SDK, you also need to have Python 2.7.5 installed on your machine. Downloading the SDK is a 3-step process
  • Select the GAE SDK for Go
  • Select the platform machine by clicking on the appropriate link. The download will start. The downloaded file will be in a compressed format
  • Uncompress the SDK into the directory.(I am storing it in C:\go_appengine)

Getting Started…

  1. Start Eclipse, then select Help > Install New Software
  2. Leave the Name text box blank (the name will be retrieved from the updated site). Click OK

  3. In the Install dialog, the center box should be filled with the category: GoPlug-in for Eclipse(GoClipse). Select the checkbox
  4. Follow the steps that are given for installation
  5. You will be prompted to set the workspace. The workspace should be  where your SDK resides. (in my case, it would be C:\go_appengine as I have stored my SDK here)
  6. You are ready to create a Go Project. Click on File > New > Project. Select the Go Project from the tree. Click Next
  7. Enter the name of the project in the Project name text field. Click Finish
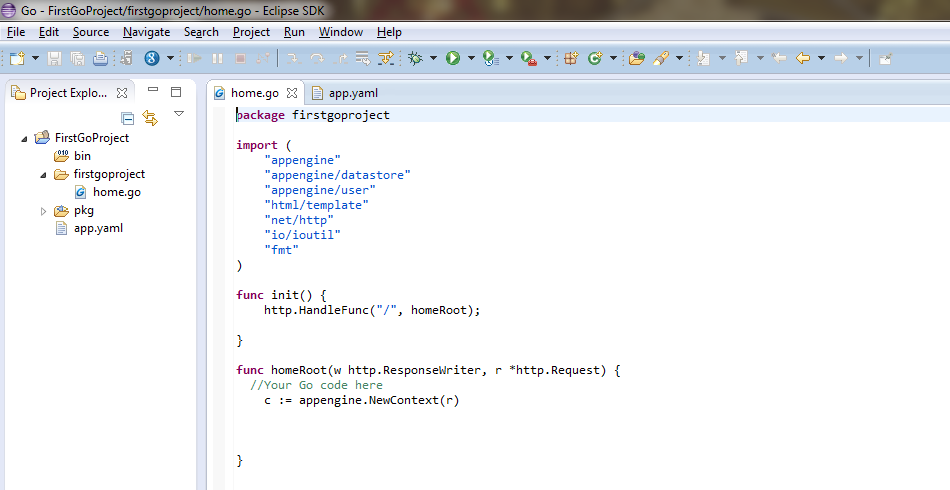
  8. You can check the project created in the workspace for yourself!

…You’re not done yet!!!

That's not all!! Now that you have successfully created your first Go project for Google App Engine environment, you have to set the Go root path.

Setting the GOROOT path

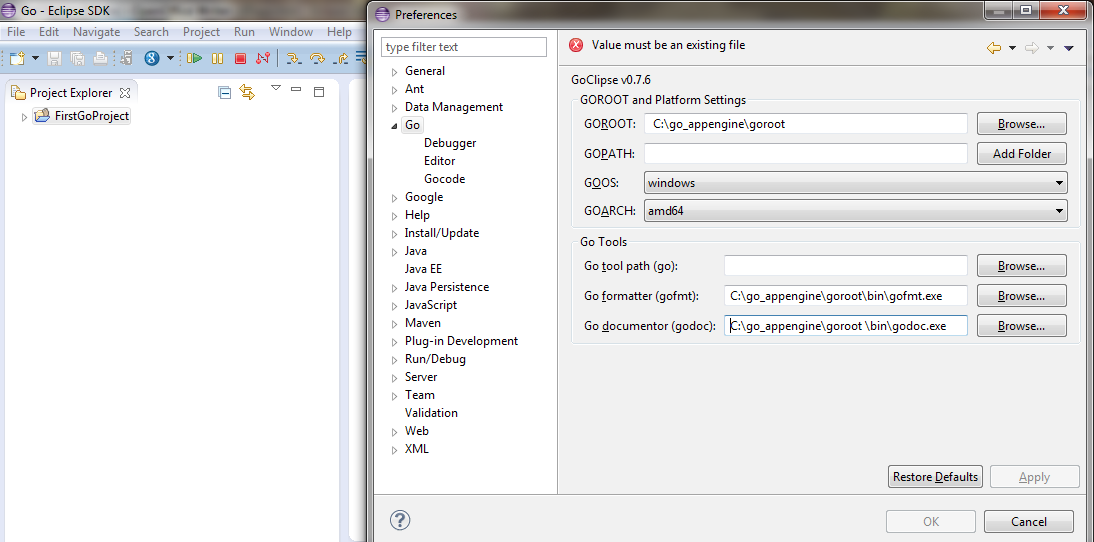
  • Select Windows>Preferences>Go
  • Set the GOROOT path to the target directory (in my case C:\go_appengine\goroot )
  • Let the GOPATH be blank
  • Select the GOOS and  GOARCH accordingly(in my case it is GOOS:windows and GOARCH:amd64)
  • The Go formatter and Go documenter will be filled in automatically
  • Apply the changes and click on OK button

Now it’s time to run the project!


Create your GO file

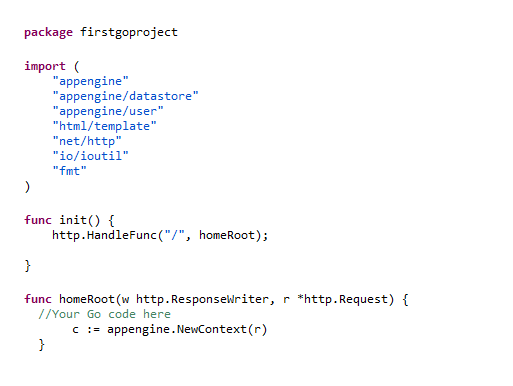
  1. Define packages and import necessary functions
  2. Write your Go functions in your Go file
  3. Under init() provide mapping for URL and functions. Please refer below image

Create your YAML file

Creation of a yaml file is a 3-step process as listed below:
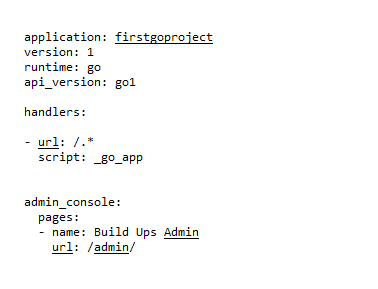
  1. Create app.yaml file in the main folder of your project
  2. It should consist of the following fields:
    • application: application-name(this name is used by appengine to identify your project,in my case:firstgoproject)
    • version: version number(depending on your project version)
    • runtime: go
    • api_version: go1(latest stable version)
    • handlers:(they redirect your URLs to the respective functions)
  3. The URL for your project would be "http://application-name.appspot.com/"
 Please refer below image

The last piece of the puzzle: Running your project

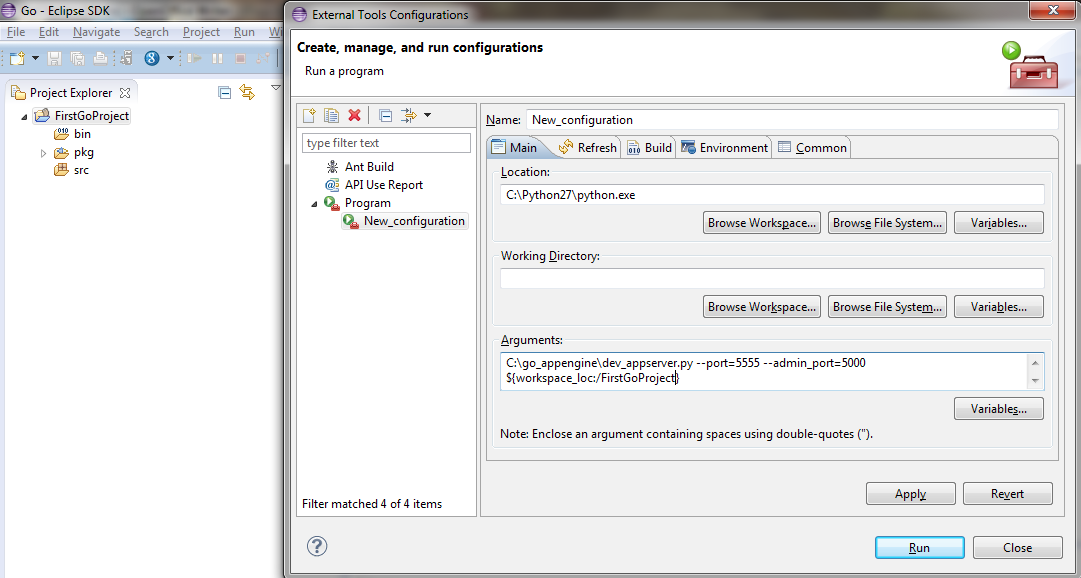
  1. Click on the External Tools button> External Tools Configurations >Program>New Configuration
  2. In the location text field,  set the path where your python 2.7.5 is installed
  3. In the Working directory text field, click on Browse Workspace and select the desired project
  4. In the arguments text field, fill out the arguments as shown above. Here port 5555 will host your project and port 5000 is the Google Appengine datastore
  5. Type localhost:5555 in your browser to load your project and localhost:5000 to view the Google Appengine for the same. It is important to note that 5555 & 5000 are any random port numbers

And it’s done! You have installed GoClipse and run your first project successfully. Was a cakewalk, wasn’t it? In my next blog post, I will take up a few common problems faced by Go programmers. Till then, Happy Gophering!


Written by Sonali Dalvi,  Google Developer at Eternus Solutions
Read More »

Tuesday, 24 March 2015

The Magical world of Model Binder

For those who are new to ASP.NET MVC framework but have substantial experience on ASP.NET Web form like yours truly, getting the value of HTML form at client side and binding it to the model at server side is nothing short of absolute magic! This is achieved through Model binder which gets the values from the HTML form and binds them to the model, or the class having getter/setter properties on the server side.

In order to fully understand and appreciate the significance of model binding, let us go back in time a bit and recall how things were done in the ‘pre-Model Binding’ era. I used the default register view present in the default MVC project when you create the new project using Visual Studio for this demonstration as shown in the image below.


Now let’s see how it is handled at the server side when you click on the Register button. For this purpose, comment the action register which is using the model binder to get values from the client side to RegisterViewModel in the controller, in order to create the new register action, which accepts the input values as form-collection. The code snippet for the same is given below:


Code snippet with FormCollection:

Once this is done, check debug to see the output obtained in form-collection. As you can see for yourself in the image below, we get the input fields within the form-collection.


However, imagine the situation if your form had hundreds of input fields, or you needed a model within the model. The process would be tedious and time-consuming. You would need to mention the collection[{input field name}] for each input field and there is no intelligence provided by Visual Studio as the field are not tightly bound. Such scenarios are common within banking applications where you need to bind hundreds of fields.

Have no fear when Model binder is there!

I used the following code to perform this otherwise manual, tedious task and could directly access the value from the model itself. Model binder also ensures less errors as compared to the manual process.

Magical, isn’t it? However, unlike other magicians, I will let you in on the secret.

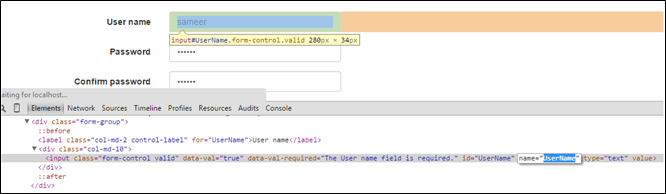
Model Binding depends upon the name attribute of the HTML variable which supplies the values. The mapping for the name property is automatic and executes by default.

It is important to note that the value of the name attribute in HTML must be an exact match with the model property or else the binding will not work out.

For this purpose, HTML helpers are quite helpful as they enable us to use the tightly bind model with the HTML helper which generates the HTML with the same name attribute as the model property.


The HTML in the browser is generated as shown below:

Voila! It’s done! Although this is done via DefaultModelbinder, you can customize the model binder as per your requirement, in case you want to create your own framework. So try it and let me know if it worked as seamlessly for you as it did for me.


Written by Sameer Sharma,  .NET Champion at Eternus Solutions
Read More »

Thursday, 19 March 2015

How to Build a Hierarchical Map using Apex

I was recently working on an integration project where we needed to generate a simple piece of output! I needed a simple hierarchical map of Salesforce objects which can be retrieved from relational queries. Sounds simple enough, right? You couldn’t be farther from reality though. It ended up giving me sleepless nights!

Ticking off the list…

When I started designing, I realized that there are many things that had to be taken into consideration for the design to hold up in the long run. The design needed to be reusable, support ‘n’ levels, support lookup, master-detail relationships and provide for value match for related records. Moreover, the design needed to have the ability to support more than one where clause to retrieve related records, to add child data to the single parent map and give you the flexibility to configure your own keys for the values.

Once I ensured my framework had all of this, it looked something like this:


The objects outlined above had the following key features:
  1.  Query – Query object would hold the queries
  2.  Domain – Domain object would hold a reference to the query to be executed. Some of the key attributes of the Domain object are listed below:
    • Query – It contains the reference to the Query object
    • Domain Parameters – These are parameters required by the top level domain to execute. For e.g. – the keyword to bind the result set, any input parameter to be provided to the top level query. This can be put in the JSON format.
  3.  Domain Index – This object will hold the reference to the parent and child domain. Some of the key attributes of the Domain Index object are listed below:
    • ParentDomain – It contains the reference to the parent Domain ID
    • Domain – It contains the reference to the Domain
    • BindTo - This field will contain the field name based on which the child data will be  bound to the parent
    • GroupBy- This field will contain the Param Property Name based on which the child data will be grouped.
  4. PropertyPool – This object is a pool of all the properties or fields that would be referenced in the queries
  5. Param Group – This object will be specific to each query to hold the input and output parameters for the query
  6. Param Properties – This is a junction object between Param Group and Param Properties

Twist in the Tale...

However, the trickier part here was how to build the tree. While retrieving the results was simple enough, all the result sets needed to be merged together to be inserted into the map in the form of the tree defined in the metadata.
 

At first, I tried building it from top to bottom but unfortunately that didn’t work out. I then found a simpler way to build it using the bottom up approach.

Need of the Hour…

This is the sample hierarchy that is expected

->Account

    ->Contact

        ->CustomObject A

             ->CustomObject B


How I Won the Battle

The approach that I followed is a 6-step process.
  1. First, I defined Account as the top level domain and Contact as its domain index
  2. Then I defined CustomObject A as the domain index for Contact and
  3. CustomObject B as the domain index for Custom Object A
  4. I went on to define the param properties for each domain and created all the input and output parameters
  5. I stored all the result sets from each query in a List of Map (String, Object). While storing the result set for the child queries, it’s important to store it grouped by the grouping parameter (GroupBy) defined in the Domain Index.
  6. Now, I started building the tree by iterating from the second last member in the list going the level up in the hierarchy and based on the GroupBy field keyword, I could club the child with the parent.

Although it looks a bit complicated on the first look, you will notice that everything falls in place as you start writing the code. I have elaborated the architecture within this post and in my next post, I would be including the code snippets that support the same. 


Written by Jina Chetia, Solution Architect at Eternus Solutions
Read More »

Don’t win the race, to lose it all to a race!

It was 3 in the morning but the office was buzzing! Absolute mayhem! You would think we were at war. We were faced with an issue like never before, and we were no closer to the root cause than Leonardo di Caprio was to winning an Oscar! Sure, the issue was simple enough.  On two separate instances, customers had been charged twice for the same transaction, and if that weren’t enough, the attachment logging payment attempts was not reflecting the number of payment attempts. To cut a long story short, the customers’ money was simply vanishing in a black-hole with absolutely no traces on the Salesforce instance whatsoever! Yeah, THAT!

Now, it’s not for nothing that we are called the ‘fire-fighting’ unit internally but our reputation was facing some serious threats! We were at it for almost 20 hours by now, and the only possible explanation we had figured out so far was the one hiding behind two daemon (demon for us really) batches overlapping within the same time frame. And then, over a cup of magical coffee, we had our ‘Eureka’ moment! “What if the batch is reading what they are not supposed to?” “What if another batch has processed a particular record and the first batch still sees the unprocessed record?” In this case, the batch was triggered at the same time each day, processing records for that day. Quite a common, every-day use case. What was different, however, was that the batch started on day 1, extended its execution on day 2, and by then the second batch had already been triggered, resulting in two batch threads executing simultaneously. The answer lied on the thin edge of newline (\n) character between the start() and execute() Batch class methods. A lot more than what met the eye was happening between the executions of these methods!!!

The code was developed based on the incorrect assumption that a set of batch triggered will ALWAYS finish before another batch set. The records were being processed twice because Salesforce caches records queried in start( ) across start and execute invocations. In other words, Batch 2 dirty reads Record 1 state as it was during the time Batch2.start( ) was executing, and not the current database state after Batch1.execute( ), which has already processed the record.


How we got our Mojo back

Before I tell you how we fixed it, here’s a thumb rule for future reference, which I learnt the hard way: Never, ever depend on the state of records in Batch.start() method, but query IDs in start() and generate the QueryLocator accordingly.

In Batch.execute(), we re-queried the database on the set of IDs retrieved in Batch.start() including the where clauses. Including the where clause again in Batch.execute() was very important because the same records which passed the where clause in Batch.start() may fail to satisfy the where condition(s) in Batch.execute(), as another batch transaction may have modified the records in the interim.


Sample Code Snippet


The final word…

As programmers, we are often guilty of linear thinking, building batches after batches on the same track, without anticipating runtime interaction between multiple batch threads. Comprehensive testing is a key factor, although it’s not given that you will be successful in uncovering all issues/bugs during the testing phase itself. The best possible way to tackle such scenarios is a two-way magic mantra: 1) to never assume the order of execution of the batches and 2) to follow defensive programming techniques as mentioned above.

Over the next few weeks, I will discuss a few other race scenarios like locking records in the same transaction to avoid race conditions, trigger race conditions, all aimed at making the job of developers a tad easier.


Written by Swapnil Shrikhande, Salesforce Champion at Eternus Solutions
Read More »

Thursday, 12 February 2015

Salesforce Magic Tricks: Case & Report

In my previous post, I had shared some useful tricks to conquer the world using Standard Salesforce objects like Lead and Account. True to my promise, I am back with a few more tricks up my sleeve, this time for Case and Report object.

Case: Flagging neglected cases

Without a shade of doubt, servicing our clients is of utmost importance, especially if you are in the service industry. That is why when one of your customers raises an issue or a query through the portal, your service desk person raises a case immediately, noting and monitoring his problems, resolutions and all the communication within that case history. But what happens if your customer has not responded to your query for details? Or in the flood of all the cases your agent has to handle, (imagine multiple updates from each single case and multiple cases assigned to each agent!) he has overlooked one of the open cases simply because the client did not respond for quite some time.

It is important that as a service agent, you mark such cases and ensure reports are generated to help you act over them. Let me show you a simple way to do that.

Formula for your success... (Formula Field)

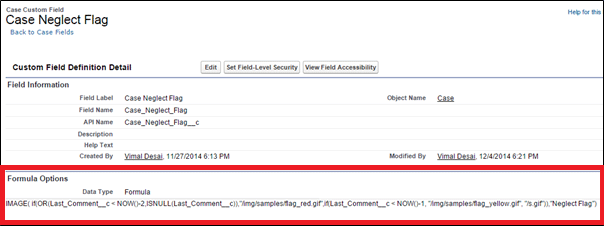
A simple image formula field will do the trick for us! We will use the image formula field to flag cases that have been dormant for a long time (i.e.no comments have been posted for a while). However, as a prerequisite for this, you need to have a Last_Comment_c date field. So, the formula that I used was: 


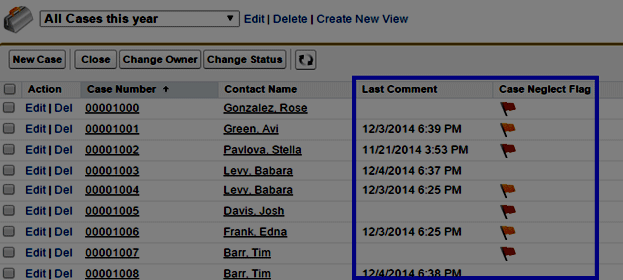
Voila! It’s done! Now every time you have a case that you have neglected for too long, you will get a red or a yellow flag (depending on your formula) as shown below:


Report: Editing records from within a Salesforce Report

You have used a Salesforce report for not only analyzing and viewing a plethora of information but also for showing up details of columns, filter criteria, date range, etc. What if I tell you that you can not only view all the information, but also edit several records at a go from within the report?

“You’re kidding me!” I already hear some of you say. Hold on! Let me show it to you


Eureka!!!.....Just an Edit!

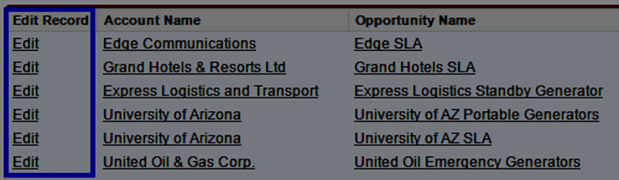
I am going to add an Edit link right within the report to do this. ‘How?’ you ask me. Here’s how.

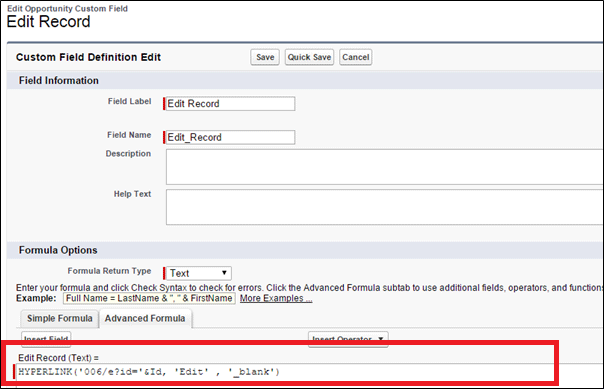
I will first create a text formula field. The formula I will need to use is simple enough.


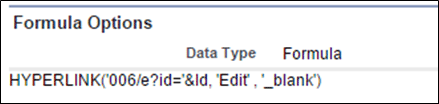
where Object key prefix can be 00Q for Lead, 001 for Account, 003 for Contact, 006 for Opportunity and so on!

Once created, you do not need to display this field on the page layout. However, you will need to display it on the Report layout as shown in the figure below.


So if you want this action link for the Opportunity object, your formula needs to be:


Additional Tip:
You can also use this formula link in List Views

I hope these tricks help you perform simple yet effective magic with Salesforce, just as they help me in my daily tasks. I will be back soon with more tricks up my sleeve!


Written by Vimal Desai, Project Manager at Eternus Solutions


Read More »

Wednesday, 11 February 2015

How MSMQ saved my day (and my application too!)

Have you ever tried opening twenty applications on a 1 GB RAM machine? Or tried transferring five blue ray movies in five different windows on that same machine? “Why would you do that, that’s gonna kill your machine!” I can hear some of you saying. I did something similar a couple of days back when I had to send an email to 5000 people. Now I know what you are thinking. Sending mails ain’t rocket science! I agree. But sending it to 5000 people would’ve made my web application unresponsive and I simply could not afford that. I needed a workaround, and that’s when I instantly thought of MSMQ!

MSMQ: My Saviour (Microsoft) Message Queue

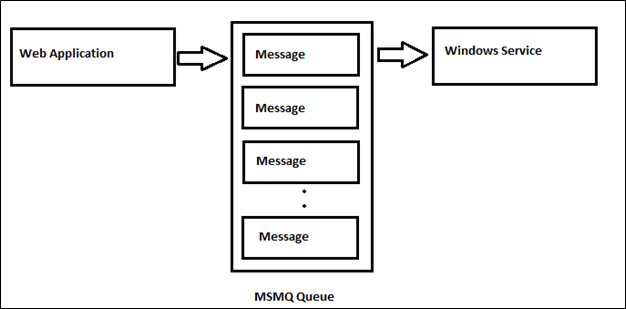
Microsoft Messaging Queue (MSMQ) is a message storage area which can be used by one or more than one applications to store and retrieve messages. I used MSMQ to store all the emails on a button click and then wrote a windows service to send the mails to all my recipients. Sending these records to MSMQ queue was not a time consuming job, so it was done rather quickly and the application was free to service the next user request.

Basically, my Web Application would now send the messages to the queue and then be free to execute the next request made by the user. A Windows service continuously running in the background would send the emails (and do the time-consuming job, without killing my application!). 


First things first: Installing MSMQ

Before I show you how to make MSMQ work, let me first show you how to install it properly.

Step 1:
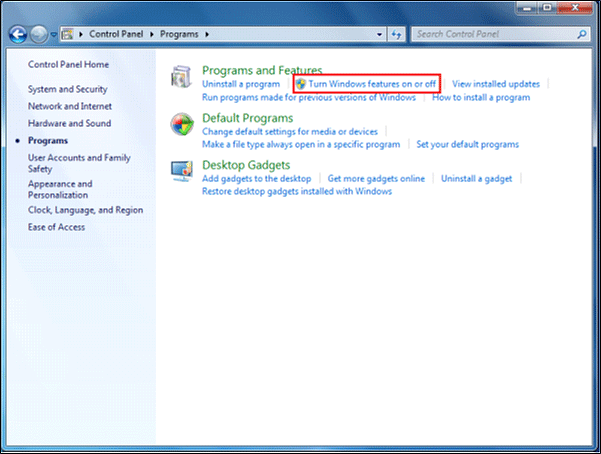
Go to Control Panel –> Programs –> Turn Windows Features On or off

Step 2:
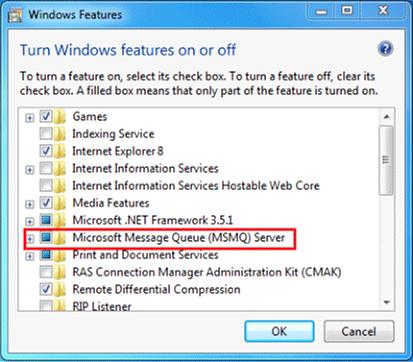
Select Microsoft Messaging Queue (MSMQ) Server

This will install MSMQ on your machine.

Creating a Queue

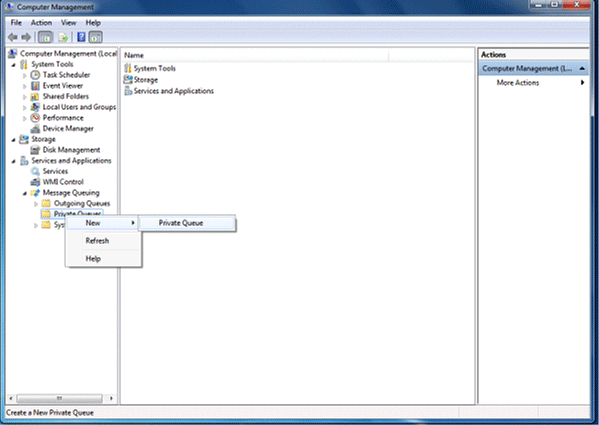
In order to create a new queue, simply right click on My Computer and select Manage, as I have shown below:

You can also create a queue through programing using a System.Messaging namespace. If you are working on Visual Studio for Web, you might need to add this DLL from C:\Program Files (x86)\Reference Assemblies\Microsoft\Framework\.NETFramework\v4.5.1. 

For creating a new queue, you will need to specify a queue name in a specific format. The queue name needs to start with a “.” and should have a “$” after private, as shown below in the example. 


e.g. “.\\Private$\\Queue1”

The above code will create a new queue if it does not already exist.

The battle begins: Inserting Messages in the Queue

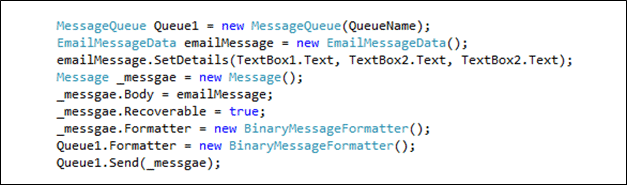
Now came the crunch part: to insert messages in the queue I just created. I used the following code snippet to insert the messages into my newly created queue:

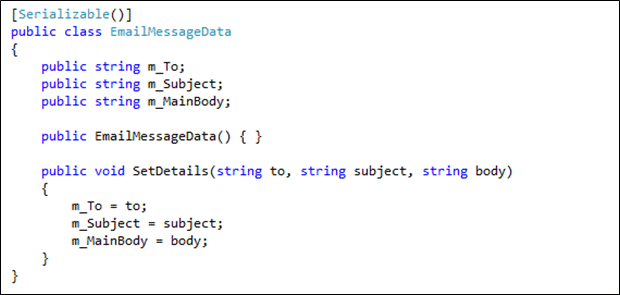
The above code will give you an exception if queuing is not enabled. I also created a class EmailMessagedata where I set all the properties like emailID, subject, body etc. You can use the following code snippet for the same:


Providing the finishing touches: Retrieving Messages from the Queue

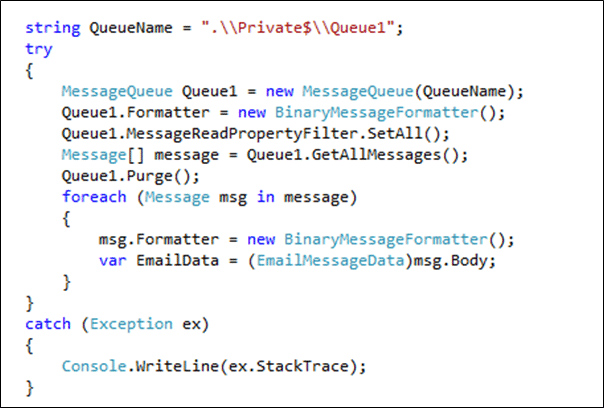
Now all I had to do was to retrieve these inserted messages and send mails or perform the required operation. I retrieved all the messages from Queue1 and saved them in an array, and then deleted all the messages in Queue1 using purge().

You need to add a reference to the Web Application’s DLL using which you can insert the message in the queue to get the message content in the format specified in your EmailMessagedata class.

My takeaway

Using this approach, I was able to save a lot of time as all my emails were stored in the MSMQ. I did not have to wait while my emails were being sent; I was able to continue using the application while the windows service was sending the emails in the background. All this while, my application remained responsive. If you need to execute time consuming tasks, I would recommend you use MSMQ. Just as it saved my day, I am sure it will save yours too.


Written by Manish Patil, Dotnet Developer at Eternus Solutions
Read More »