Monday, 13 July 2015

Analyzing Salesforce data with Google Analytics: Part 2

In our quest of tracking the most popular Accounts based on page views, we had configured our Google Analytics account in the previous post. In this post, I will take you through the configurations required in your Salesforce org.

Creation of Home Page Custom Link

The first step in configuration of your Salesforce org is the creation of a Home Page Custom Link that will load our Google Analytics resource for tracking every page. This is a simple 7-step process:
  1. Go to Setup | Customize | Home | Custom Links
  2. Click on the New button
  3. Label it as Google Analytics
  4. Change the Behavior to Execute JavaScript
  5. Change the Content Source to OnClick JavaScript
  6. Copy the relative path URL of the JavaScript file that we added in the static resource

    We need to use {!REQUIRESCRIPT()} function, as using this function will load the script automatically upon page load, without even  needing to click on the Custom Link. The final URL will look somewhat like:
    {!REQUIRESCRIPT("/resource/1428508522000/GoogleAnalytics")}


  7. Click on Save

Creation of the Home Page Component

Once you have created the Home Page Custom Link, you will need to create a Home Page Component in your Salesforce org, through a simple 8-step process listed below:

  1. Go to Setup | Customize | Home | Home Page Components
  2. Click on New button
  3. Click on Next button if the Overview page is loaded
  4. Name the new custom component as Google_Analytics
  5. Select Type as Links

  6. Click on Next button
  7. Choose your Google_Analytics custom link from the left section list of options and move it to the right under the Custom Links to show tab in this new home page component, as shown below

  8. Click on Save

Add Home Page Component to the Home Page Layout

As the next step, you need to add this home page component to a Home Page Layout and assign it to the users that you need to track.
  1. Go to Setup | Customize | Home | Home Page Layouts
  2. Click on Edit on the action column (see the screenshot below) next to the layout in which you want to add the Google Analytics tracking


  3. Check the Google Analytics checkbox under “Select Narrow Components to Show“section.

  4. Click on Next
  5. You will be redirected to the Order the components step, where you need to add your home page component into the Narrow(Left) Column section

  6. Click on Save

Show Custom Sidebar Components on All Pages

As the final step of configuring your Salesforce org, you need to show your Custom Sidebar Component on all the pages, through a simple 3-step process listed below.
  1. Go to Setup | Customize | User Interface
  2. Ensure the sidebar option Show Custom Sidebar Components on All Pages is checked

  3. You can check your custom sidebar components on all the pages. It should look similar to the screenshot shown below:


Good News..!!! We are almost done…!!! Let’s see what we have got.
  1. Click on any tab of your Salesforce site and check under the Real time section of Google Analytics by clicking on the overview link.  Google will show the tab or page you clicked most recently. You can also see the Active page URL on the “Top Active Pages” section.


  2. You can also see the all site content like numbers of visits, unique page views, bounce rate, page title, and average time on page etc. on the Behavior section of Google Analytics.


In my next step, I will show how Google Analytics can be used for tracking your most popular Accounts based on page views, so that the key insights help your Sales reps take strategic action. Till then, stay tuned.


Analyzing Salesforce data with Google Analytics:  Part 1, Part 3, Part 4

Written by Arun Kumar Bharati,  Salesforce Developer at Eternus Solutions

Read More »

Monday, 15 June 2015

Analyzing Salesforce data with Google Analytics: Part 1


As a Sales Rep or a Strategic Account Manager, I am sure you have felt the need to understand who are your most popular Customers or Opportunities. This information is invaluable and opens up a heap of avenues which can be leveraged to build a better strategy in nurturing the relationship with them, thus resulting in a mutually rewarding situation. In this blog series, I will help you track your most popular Accounts based on page views and hence get a little more out of your Salesforce CRM. We would leverage Google Analytics in conjunction with your Salesforce org to accomplish our goal. However, before we jump hoops, I will first demonstrate how to configure your Google account and Salesforce orgs for achieving the same. In this first part, I will explain the configurations you need to make to your Google account, while subsequent posts will explain the configurations you need to make to your Salesforce org to track your most popular accounts.

Prerequisite: a Google Analytics account

Before we begin, you need to create a new free Google Analytics account. Visit http://www.google.com/analytics/  for the same. You can also use an existing analytics account, if you have one.


Setting up a property in the Google Analytics account

Once your Google Analytics account is ready, you need to create a new Property to generate a Google Analytics tracking ID and tracking code.
You will need to specify a Property Name and Default URL for the property.

Make sure you use the https:// protocol for your URL. The URL should be in the same format as your Salesforce login URL i.e. https://{yourServerName}.salesforce.com


Creating a New Property

To create a new property, simply follow the steps given below:
  1. Go to the Google Analytics Admin section and click on Create new property.


  2. Once you click on Create new property, a property settings page opens. Fill the required details as shown below
     

  3. Once you click on Get Tracking ID, you will be redirected to the Tracking Info page where you will get your Tracking ID in the UA-xxxxxxxx-X format along with the Tracking Code script.

We are going to use this tracking ID and code in our Salesforce org or site.

Creating a Salesforce Account

In the highly unlikely scenario that you do not have a Salesforce developer org already, you can create a new one by visiting https://developer.salesforce.com/signup

Creating a Static Resource File

  1. For creating a Static Resource file, we need to create a JavaScript file with the generated Google Analytics tracking code and tracking ID. This file will be uploaded as a Static Resource on your Salesforce org.

    Once you have uploaded it on your Salesforce org, you can reference it as and when you need it through a custom home page narrow sidebar component, which I will show in subsequent sections of the blog.
  2. Copy and paste the JavaScript code given below on a file on your local machine named GoogleAnalytics.js.  
  3. Replace the tracking ID UA-xxxxxxxx-X on line 7 with your Google Analytics tracking ID. Remember to exclude your JavaScript start and end tags, i.e. <script> or </script>.


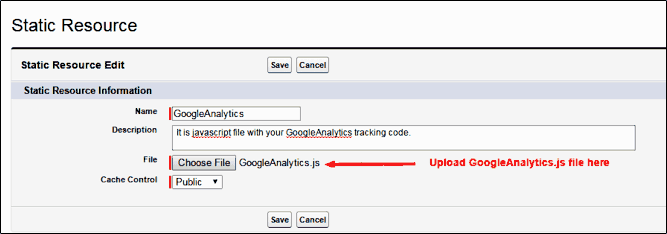
  4. Upload the GoogleAnalytics.js file to Salesforce
    by going to Setup | Build | Develop | Static Resources


    • Click on the New button
    • Name the static resource as GoogleAnalytics
    • Click Browse and select the JavaScript file that you created recently
    • Set Cache Control to Public


  5. Click on Save

    Salesforce has a limitation that Custom Link Home Page components do not have access to the $Resource merge fields, so you need to know the actual URL of the JavaScript file that you uploaded (for more information on this, see https://success.salesforce.com/ideaView?id=08730000000KRuxAAG).
  6. Click on View file on the Static Resource page and copy the relative path from the browser (it would be in a format like: /resource/1428508522000/GoogleAnalytics.js). The numerical part in the URL is actually a date timestamp that Salesforce uses for caching purposes.


Note: If you want to see the JavaScript file and the relative path URL, you simply need to click on View file.


In the next part of this blog, I will explain the required configuration that you need to do to your Salesforce org, which includes creating home page custom link and component, adding the component to the home page layout and showing the custom sidebar components on all the pages. Till then, keep your Google Analytics account ready!


Analyzing Salesforce data with Google Analytics:  Part 2


Written by Arun Kumar Bharati,  Salesforce Developer at Eternus Solutions
Read More »

Thursday, 14 May 2015

Visualforce Remoting: an unsung hero of the Salesforce world!


In this ultra-fast, action-packed world of Salesforce that we all live in, nobody likes to wait for a response, not even your HTTP callout! Just the other day, I needed to work on a requirement, where I needed to update records through a Visualforce page, send the updated data to a third-party web service and display the results on my Visualforce page! Sounds quite a handful, doesn’t it? That’s when Visualforce remoting came to my rescue.

Initial hurdles…

In order to perform an HTTP callout from my page, I knew I needed to develop my controller in a way that would help me show only the relevant things on my page depending on the response. Using re-render and rendered attributes on my elements was the key that worked to good effect, except one small thing: the response times.

Using apex methods meant that the page would perform AJAX calls to the Salesforce server, which in turn would perform the HTTP callout and provide me with the results, so that I could further render the elements on my page. The major drawback of this method was that the user would be forced to wait and allow it to finish. I needed something faster, something that rendered the execution more efficiently and swiftly.

When Lightning struck…

Suddenly, an idea which was hiding in a remote (pun intended) corner of my mind came up: Visualforce Remoting. I had hit the bull’s eye! Here’s how I did it:
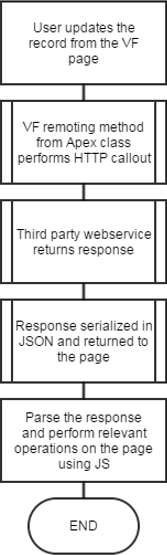
  • I called a Visualforce remoting method from an apex class on the update of the record. This remoting method performed the callout to the third party web-service.
  • The method then returned a JSON object that contained values that needed to be displayed on the page
  • I then went on to parse the JSON response and perform the relevant operations
  • Finally, I displayed the results on the page 

The Process Flow…

I have included the process flow below for easy understanding:


The entire operation was considerably faster now. Finally I could breathe easy!

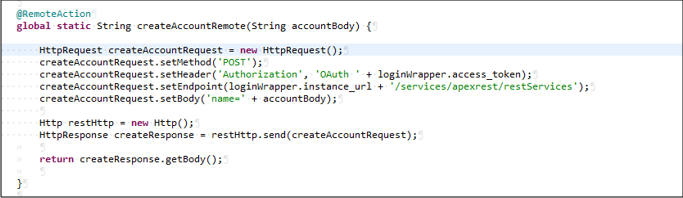
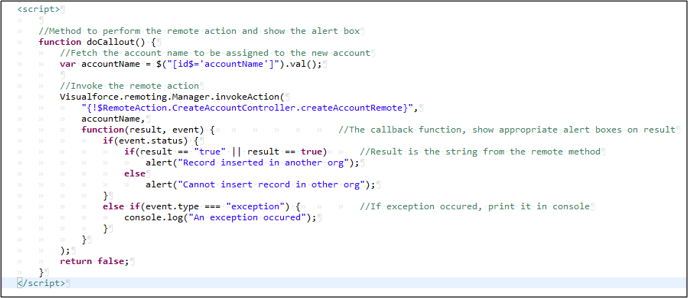
I have included the sample code snippet below, where I am accepting the account name from a text input on my page and creating a new record with that name in another developer org.


This remoteAction method was called asynchronously by the remoting script written on my page. The string response that I received from the createAccountRemote was checked for its trueness and an alert message was displayed on the page accordingly.


It is important to note that in this case, there was no other action to be performed, but using Visualforce remoting method was still a better move than using traditional future methods.

Why is Visualforce Remoting indispensable?

  • Faster response times as compared to apex actions
  • Flexibility to modify the HTML as remoting enables you to directly perform JavaScript actions based on the response
  • Remoting methods are executed in the context of the user
  • Methods are not bound to the view state of the page
  • Can be used to perform complex operations on the page that would not be easily possible using apex tags

…but it’s not all hunky dory…

  • As Visualforce remoting methods are supposed to run in the static context, they cannot access controller variables, so the user needs to perform another logic to access controller data
  •  Visualforce remoting methods are asynchronous, making it difficult to handle situations where serial execution of events is needed. Explicit care needs to be taken in order to ensure that the results are available before the next set of processing takes place.
  • In order to use Visualforce remoting, a basic understanding of JavaScript is required

Its limitations notwithstanding, Visualforce remoting is quite handful when you need faster response times using Apex. So next time you use Visualforce remoting for one of your requirements, don’t forget to say a quiet ‘thank you’ to this unsung hero of the Salesforce world.

References:

https://www.salesforce.com/docs/developer/pages/Content/pages_js_remoting_example.htm


Written by Saket Joshi, Salesforce Developer at Eternus Solutions
Read More »

Wednesday, 13 May 2015

Duplicate Management in Salesforce

If you have worked on Salesforce, you have invariably waded through troubled waters, thanks to the innumerable duplicates in your data. Tracking duplicates and weeding them out of my Salesforce orgs for accurate reporting and forecasting periodically is one of the most frustrating tasks that I have ever undertaken. That is why when Salesforce introduced the Duplicate Rule in the winter ’15 release, my joy knew no bounds!

Discovering the Duplicate Rule

Organizations can take advantage of the duplicate management rule to keep their sales teams’ contacts and accounts free from duplicates. The Duplicate rule gives users the ability to prevent data redundancy and maintain data integrity. It's also a boon for sales reps as it enables them to avoid multiple calls being made to the same lead/contact, thus streamlining the Sales Process. It reduces the effort that you would take to create Apex code for eliminating duplicates, or marking fields as Unique to avoid duplicates by multiple field values. Simple ‘point and click’ will suffice!

The UI is easily navigable and based heavily on the Workflow and Workflow Rule creation process. A user defined alert is displayed whenever a duplicate record is found.

Duplicate Management: Because two of everything isn’t always good!

Using Duplicate Management in Salesforce, the users can:
  • Allow/block the creation of duplicate records
  • Customize the criteria for identifying duplicate records, such as:
    • Duplicates by email only
    • Duplicates by email, first name and last name combined
  • Report on the duplicate records found by the rules. You can also create custom report Types to report on duplicates.

Empowering your Sales Reps

Nothing can be worse than having two of your Sales reps call the same lead! Using the duplicate rule, you can easily avoid such embarrassing situations. Let me show you how your Sales reps can get back their mojo, ensuring a surge in their efficiency, productivity and overall data integrity.
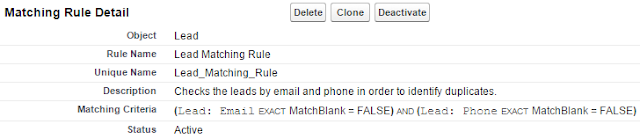
  1. Define a Matching Rule as I have shown below, which will help your Sales reps to customize the matching criteria to identify duplicate records for their leads. For example, they can use the combination of Email and phone number to identify the duplicate leads.


  2. You will then need to create a Duplicate Rule and associate it with the Matching Rule that you created above. It also gives you the provision to create customized alert messages.


  3. While creating the rule, you have an option to allow/block the creation of duplicate records which can then be used in reporting. The fields that are included in the duplicate identification criteria are highlighted as shown below while trying to save/edit a record that matches the criteria.


    (a) Saving duplicate records

    (b) Sales reps cannot save records until they change duplicate values
And it’s done! Your Sales reps won’t stop thanking you forever!

Duplicate Management: Limitations

Duplicate Management was only introduced recently by Salesforce, in the winter’15 release and therefore has its fair share of limitations still associated with it:
  • Duplicate Management is available only for Accounts, Contacts, Leads and custom objects
  • Duplicate Rules are not fired while using Quick Create or lead conversion
  • As of now, you cannot deploy them via change sets
That said, Duplicate Management is quite a useful tool that truly makes life easier for the Salesforce users. Once Salesforce irons these minor chinks, and I am sure it is just a release or two away, Duplicate Management will definitely be an unputdownable functionality.


Written by Saba Shaikh, Salesforce Developer at Eternus Solutions
Read More »

Monday, 6 April 2015

Navigation made easy with Lead Notifier

It’s that time of the year when the air is full of performance reviews. Appraisal cycles are in full bloom and the managers are on a prowl! Every employee is seen making his best attempts to impress his manager, hopeful of getting a bigger chunk of the delicious pie called performance bonus and I was no saint either! But impressing my manager was no easy job! What is it that I could do? I probably needed something as path breaking as a time machine!

Introspection…Innovation…Impression…

I thought and thought hard. I realized I had the power of Salesforce and I felt like a rock star! My plan was beginning to shape up now. Let me give you a sneak peek!

I realized that most Sales Reps in my organization ended up spending a huge chunk of their time navigating back and forth, from their Salesforce screens to monitor the new incoming Leads. This navigation was a big no-no as far as productivity was concerned and monitoring new leads was becoming increasingly difficult for them. “Why is that a big deal? You have Queues, Assignment rules and emails for Lead Management!” I hear you say. However, ours was a Salesforce instance that had just started out. And I needed to do something about it!

The Game Plan!

My game plan was built on a simple fact: The user should be notified whenever a new lead is generated, irrespective of which tab he was navigating on: home or elsewhere within the application.

The solution involved using a combination of Apex and Visualforce but the secret component of my solution plan was to leverage the Home Page and Sidebar components. Let me show you how I did it in a few simple steps!
  1. First, I created a simple Visualforce page using the code snippet given below. I call it the Lead Notifier Page.

    Apex Code

    Visualforce Code

    The Visualforce code leveraged the standard < apex:actionPoller > which enabled auto refresh, thus facilitating the lead notifier to pick up the newly created Lead information in real time.

  2. Once this was done, I modified the home page component and added the Lead Notifier Page created in step 1, so that it started appearing on the Home page.


  3. I went on to modify the sidebar component to add the Lead Notifier Page created in step 1, so that it started appearing on the Home page.


    Finally, this is how my Home page looked like.


There! I had nailed it! My Sales Reps were absolutely loving it! Needless to say, I got a few brownie points from them when they put in a favourable word to my boss. As for me, I was simply glad I had Salesforce to rely on, no matter what!


Written by Jigar Shah, Solution Architect at Eternus Solutions
Read More »

Thursday, 2 April 2015

Topic-based Publisher Subscriber Design Pattern

When it comes to design, I have a pretty simple philosophy: set up something that is generic and reusable. But design patterns sound way easier than they actually are. It is like setting up the electricity wiring for your newly built house. You know that you need approximately 200 Amps of electricity, but actually setting up the wiring is altogether a different ball game. Like I said, deep diving in the sea of design patterns was not an easy task. Thankfully, I came across the Publisher Subscriber Design pattern, which is generic, easy to use and dynamic, meaning I can dynamically add anything with just a few clicks!

Publisher Subscriber Design Pattern: A Closer Look…

As far as the architecture is concerned, a Publisher Subscriber Design Pattern will generate messages for another system to consume. This chaining will go on for n levels.


  1. Publisher - Publishers post messages to any message broker or queue; for topic based pub-sub model messages, belonging to a specified topic to which Subscribers can subscribe to.
  2. Subscriber - Subscribers can subscribe for the messages published by the publisher system through topic based subscription via a message broker or a queue.
  3. Topic Subscription - The topic subscription will hold the subscription specific details. Since the Publisher would not know its subscribers, the messages would be routed to the subscriber based on the topic subscriptions.
In short, the Publisher system is going to publish to the Message Broker/Queue where the topic subscription would already be set in. So this architecture signifies the many-to-many relationship between the end systems.

Schema Structure & Analyzed Keynotes

Before starting to put anything architecturally, I needed to think of a generic data model that would suffice for any kind of system. A single system ideally would work as a Publisher as well as a Subscriber for others.

The data model shown below leverages Event Notification Service to capture any messages that need to be published/subscribed in the form of an event.

  1. System Table - This table would hold the Publisher and the Subscriber information. Each system should be associated with one unique key constraint so that this would be globally unique.
  2. Topic Table - This table would hold the list of Subscribing & Publishing topics. Based on these topics, the system would either consume the message it has subscribed to or publish the message
  3. Event Table - This table will be associated with the Topic & the System. This object is the entry point for data flow within the system or externally. Any operations that need to be performed within the system or outside the system will be flown through the Event table.

Generalization of Structure

  1. Whenever any event records get created across any topic, the system would generate an automated process to perform the respective operation.
  2. The post logic would be run either for further raising any events acting as new Publisher or respond to its respective publisher system.

Advantages of Publisher Subscriber Design Pattern

  1. Scalability - It takes just a few clicks to add / remove the event subscription. Whenever you want to add/remove any system, you just need to go and update the queue table which will eventually start/stop acting as per the requirement
  2. Single Point Control - Updating a single table will change the whole cycle.
  3. Implementation Cost – This architecture is quite simple to implement. The structure of each system for handling the event notification structure remains the same and hence leads to considerable reduction in implementation cost.

Disadvantages of Publisher Subscriber Design Pattern

  1. Failure In Message Delivery - Failure in delivering a message would cause a problem to the subscribing system in case you need the messages to be delivered in a sequence.
  2. Ordering – In case custom sequencing or ordering is not implemented, the messages do not guarantee an order.

The final word…

Despite its due share of cons, I would recommend using the Publisher Subscriber design pattern, especially when you want to put a dynamic and reusable architecture and make multiple systems interact amongst each other, that too, with just a few clicks! Why don’t you give it a try and tell me how it worked out for you?


Written by Amit Shingavi,  Salesforce Developer at Eternus Solutions
Read More »

Wednesday, 1 April 2015

Bing Map for Microsoft Dynamics CRM using an HTML Web Resource

Thanks to its readymade SDK, Silverlight was considered as the best option to display maps on Microsoft Dynamics CRM for a very long time. However, owing to plug-ins requirement and limitations with device compatibility, developers round the globe like me were forced to look for an alternative, more suitable option. And we struck gold...with HTML5! In this post, I am going to demonstrate how to build a simple map component in MS Dynamics CRM with nothing more than HTML5 and JavaScript!

Before we get started…

You will need to have a basic idea about how to use Bing maps in HTML and decent hands-on experience of customizing MS Dynamics CRM. You will also require to add latitude and longitude fields under the Address field in Account, Contact and Lead entities.

So let’s get rolling!

Our Target

We are going to build a map for three of the most-used entities in MS Dynamics CRM: namely Account, Lead & Contact. We need to display all the records for these entities within our map.

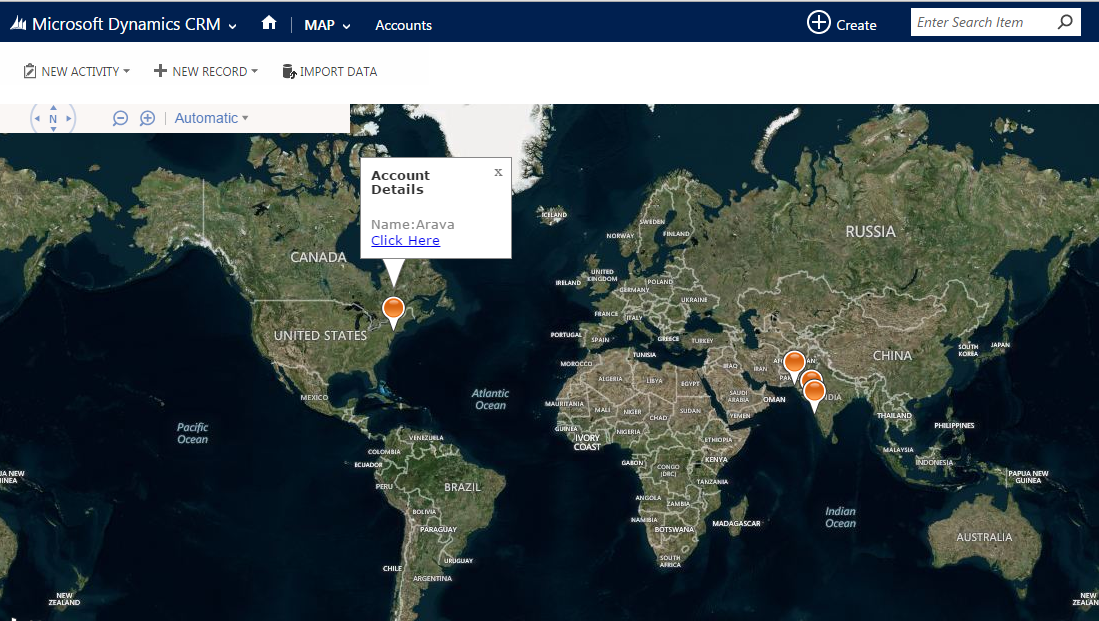
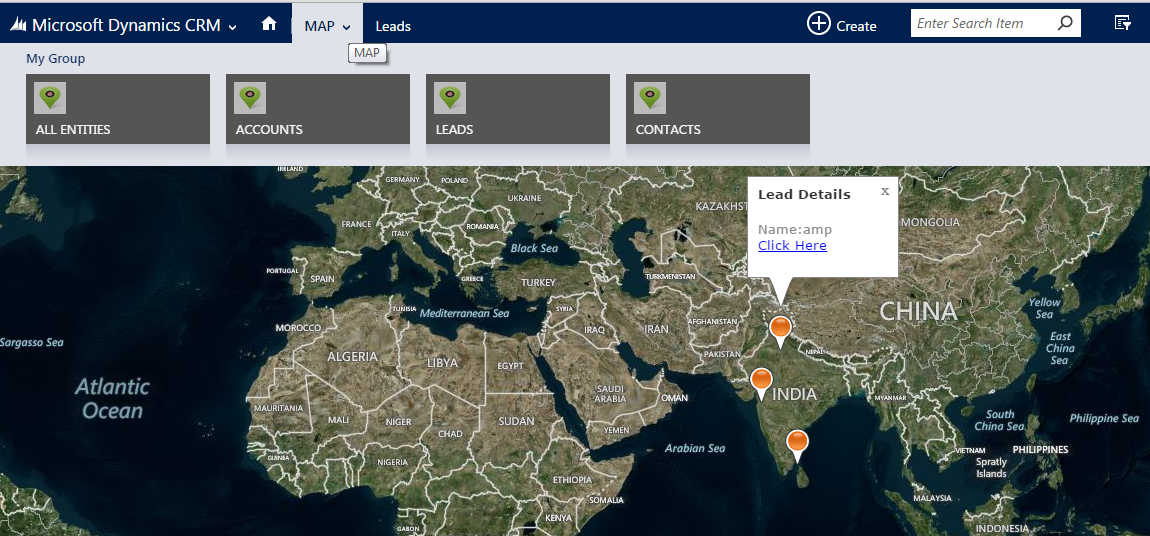
Take a look at the image shown below where all accounts are displayed on the map in the form of Bing map pushpins, accompanied by a hover effect, which provides more details of the selected account.


This is a 6-step process:

Step 1.

Get the base URL for accessing the application data, as shown below.


Step 2.

Next, you need to create the request query for accessing the latitude and longitude of all Accounts, from the Account entity itself. I used the following Query:


Step 3.

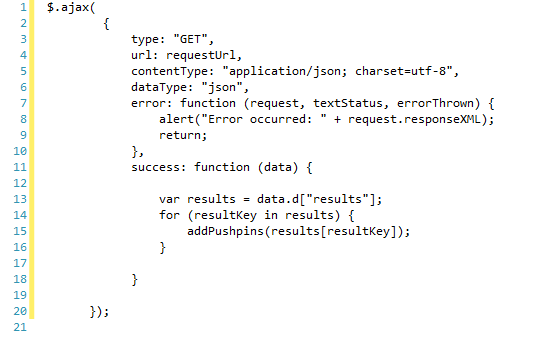
Once you have created the request query ad demonstrated above, you need to make an Ajax call to get the actual data from MS Dynamics CRM with the help of requestUrl used in step 2 above. Pass on this result to another JavaScript function to add the pushpins on the map as shown here.


Step 4.

Once you get the data from the Ajax call, you can proceed to adding the pushpins on the map. However, bear in mind that before you start this, you must have initialized the map component on the HTML page. I have demonstrated the same below.


In the code snippet shown above, the click event is added dynamically to perform the click operation for opening the corresponding Account page directly, while the mouseover event is added dynamically to see the details of selected account.

Step 5.

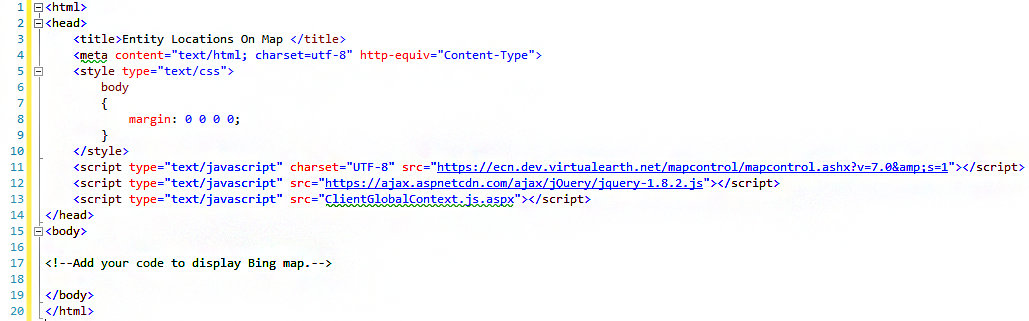
Once this is done, add your all Java Script code to your HTML page, within the body tag.


As you can see above, we have added a simple HTML web resource for the map in MS Dynamics CRM. Now you need to upload the web resource to the MS Dynamics CRM and customize the ribbon, in order to access the map resource on the MS Dynamics CRM page.


Step 6.

Finally, you need to modify Step 2 for performing the same operation on Contact and Lead entities.
You can change this customization to provide a Heat map simply by just changing the map type. You can also use additional Bing map APIs to get direction or route to different entities in MS Dynamics CRM.

Use HTML Web Resources instead of Silverlight because…

  • Silverlight web resources cannot be viewed in the 64-bit version of Microsoft Office Outlook
  • Silverlight web resources remain supported in Microsoft Dynamics CR 2015 and Microsoft Dynamics CRM Online 2015 updates for backward compatibility. However, Microsoft recommends using HTML web resources with HTML5 instead of Silverlight for components that will be able to be presented on all clients.
  • HTML5 is the preferred client technology for the web over web plug-ins like Silverlight and Flash. HTML5 can be consumed from any device, be it your PC, tablet, smartphone and much more, and heavily uses JavaScript and its powerful libraries like jQuery and CSS.

For more information, you can refer to https://msdn.microsoft.com/en-us/library/gg328358.aspx


Written by Pramod Dhokane,  .Net Champion at Eternus Solutions
Read More »