Monday, 6 April 2015

Navigation made easy with Lead Notifier

It’s that time of the year when the air is full of performance reviews. Appraisal cycles are in full bloom and the managers are on a prowl! Every employee is seen making his best attempts to impress his manager, hopeful of getting a bigger chunk of the delicious pie called performance bonus and I was no saint either! But impressing my manager was no easy job! What is it that I could do? I probably needed something as path breaking as a time machine!

Introspection…Innovation…Impression…

I thought and thought hard. I realized I had the power of Salesforce and I felt like a rock star! My plan was beginning to shape up now. Let me give you a sneak peek!

I realized that most Sales Reps in my organization ended up spending a huge chunk of their time navigating back and forth, from their Salesforce screens to monitor the new incoming Leads. This navigation was a big no-no as far as productivity was concerned and monitoring new leads was becoming increasingly difficult for them. “Why is that a big deal? You have Queues, Assignment rules and emails for Lead Management!” I hear you say. However, ours was a Salesforce instance that had just started out. And I needed to do something about it!

The Game Plan!

My game plan was built on a simple fact: The user should be notified whenever a new lead is generated, irrespective of which tab he was navigating on: home or elsewhere within the application.

The solution involved using a combination of Apex and Visualforce but the secret component of my solution plan was to leverage the Home Page and Sidebar components. Let me show you how I did it in a few simple steps!
  1. First, I created a simple Visualforce page using the code snippet given below. I call it the Lead Notifier Page.

    Apex Code

    Visualforce Code

    The Visualforce code leveraged the standard < apex:actionPoller > which enabled auto refresh, thus facilitating the lead notifier to pick up the newly created Lead information in real time.

  2. Once this was done, I modified the home page component and added the Lead Notifier Page created in step 1, so that it started appearing on the Home page.


  3. I went on to modify the sidebar component to add the Lead Notifier Page created in step 1, so that it started appearing on the Home page.


    Finally, this is how my Home page looked like.


There! I had nailed it! My Sales Reps were absolutely loving it! Needless to say, I got a few brownie points from them when they put in a favourable word to my boss. As for me, I was simply glad I had Salesforce to rely on, no matter what!


Written by Jigar Shah, Solution Architect at Eternus Solutions
Read More »

Thursday, 2 April 2015

Topic-based Publisher Subscriber Design Pattern

When it comes to design, I have a pretty simple philosophy: set up something that is generic and reusable. But design patterns sound way easier than they actually are. It is like setting up the electricity wiring for your newly built house. You know that you need approximately 200 Amps of electricity, but actually setting up the wiring is altogether a different ball game. Like I said, deep diving in the sea of design patterns was not an easy task. Thankfully, I came across the Publisher Subscriber Design pattern, which is generic, easy to use and dynamic, meaning I can dynamically add anything with just a few clicks!

Publisher Subscriber Design Pattern: A Closer Look…

As far as the architecture is concerned, a Publisher Subscriber Design Pattern will generate messages for another system to consume. This chaining will go on for n levels.


  1. Publisher - Publishers post messages to any message broker or queue; for topic based pub-sub model messages, belonging to a specified topic to which Subscribers can subscribe to.
  2. Subscriber - Subscribers can subscribe for the messages published by the publisher system through topic based subscription via a message broker or a queue.
  3. Topic Subscription - The topic subscription will hold the subscription specific details. Since the Publisher would not know its subscribers, the messages would be routed to the subscriber based on the topic subscriptions.
In short, the Publisher system is going to publish to the Message Broker/Queue where the topic subscription would already be set in. So this architecture signifies the many-to-many relationship between the end systems.

Schema Structure & Analyzed Keynotes

Before starting to put anything architecturally, I needed to think of a generic data model that would suffice for any kind of system. A single system ideally would work as a Publisher as well as a Subscriber for others.

The data model shown below leverages Event Notification Service to capture any messages that need to be published/subscribed in the form of an event.

  1. System Table - This table would hold the Publisher and the Subscriber information. Each system should be associated with one unique key constraint so that this would be globally unique.
  2. Topic Table - This table would hold the list of Subscribing & Publishing topics. Based on these topics, the system would either consume the message it has subscribed to or publish the message
  3. Event Table - This table will be associated with the Topic & the System. This object is the entry point for data flow within the system or externally. Any operations that need to be performed within the system or outside the system will be flown through the Event table.

Generalization of Structure

  1. Whenever any event records get created across any topic, the system would generate an automated process to perform the respective operation.
  2. The post logic would be run either for further raising any events acting as new Publisher or respond to its respective publisher system.

Advantages of Publisher Subscriber Design Pattern

  1. Scalability - It takes just a few clicks to add / remove the event subscription. Whenever you want to add/remove any system, you just need to go and update the queue table which will eventually start/stop acting as per the requirement
  2. Single Point Control - Updating a single table will change the whole cycle.
  3. Implementation Cost – This architecture is quite simple to implement. The structure of each system for handling the event notification structure remains the same and hence leads to considerable reduction in implementation cost.

Disadvantages of Publisher Subscriber Design Pattern

  1. Failure In Message Delivery - Failure in delivering a message would cause a problem to the subscribing system in case you need the messages to be delivered in a sequence.
  2. Ordering – In case custom sequencing or ordering is not implemented, the messages do not guarantee an order.

The final word…

Despite its due share of cons, I would recommend using the Publisher Subscriber design pattern, especially when you want to put a dynamic and reusable architecture and make multiple systems interact amongst each other, that too, with just a few clicks! Why don’t you give it a try and tell me how it worked out for you?


Written by Amit Shingavi,  Salesforce Developer at Eternus Solutions
Read More »

Wednesday, 1 April 2015

Bing Map for Microsoft Dynamics CRM using an HTML Web Resource

Thanks to its readymade SDK, Silverlight was considered as the best option to display maps on Microsoft Dynamics CRM for a very long time. However, owing to plug-ins requirement and limitations with device compatibility, developers round the globe like me were forced to look for an alternative, more suitable option. And we struck gold...with HTML5! In this post, I am going to demonstrate how to build a simple map component in MS Dynamics CRM with nothing more than HTML5 and JavaScript!

Before we get started…

You will need to have a basic idea about how to use Bing maps in HTML and decent hands-on experience of customizing MS Dynamics CRM. You will also require to add latitude and longitude fields under the Address field in Account, Contact and Lead entities.

So let’s get rolling!

Our Target

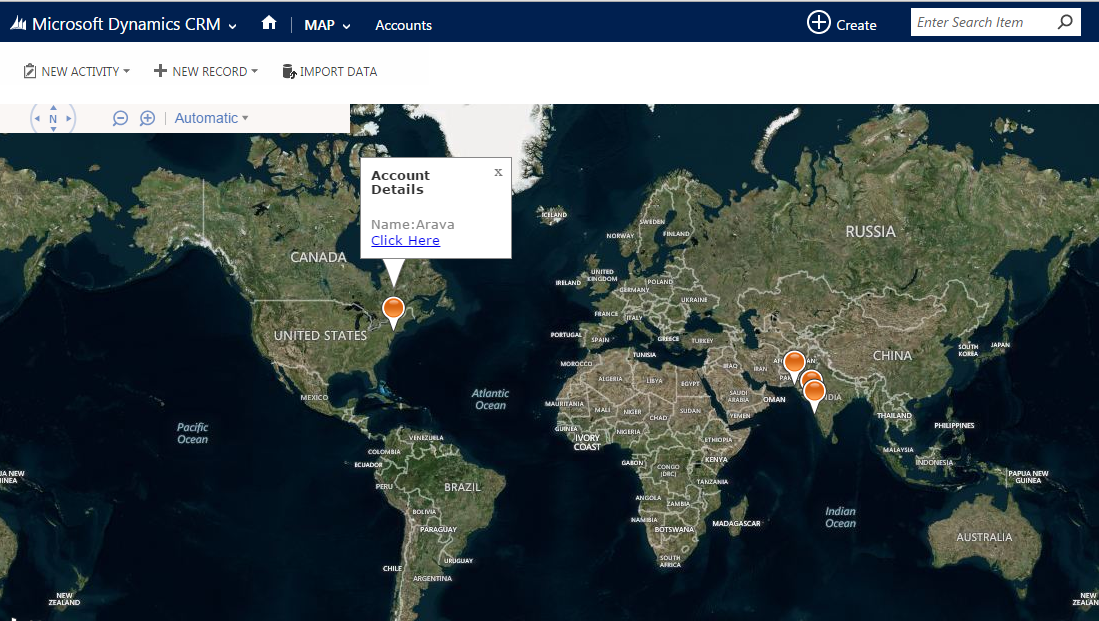
We are going to build a map for three of the most-used entities in MS Dynamics CRM: namely Account, Lead & Contact. We need to display all the records for these entities within our map.

Take a look at the image shown below where all accounts are displayed on the map in the form of Bing map pushpins, accompanied by a hover effect, which provides more details of the selected account.


This is a 6-step process:

Step 1.

Get the base URL for accessing the application data, as shown below.


Step 2.

Next, you need to create the request query for accessing the latitude and longitude of all Accounts, from the Account entity itself. I used the following Query:


Step 3.

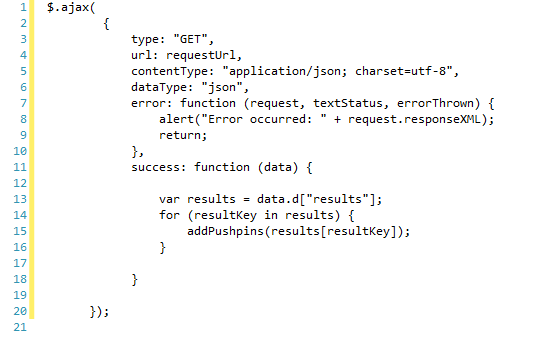
Once you have created the request query ad demonstrated above, you need to make an Ajax call to get the actual data from MS Dynamics CRM with the help of requestUrl used in step 2 above. Pass on this result to another JavaScript function to add the pushpins on the map as shown here.


Step 4.

Once you get the data from the Ajax call, you can proceed to adding the pushpins on the map. However, bear in mind that before you start this, you must have initialized the map component on the HTML page. I have demonstrated the same below.


In the code snippet shown above, the click event is added dynamically to perform the click operation for opening the corresponding Account page directly, while the mouseover event is added dynamically to see the details of selected account.

Step 5.

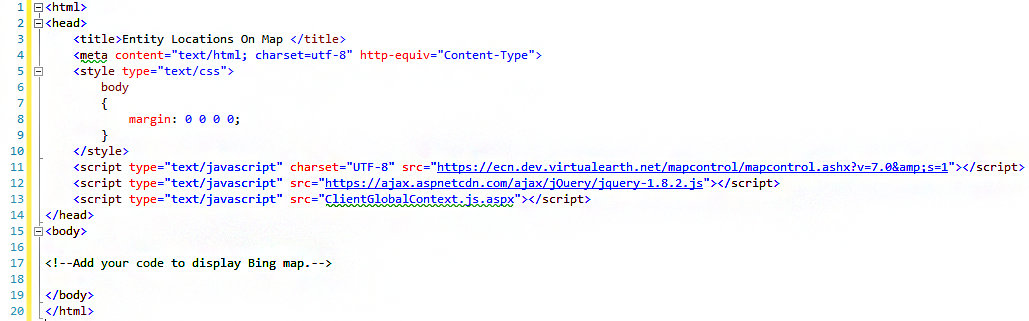
Once this is done, add your all Java Script code to your HTML page, within the body tag.


As you can see above, we have added a simple HTML web resource for the map in MS Dynamics CRM. Now you need to upload the web resource to the MS Dynamics CRM and customize the ribbon, in order to access the map resource on the MS Dynamics CRM page.


Step 6.

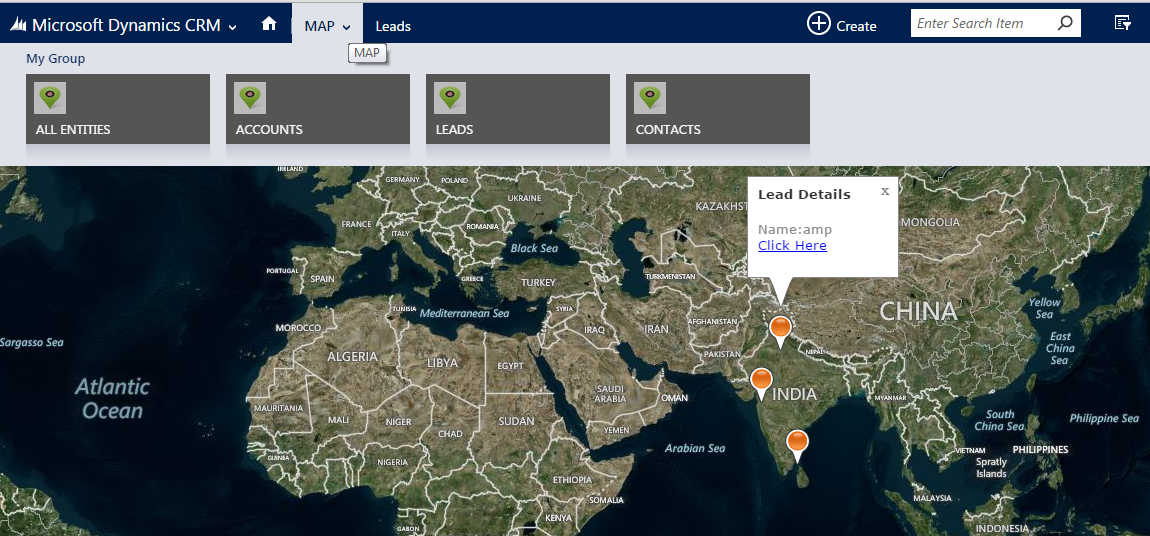
Finally, you need to modify Step 2 for performing the same operation on Contact and Lead entities.
You can change this customization to provide a Heat map simply by just changing the map type. You can also use additional Bing map APIs to get direction or route to different entities in MS Dynamics CRM.

Use HTML Web Resources instead of Silverlight because…

  • Silverlight web resources cannot be viewed in the 64-bit version of Microsoft Office Outlook
  • Silverlight web resources remain supported in Microsoft Dynamics CR 2015 and Microsoft Dynamics CRM Online 2015 updates for backward compatibility. However, Microsoft recommends using HTML web resources with HTML5 instead of Silverlight for components that will be able to be presented on all clients.
  • HTML5 is the preferred client technology for the web over web plug-ins like Silverlight and Flash. HTML5 can be consumed from any device, be it your PC, tablet, smartphone and much more, and heavily uses JavaScript and its powerful libraries like jQuery and CSS.

For more information, you can refer to https://msdn.microsoft.com/en-us/library/gg328358.aspx


Written by Pramod Dhokane,  .Net Champion at Eternus Solutions
Read More »

Salesforce to Amazon Integration Using Signature Version 4: Part 2

In my previous post on Salesforce to Amazon integration using Signature Version 4, I had taken you through the process of creating a canonical request, which formed the first step for calculating a signature required for the integration. As promised, I am back with the remaining steps you will need to complete for integrating Salesforce with Amazon.

Step 2: Create a String to Sign


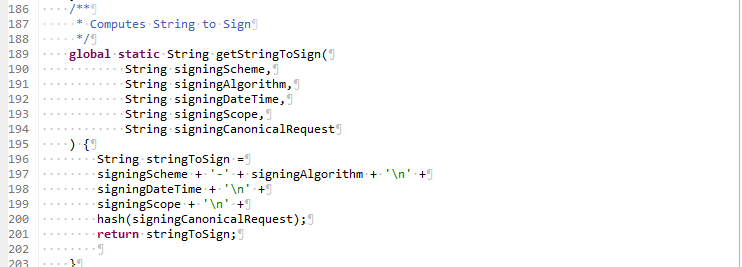
The string to sign will include meta information like algorithm, date, credential scope and the digest that was calculated in step 1. It is calculated as shown below:

  • Generally, SHA256 algorithm is used for generating digest. For creating a String to Sign, you need to write AWS4-HMAC-SHA256 instead of SHA256
  • Add the request date in ISO8601 Basic format via the x-amz-date header in the YYYYMMDD'T'HHMMSS'Z' format
  • Credential scope includes date(just date, not date time), the region
  • The service that we are requesting and the terminating string i.e. aws4_request must be in the lowercase. The region and service name strings must be UTF-8 encoded.
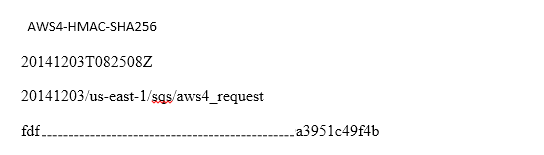
  • Finally, append the hashed canonical request that was calculated in the first step using the Hash function mentioned above. Your string to sign will look like:


Step 3: Calculate the Signature


For calculating the signature, you need to derive the signing key from AWS secret access key. For deriving the Signing key, you need to create a series of hash-based message authentication codes (HMACs) using HmacSHA256AH algorithm for date, region, service. You can derive the signing key as given in the code snippet below:


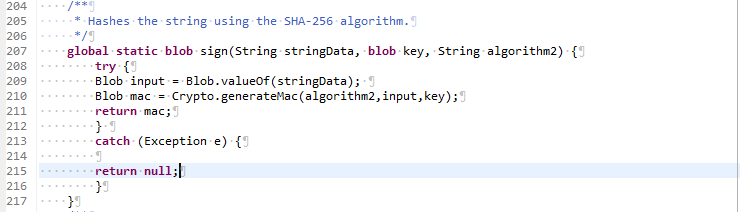
The sign function used for creating the HMACs is as shown below:


After creating the signature as a digest, convert it into a hexadecimal representation using EncodingUtil.convertToHex function. The final signature, after conversion to hex will look something like this:


B. Creating a Sign Request


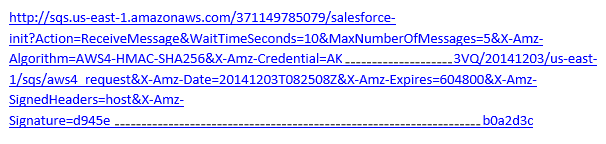
After the signature has been calculated, you need to add it to the query string. Query string will contain the action, the action parameters, and the signing information. This request is known as pre-signed URL and it is calculated as:


The following example shows what a request might look like when all the request parameters, including the signing information, are included in query string parameters.


Before I sign off…


While integrating Amazon with Salesforce using signature version 4, you need to bear the following in mind:
  1. Date information should be an eight-digit string representing the year (YYYY), month (MM), and day (DD) of the request (e.g., 20120228)
  2. Region information should be a lowercase alphanumeric string
  3. Service name information should be a lowercase alphanumeric string
  4. A special termination string: aws4_request

There! You are now ready to conquer the world, what with both Salesforce and Amazon data at your disposal at a single location, and why not, you have it covered A to Z after all.


Reference: http://docs.aws.amazon.com/general/latest/gr/sigv4_changes.html


Written by Tejashree Chavan,  Salesforce Developer at Eternus Solutions
Read More »

Multilingual Data Import into Salesforce Made Easy

If you have been working on Salesforce for a while, you will agree with me that no matter what application you build, importing large amount of data in Salesforce comes with its own set of challenges. This problem is compounded when you need to import multilingual data, and you can only imagine the magnitude of the problem when you are importing large amount of multilingual data!

My David vs. Goliath moment

I had this feeling last week, when I needed to important approximately 60,000 records in…hold your breath…five different languages: Vietnamese, Cantonese, Thai, Japanese and Korean! These languages have special Unicode characters, making my already unenviable task even more cumbersome. Some of my peers sympathized, some even sniggered!

What’s the big deal, eh?

To say that importing Unicode characters is difficult would probably be the understatement of 2015! The normal data import process of using Data Loader or the use of native Salesforce Import/Export Wizard does not work directly in an efficient manner for multilingual data, especially for Unicode characters. You can still import data in Salesforce using either of these approaches. However, most of the Unicode characters are converted into #,? and other random characters, thereby compromising the correctness of data imported.

So how did I wade through this labyrinth?

Keep it Handy!

Before I take you through this easy 6-step process, there’s one thing you’ll need ready with you: an Excel worksheet consisting of the multilingual data containing the Asian characters that you need imported in Salesforce.

Solving the Maze


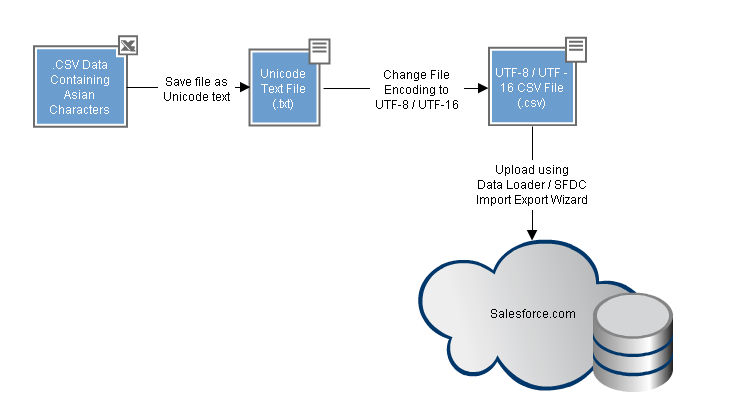
  1. Save the Excel data sheet containing multilingual data as a file. For the purpose of this demonstration, I have named it Unicode Text.xls
  2. Open the file created in step 1 with Notepad
  3. In Notepad, navigate to File > Save As. Check if the popup shown has an option to set the ‘File Encoding’. If it does, change the encoding to UTF-8. If it doesn’t have an option that says UTF-8, then you have an older version of Notepad that doesn’t support this option. Here you would end up saving it as UTF-16 which can also be imported by Salesforce.
  4. Ensure the filename has ‘.csv’ as its extension in its name and the “Save as Type” has “All Files” selected in the dropdown. Save the file.
  5. Using Import Wizard/Data Loader, import the file created in step 4 into Salesforce. Select your file to Import and the Encoding in the drop down list. This could be either in UTF-8 or UTF-16 format, depending on the selection you used while saving the CSV files.
  6. Check the log. Although the .CSV file was not comma delimited, Salesforce is able to import it properly. The characters now show up accurately in Salesforce.
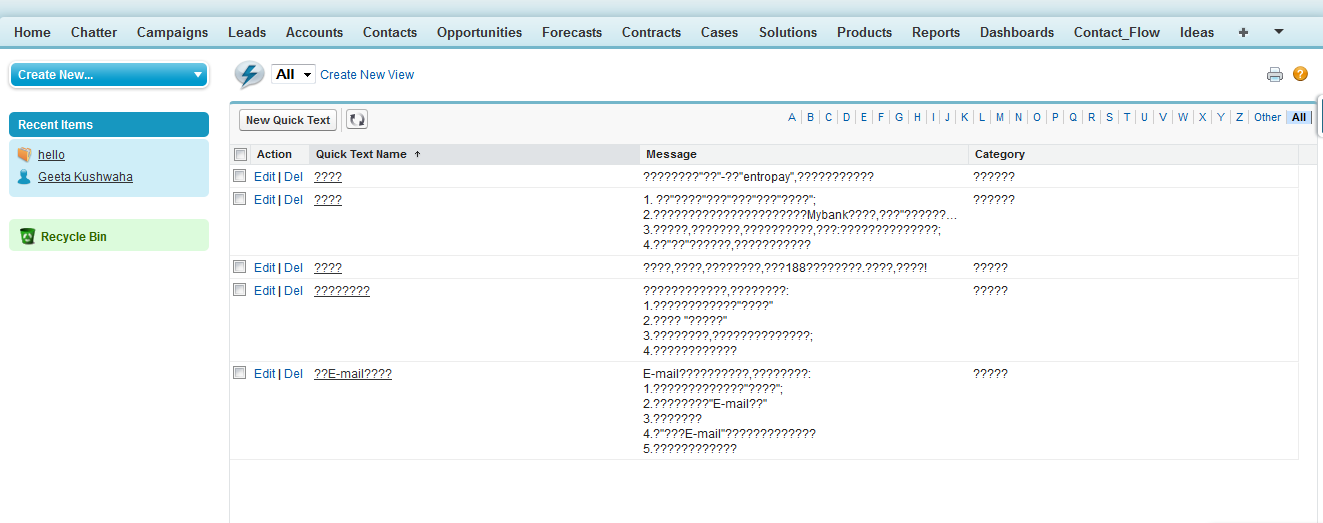
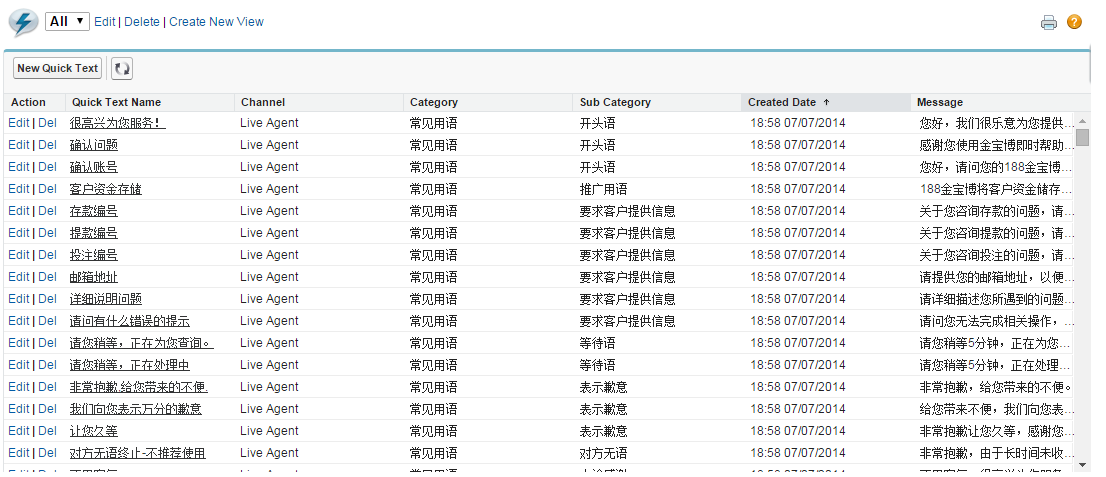
To give you a perspective, I have included snapshots of how it appears within Salesforce with and without encoding.


Data Import without Encoding


Data Import with Encoding

What a wonderful thing encoding is, isn’t it? So go on, try this out. I am sure all those sleepless nights when your imported data turned out to be totally screwed up will be a thing of past now!


Reference: How to import Asian characters from a CSV file into Salesforce


Written by Nupur Singh, Technical Lead at Eternus Solutions
Read More »

Tuesday, 31 March 2015

Data Import Simplified: Excel to SQL Using Stored Procedure

As a programmer, one of the most common problems I face during data migration is the diverse forms that data comes in, rendering import of that data into SQL Server quite a cumbersome task! In fact, last week itself I was working on data import from as much as five different sources, all in their own disparate formats! Importing data through code was killing my project!!! That’s when I came up with the idea of OPENROWSET method through stored procedure in SQL Server. Now I can import tons of data using OPENROWSET method within a fraction of seconds!

Let me show you how to easily import data from Excel files, .xls or .xlsx into SQL, using a stored procedure.

T-1: Prerequisites for Data Import

For this data import, we need to:
  • Create an Excel file to import sample data
  • Configure Windows Server, installing the necessary components
  • Configure the necessary permissions to the SQL instance from where we need to obtain data files
  • Stored procedure to read excel sheet and import data into the table with validations

Once we have all this, we need to prepare the environment for data import.

1. Creating an Excel File

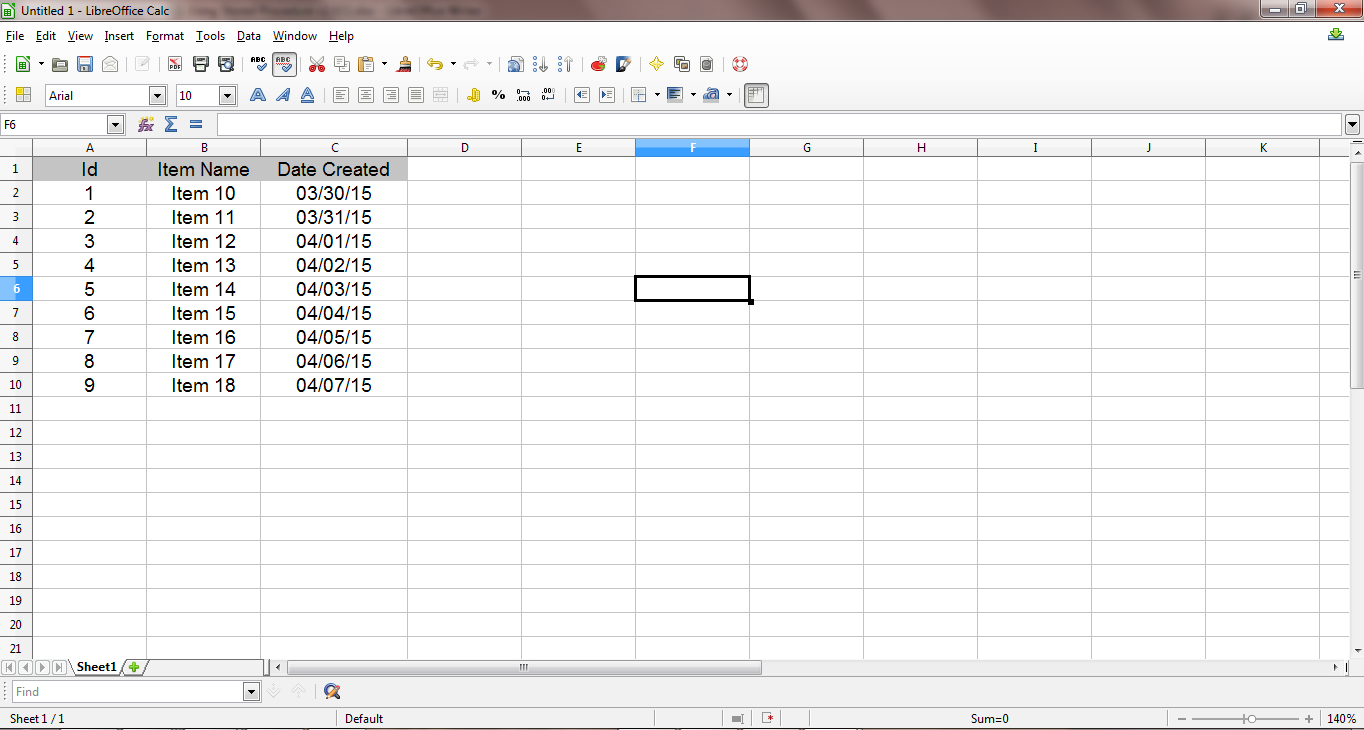
The first step involves the creation of an Excel file sample with a few rows of data for demonstration purposes. We need to add a header row to explicitly define the data: ID, Item Name and Date Created.  It is important that you note that the data sequence is only for facilitating the visualization of the content that is being manipulated.


2. Installing the necessary providers

As the next step, we now need to get the data through a query inside the SQL Server using an OLEDB Data Provider.  I used Microsoft.ACE.OLEDB.12.0 Data Provider which is available free of cost, and provided all ODBC and OLEDB drivers.

Note that there are two versions of this package: AccessDatabaseEngine.exe for x86 platform and AccessDatabaseEngine_x64.exe for x64 platform, so choose a version suitable to your platform.

3. Enabling SQL Server Instance to Read File

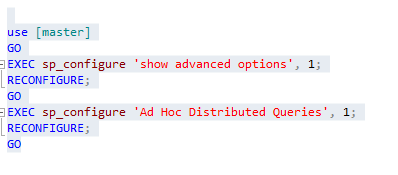
The execution of stored procedure using OPENROWSET is only possible when the SQL Server instance has the AdHoc Distributed Queries configuration enabled. By default every SQL Server instance keeps this configuration disabled.

To enable Ad Hoc Distributed Queries configuration I used the following query.


Ad hoc distributed queries configuration will be effective only after the execution of the reconfigure command, as shown above.

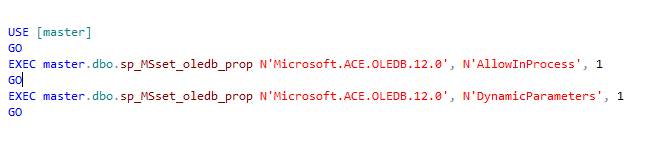
In order to get permission required to use the OLEDB Drivers, link stored procedure with Microsoft.ACE.OLEDB.12.0 provider in SQL Server using AllowInProcess & Dynamic parameters. I used the following query.


4. Using OPENROWSET method in stored procedure

Now we will query to read excel sheet data using OPENROWSET method. We need to pass some essential parameter to this method:
  • Data Provider: Microsoft.ACE.OLEDB.12.0
  • Options: File Version; File path; Header (HDR); Import Mode (IMEX)
  • SQL statement with or without clauses to filter data

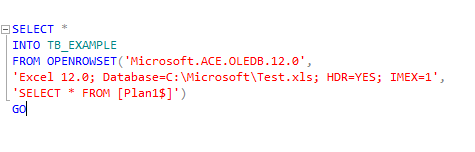
To perform other tasks for data manipulation, you should ideally always load the data into the database. You can insert data on existing table or else you can create new table.

I used the following query to use OPENROWSET method


It's also important to check if the SQL Server Service user has access to the Windows directory where the Excel files are stored.

Getting in the Groove: Importing excel template into the physical table through Stored Procedure

Now comes the real deal, importing excel template into the physical table with the help of a stored procedure. I have listed below the simplified, 8-step process, along with the query.

1. As the first step, you need to pass three parameters to the stored procedure:
  • Destination Table Name
  • File Path
  • Sheet Name

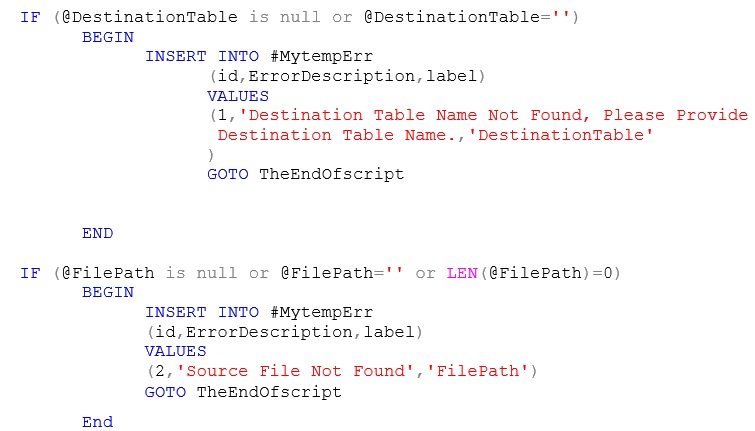
2. Once the above parameters are passed, you need to provide the following validation for table and excel Sheet:
  • Destination Table Name cannot be null or Empty, you have to provide the table name
  • File Path cannot be null or Empty, you have to provide the File Path

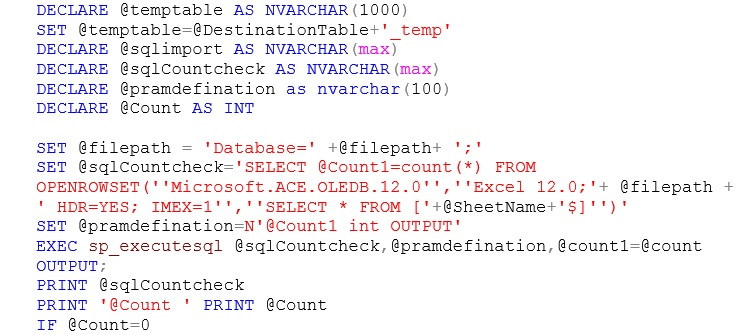
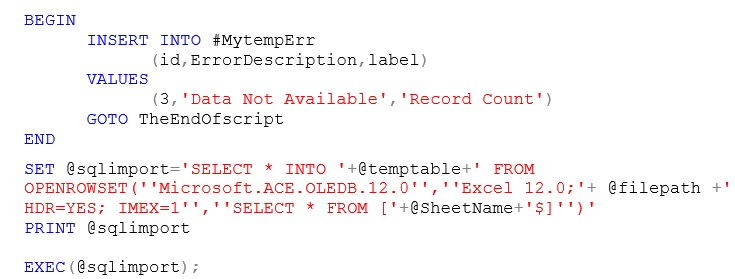
3. Once you have provided the validations, you then need to read the count of records from Excel sheet and store it into a variable. If the count is zero, you need to raise an error message in excel sheet that says Data Not Available; if the data is available, you need to read the data from the excel sheet and insert it into a temporary table, as shown below:


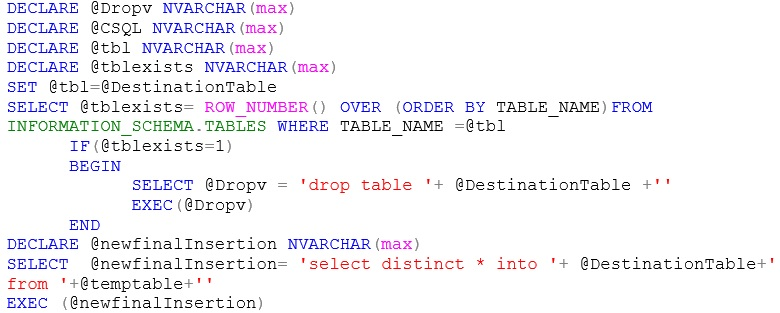
4. If the physical table exists, you need to drop the existing table and insert the records of the temporary table (excel sheet) into the physical table. Alternatively, if the physical table does not exist, you need to directly create and insert the data from the excel sheet into the physical table, as shown here:


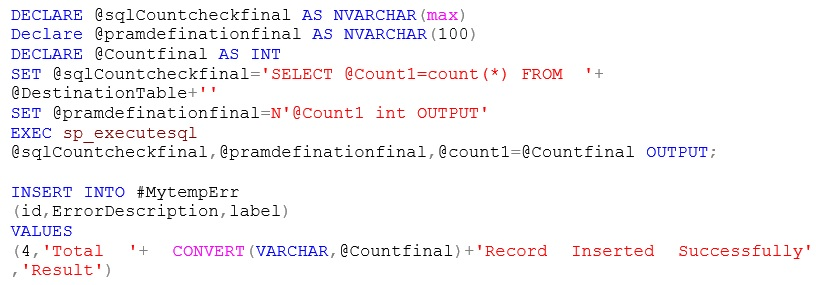
5. Once this is done, you need to get the count of successfully inserted records into the physical table. In order to show the message, use the code given below.


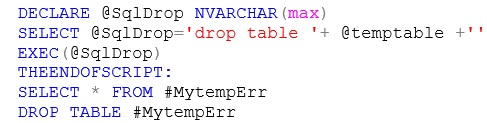
6. After getting the count into the physical table, you need to drop the temporary table. You can use the following sample code for the same.

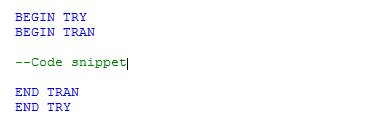
7. In this example, I have used Transaction within my stored procedure. The data can be rolled back in case of any error. Each transaction lasts until either it completes without errors and COMMIT TRANSACTION is issued to make the modifications a permanent part of the database, or errors are encountered and all modifications are erased with a ROLLBACK TRANSACTION statement.

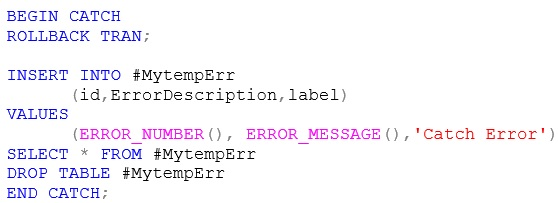
8. In order to conclude this process, you need to handle all errors within the Catch block and store the errors into the error table, as shown below


Time is Money!!!

There are alternate methods to import data but if you are in a Catch-22 situation like me, importing data through SQL Server is your best bet. Remember, timely access to data is as important, if not more, as access to data itself.


Reference: Importing an Excel Spreadsheet into a SQL Server Database


Written by Piyush Ostwal,  .Net Champion at Eternus Solutions
Read More »

Salesforce Magic Tricks: Opportunity

Hello fellow magicians! How does it feel to be able to do magic with Salesforce? It’s a surreal feeling, isn’t it? In the previous posts, we discussed some quick tips and tricks about Lead & Account object, as well as Case & Report. After a longer than anticipated hiatus, I am back, but this time with a great idea presented by Steve Molis for the Opportunity object!

Opportunity: Unidirectional Sales Stage Cycle

Salesforce allows users to move from an advanced stage of the Sales cycle to a previous stage through an out-of-the-box feature. However, quite a lot of organizations have their business sales cycle configured to move in a unidirectional, forward way, which is also a good practice from a Sales Pipeline Management perspective. Now comes a pertinent question: How do we achieve that?

Why does it matter?

Rather than designing the pipeline as a silo storage container for sales opportunities, it’s a best practice to architect the sales pipeline keeping in mind the bigger context of a revenue funnel. For most organizations, this means consolidating the Top of the Funnel (TOFU) managed by marketing with the Middle of the Funnel (MOFU) which is cooperatively facilitated by both marketing and sales and the Bottom of the Funnel (BOFU) which is managed by sales. Managing the bigger picture allows sales to better understand the pipeline health, including inflow, outflow, movement, stagnation and velocity. Any alteration to the above flow may obstruct the Sales Cycle and hence affect the Pipeline performance.

V for Victory (Validation Rule)…

Yes truly! All that you need to do is to have a validation rule triggered every time a user tries to change the stage value to any of the previous ones. Let me explain how you can do this.

Use a validation rule that will enable you to evaluate the current value for the Opportunity stage and compare it with any of the previous values for the Opportunity Stage. A similar rule is given in the example below:

CASE( StageName ,
     "Prospecting", 1,
     "Qualification", 2,
     "Needs Analysis", 3,
     "Value Proposition", 4,
     "Proposal/Price Quote", 5,
     "Negotiation/Review", 6,
     "Closed - Won", 7,
     "Closed - Lost", 7,
     0)


     <

CASE(PRIORVALUE(StageName),
     "Prospecting", 1,
     "Qualification", 2,
     "Needs Analysis", 3,
     "Value Proposition", 4,
     "Proposal/Price Quote", 5,
     "Negotiation/Review", 6,
     "Closed - Won", 7,
     "Closed - Lost", 7,
     0)


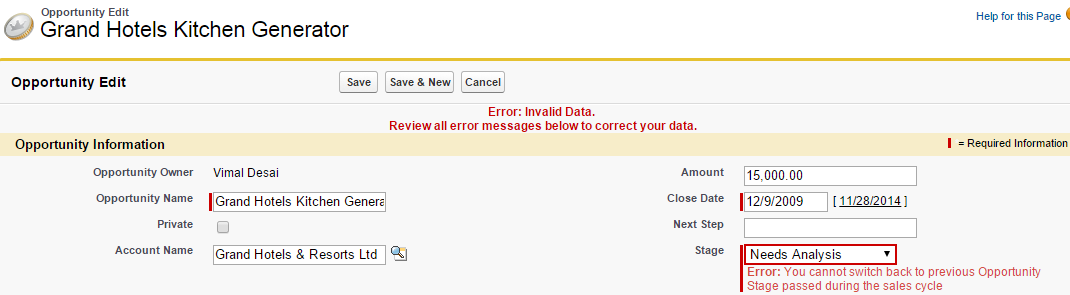
Now every time you try switching to a stage in the Sales Cycle that has already been passed in the sales cycle, an error message will be displayed and Salesforce will not let you proceed further, just like in the figure shown below!


Sweet, isn’t it?

Try this out and I am sure it will work seamlessly for your requirement. After all, we are Salesforce magicians!!!  I will be back very soon with some more tricks and tips in my bag. Till then, spread the magic!!!

Watch Steve Molis present this beautiful idea in Dreamforce’14 Formula Ninjas session here!

Written by Vimal Desai, Project Manager at Eternus Solutions

Read More »