Tuesday, 1 September 2015

Analyzing Salesforce data with Google Analytics: Part 3

Hello there! So now that you have configured your Google Analytics account (Part 1) as well as your Salesforce org (Part 2), let’s go straight to creating the custom variables required for segmentation within Google Analytics.

Creating Custom Variables


Custom Variables are the most powerful segmentation feature in Google Analytics, enabling marketers to understand their site visitors better. Standard Google Analytics users have only 5 variable slots available, so it is important to plan Custom Variables implementation effectively.

Custom variables are a good way to insert any type of custom data into Google Analytics. If you have data available with you in the source of a web page, you can pass it to Google Analytics through custom variables.

A basic method for creating a custom variable into your google analytics JavaScript is given below:

_setCustomVar(index, name, value, opt_scope)

Custom variables can also be used in custom reports and advanced segments. The name of the custom variable becomes the Key dimension and the value of the custom variable becomes the Custom Variable Value dimension.

A code snippet that illustrates how you might set a custom variable into your Google_Analytics.js file for tracking is given below.


I created five custom variables in the name-value pair format. For example, in the first custom variable User Name is the key and John Smith is the value for this key. Additionally, I set the first parameter i.e. index to 1. Index is a way to organize your custom variables and is also referred to as slot. I also set the fourth parameter i.e. opt_scope to 3 (page-level). This was done because I am going to track my Salesforce website where a lot of page-level activities are going to be done by different Salesforce users, and the visitors may view/click many different section, articles and tabs.


Note: Standard Google analytics user can only create 5 custom variables. So it's important to plan effectively before creating or implementing the custom variables.

Is there a way to get value parameter of custom variables dynamically?


Yes, there is. In the above example, I put the hard-coded values in the value parameter of a custom variable. I am now going to show how we can query and get the details of any Salesforce object using connection.js and put that as the value parameter of custom variable.

Suppose you want to track the Salesforce logged in user name and his 15 digit user ID using custom variables and also report on the same. The code snippet below illustrates the Google_Analytics.js file created for this solution.
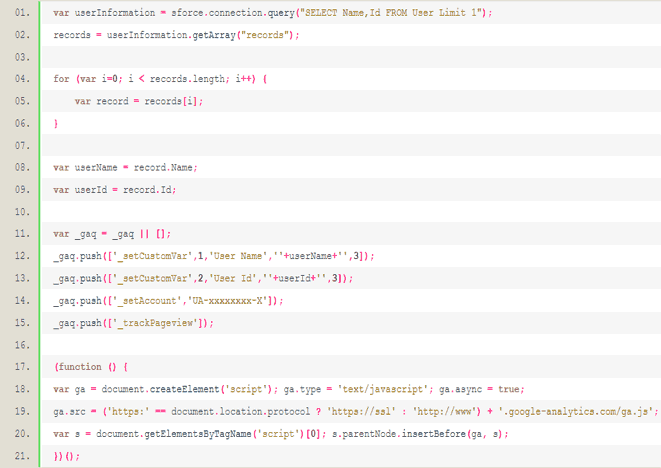

In this Google_Analytics.js file, I used the connection query on user object to fetch the user details, namely name and ID and assigned these details into the userInformation variable. Then I assigned the user record that I got from the query to the records variable. I iterated over the records collection and assigned it to the records variable. Thereafter, I assigned the user name and user ID into the variables username and userId respectively. I created only two custom variables and assigned the above variables userName and userId to the value parameter of custom variables.

Remember…


The most important thing that remains is to add the following JavaScript libraries to your home page custom link. Without adding these JavaScript files, you will not be able to perform the connection query in your JavaScript file.


I have used a custom variable UserName to track the salesforce logged-in user name of my salesforce org. I can see this custom variable by finding User Name under the audience section of my Google Analytics account.

Go to Reporting Tab > Audience > Custom > Custom Variables


By default, it shows Custom Variable (Key 1) on the first column, you need to choose the secondary dimension Custom Variable (Value 1) by clicking the secondary dimension drop-down. You will find the secondary dimension drop down here:


You will then get the following screen for your first custom variable, where your key is User Name and its respective value that is being populated dynamically.


Same is true for your second custom variable i.e. User Id and also its respective value that is populated dynamically.


Great News!!!  We have successfully populated our custom variables in our analytics account. Now we are just a single-step away from our target! Stay tuned!


Analyzing Salesforce data with Google Analytics:  Part 1, Part 2, Part 4


Written by Arun Kumar Bharati,  Salesforce Developer at Eternus Solutions
Read More »

Wednesday, 26 August 2015

8 Things You Must Do Before You Implement CRM

Thinking of turning customer savvy and getting a CRM for your organization? Good! But have you done your homework? Do you know which CRM suits your business to the tee? Are your employees ready for this change? Do you know what you seek from your CRM?

Organizations have been managing their customers through custom developed applications and trackers for a while. It’s only since the turn of this century that the use of a dedicated CRM application or software has been in vogue. Often, organizations tend to either overlook these pertinent questions or are simply unaware that they need to be addressed before you embark on the journey of CRM. As a result, their CRM usually does not give the expected returns on their investment: both money and time. This blog looks at 8 most important things you must do before you implement your CRM, so that your CRM is as successful as you want it to be.

1. Know What You Want

As simple and inconsequential as it sounds, this is the key to having a successful CRM. Half the CRM implementations fail to live up to the expectation simply because organizations have no clarity on what they want their CRM to do. You have plans and programs chalked out for your CRM but not the vision or objectives of your CRM. Adoption fails because this question is never answered.

Think of the most significant questions or problems that your CRM needs to solve and ensure you ask this question to each of your departments. Getting a 360 degree perspective will help you outline the plan of action for the success of your CRM and will also help you get the required buy-in from your CRM users.

2. Plan it Out

As a CXO, you may have decided the budget or even the timelines for the CRM implementation, but have you zeroed down on the CRM champion in your organization? Does he have the full support of your management and employees alike? Does he have the required bandwidth to do justice to your CRM initiative? Is there a plan chalked out for your CRM? Is your Project Management Group aligned with the CRM champion and have they chalked out the implementation plan together?

Often organizations do not spend much thought on the planning stage and tend to rush to the implementation stage too soon. Involve your internal business units, ensure there is a plan before implementation that everyone has agreed to and they stick to it.

3. Look at Your Existing IT

Before you set about implementing your CRM, you must plan and design the interfacing for your CRM. This includes consideration of what apps the CRM will support, various data exchange between external systems and CRM and any other integration requirements. Does your existing IT demand an on premise CRM implementation or a cloud-based CRM would be more suitable?  It is important to answer these questions before you begin your quest for the CRM application.

4. Launch it with a bang!

Internal Marketing is often underestimated. A lot of CRM systems have failed to take off simply because not enough buzz was created around them. You need to market your CRM and get the buy-in from your internal user group. Talk to them about the benefits of having a CRM, how it is likely to simplify their workload and what impact it is likely to have on their department and the organization. More importantly, launch the CRM with much ado and fanfare.  Let it be an event that people talk about for weeks and use the time after launch to lobby around. People are likely to respond better.

5. Keep it Simple

It is important that you start off slow and steady and add the complex layers only when your user group is comfortable in their skin with the CRM. A simple, metro design and an application that is user-friendly goes a long way towards the success of your CRM.

6. Publish Internal Guidelines

You are going to want to use your CRM for a lot of things. Do not yield to that temptation. It is important for your organization to understand the imperatives why you want to implement the CRM and stick to the planned strategy. Form and publish the internal guidelines around the CRM and ensure the team sticks to that. This would invariably ensure that your objectives are met and the organization adheres to the vision of your CRM.

7. Chalk an End-user Training Plan

Even if you are an IT organization, do not forget to take into account that your end users might not know how to work with a CRM. Organizations implementing CRM often underestimate the importance of training their users and therefore do not plan adequately. It is essential that you train your users, make them familiar with the CRM vision, train them about the best practices and explain the purposes it is supposed to be used for, and for that, plan adequately, before the implementation is rolled out.

8. Select CRM Technology

Once you have your processes documented, strategies defined and aligned to your business vision, it is time to research and finalize the CRM that best fits in your plan and vision. It is important that you identify the CRM functionality, required integrations, and choose a CRM only after you have completed the previous steps, to ensure that your CRM meets the expectations.


The Final Word


The key to a successful CRM implementation is not so much magic or a secret recipe as it is detailing and planning, which if done properly, do not just lead to a successful CRM implementation, but also transform businesses in the true sense of the word.


Written by Nupur Singh, Pre-Sales & Marketing Expert at Eternus Solutions
Read More »

Thursday, 13 August 2015

Sales Path: Re-inventing the Sales Wheel


The world is moving at a breakneck speed. Everybody needs everything done yesterday and the sales reps feel the pressure more than the rest of us! Sales cycles need to be shorter and quicker, resulting in faster closure of deals. This is where Salesforce comes to their rescue. Salesforce empowers sales reps to rapidly increase their sales with various consumer-inspired mobile sales apps delivered on the Salesforce1 Platform, one of which is Sales Path.

What is Sales Path?

In a nutshell, Sales Path is God’s gift to your sales reps! It helps your sales reps keep a track of the revenue on-the-go and guides your sales reps through each stage of the sales cycle, helping them close deals faster. Sales Path also enables you to add chatter posts and helpful links that will assist the sales reps to close their deals smoothly.

Sales Path is NOT the same as Sales Process…

In fact, Sales Path takes sales process a step ahead. It helps you to break down your otherwise enormous sales process into multiple steps or activities at different stages, as per your business rules, and guides your sales reps through each of these stages, in order to close the deals faster. Earlier through the sales process, you could only segregate the different stages, but with Sales Path, you can also provide guidelines and segregation of key field on different stages. Sales Path enables you to show your Sales reps where they are in the sales process and what exactly they need to do next to close the sale.

Configuring a Sales Path

  1. Click on Build (Customize -> Sales Path -> Settings) as shown in the image below.


  2. Once you have enabled the Sales Path, click on New Sales Path to create and configure your Sales Path, as shown below


  3. Name your Sales Path and select the record type, if any. Check the checkbox to activate the Sales Path.


  4. Select the fields to add in the stage as key fields. Key Fields are those fields that are populated from the Opportunity which help the reps get a better understanding of that particular Opportunity.

    [*Note: You can add only five fields as Key Fields to display.]

  5. You can add guidance tips or relevant comments for the sales reps in Guidance for Success, which makes it easier for them to close the opportunity. This is a rich text area field in which you can add helpful links, chatter posts, images, numbers or bulleted lists and also highlight the important points in bold, so that the sales reps can focus on the deals easily.


  6. Click on Finish to complete the configuration of your Sales Path

Sales Path View

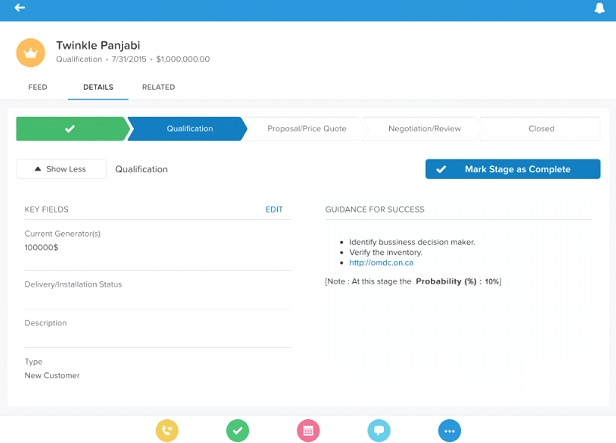
Sales Path View is nothing but a detailed view of the opportunity. As and when you complete a stage within your Sales Path, you can click on Mark Stage as Complete. You can also view the key fields and other guidance information. In case you have marked a stage as complete but want to revert the changes, you can mark that particular stage as Current Stage


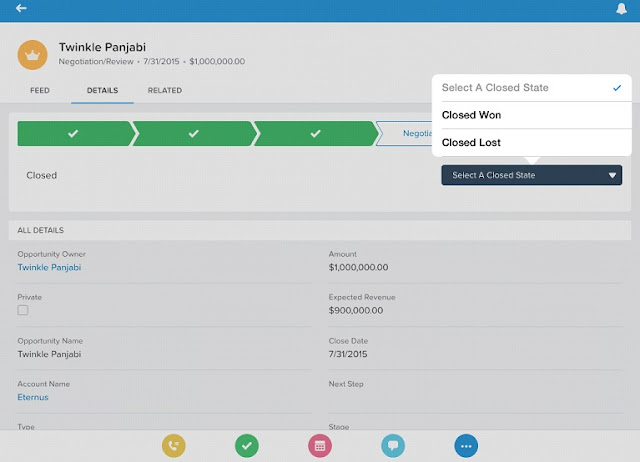
To close the opportunity, just click on CLOSED. You will get a popup with two options: Closed Won and Closed Lost. Choose the appropriate option.


Configure Sales Path because…

  • It enables real-time tracking and visualization of your opportunities
  • Enables your Sales reps to focus on important aspects of closing the opportunity
  • Focus on more profitable deals
  • Every Sales Path you create is added to the page layout automatically for that particular record type, so that you do not have to add it explicitly
  • It gives the sales reps an easy mechanism to track, visualize and focus on their opportunity, increasing the close rate of your opportunities

Limitations of Sales Path

The Sales Path has its own set of limitations:  
  • Does not work in One.app Browsers on PCs; it is only for officially supported devices
  • Sales Path is only available in organizations where Record Types/Sales Processes are available.  This means Sales Path is not available in Contact Manager, Group, and Professional Edition organizations.
  • You cannot clone a Sales Path to make minor changes and then apply to each of the Record Types
  • Sales Path can only be created for the Opportunity object. It cannot be replicated for any other standard or custom object.

Its limitations notwithstanding, Sales Path is a great tool for streamlining and speeding up your sales process. So go on, implement it for your Sales reps, and see how deals start to close faster than ever before!


Written by Twinkle Panjabi, Salesforce Developer at Eternus Solutions
Read More »

Thursday, 6 August 2015

10 Things to Look Forward to in Dreamforce 2015

It’s that time of the year again, those 4 magical days when we forget the rest of the world and immerse ourselves in all things Salesforce! Yes, I am talking about Dreamforce! Dreamforce 2015 is round the corner (September 15-18, 2015) and it is bigger and better than ever before! Here’s a list of 10 most awesome things to look forward to this Dreamforce.


1. Information…Information…Information

Aligned to the mantra of ‘Inspiration…Imagination…Innovation…’ what better place to get the best and the most updated information on Salesforce than the Holy Grail itself? Dreamforce presents the best opportunity to learn and explore the new Salesforce-related tech. Not only do you get a chance to interact with the best and learn from their opportunities, you also get to know of a lot of tips to drive end user adoption. And that’s just the tip of the iceberg!

2. In-depth Hands-on Training

Salesforce has always believed in hands-on training and previous Dreamforce sessions have been a witness to that. This year, Salesforce is providing more hands-on workshops, mini hacks and much more than previous years. World’s top Salesforce developers will be conducting these exclusive sessions and you can get yourself certified at highly discounted rates, so do not miss out on your once-in-a-lifetime chance!

3. Experience Trailhead

Trailhead is one-in-a-million experience for Salesforce professionals. Project Trailhead is designed to offer a guided learning experience albeit in a gamified manner. Trails are nothing but the path that you want to choose to learn Salesforce platform, which could be Salesforce Administration covering Point and Click to Salesforce Developer Path which includes Apex and Visualforce.

This Dreamforce, Salesforce is gamifying the entire DevZone learning experience with Trailhead and making the learning process all the more fun. Trust me on this folks, learning and grooming your skills on this platform is not something you want to miss!

4. Women’s Leadership Track

Hear it from the horse’s mouth! Engage and converse with the likes of Jessica Alba, Susan Wojcicki, Mary Molony and others and find out more about their journey to leadership, experience and the challenges they overcame. Get inspired like never before!

5. Amazing Keynote Sessions

If Marc Benioff’s custom-made Dreamforce shoes weren’t enough to bring you to Dreamforce, the keynote sessions certainly will! Over the years, a handful of eminent personalities have delivered keynotes in Dreamforce and it gets bigger and better this year! This year’s keynote sessions include those from Satya Nadella, Chuck Robbins, Hikmet Ersek, George Colony, Jessica Alba, Susan Wojcicki, to name a few, besides the much-awaited one from the man Marc Benioff himself. So make sure you reserve a spot to your favorite speaker’s keynote and get all set to let their experience and vision bring new insights to the future that awaits you.

6. The ‘1-1-1’ Model

It wouldn’t be wrong to say that philanthropy is the soul of Salesforce. The organization has been following 1-1-1 model which is based on the philosophy of devoting 1% of company’s product, equity and time to improve communities around the globe. The spirit of giving is exponentially increased during the Dreamforce where there are enough opportunities to give back to the society. So get your philanthropic self out of the bag and learn of newer ways to help the communities globally, Salesforce or otherwise.

7. The Nonprofit Track

Salesforce has always been a great deal about empowering the nonprofits to become connected and manage their fundraising and event management seamlessly. This year, hear it from the stalwarts like Goldie Hawn and Jessica Alba about how they go about their marketing and communication and engaging with the community.

8. The Higher-Education Track

If you are passionate about Higher-Ed, Dreamforce’15 is the place to be! This year’s sessions include key insights and expert tips on becoming a connected campus, hands-on sessions and expert advice on Marketing & communication and dedicated sessions on Community Engagement, to name a few. Know more about Student Success and Advancement from industry experts and be at the top of your game!

9. Truck Loads of Fun…

Dreamforce is all about mixing knowledge with fun! This year, it’s bigger than ever before, with the Dreamboat! Now you can book accommodation on the stunning cruise that will be docked at Pier 27 throughout Dreamforce! (Keep looking out for last-minute cancellations). Then there is the Dream Park! Your search for a memorable Dreamforce ends right there, and if that weren’t enough, let Dave Grohl and his team at Foo Fighters remind you what’s it like to rock out!

10. Networking…more networking…

At the core of it, Dreamforce is about networking…and then some more networking. There is no better place to showcase your products and solutions, to some of the best and the elite in the Salesforce world. In a nutshell, Dreamforce is your opportunity to establish your brand and drive demand for your offerings.


No matter what you choose to do, you are guaranteed awesomeness every minute that you spend at Dreamforce. So make sure you see all that there is to see and have the time of your life! As it is rightly said, if you love the Salesforce swag, Dreamforce is the place to be!

There is an informative post which covers more details on this year’s Dreamforce.

For more information, you can also refer to http://www.salesforce.com/dreamforce/DF15/.


Written by Nupur Singh, Pre-Sales & Marketing Expert at Eternus Solutions
Read More »

Monday, 3 August 2015

Dynamic Reporting via Reporting API

A couple of weeks ago, I was in a huge dilemma. I had to showcase a dashboard with multiple reports spanning across Cases, Contacts and Accounts on my portal landing page, each one with a different dashboard component. Additionally, the displayed reports should only contain the graphical part and exclude all the other irrelevant details. Since this facility is not available in Salesforce, like most developers, I instantly thought of using 'iframes' in my Visualforce page. But alas, that proved to be quite an issue ridden solution! Visualforce charting was also another alternative I considered and then discarded, for it would have been a time-consuming task. That’s when Reporting API, with its effective UI and quick implementation lifecycle came to my life as my savior.

Reporting API is built on REST API

Salesforce introduced a limited feature pilot of Analytics API in Summer '13 and the Analytics REST API was made generally available from Winter '14. The Analytics API allows us to integrate Salesforce report data into apps programmatically and has several resources that let you query metadata, and record details. This API is based on REST, which means that all the information that a user needs is generated real-time. The Reporting API is part of all the available REST APIs generated by Salesforce.

Reporting API: Making our lives better

Salesforce has provide multiple ways to display charts, namely Standard Reports and Visualforce Charting. However, Visualforce Charting requires controllers and test classes, and uses JavaScript to draw the charts. Standard Reports have their own set of drawbacks, their rigid format being a primary road-block. 

On other hand, Reporting API has abundant advantages, including real time display of data. The <analytics: reportChart> tag, along with a Report Id will display the report chart of the associated report. Additionally, the users have an option to run reports synchronously or asynchronously.

Most importantly, users can get a Single-View representation for multiple objects.

Some Useful Attributes of <analytics: reportChart>

  • showRefreshButton: The need for accessing the report in order to refresh it whenever new records are added is eliminated through the use of this attribute
  • cacheResults: Users can choose to display information from the cached date for multiple report runs within 24 hours
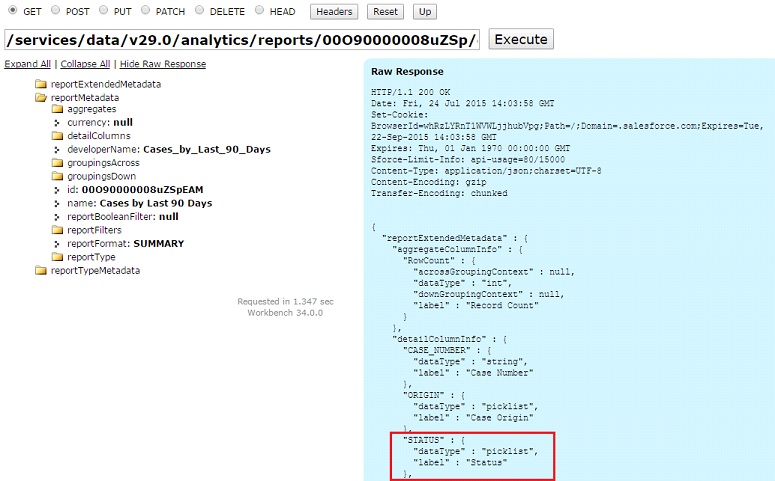
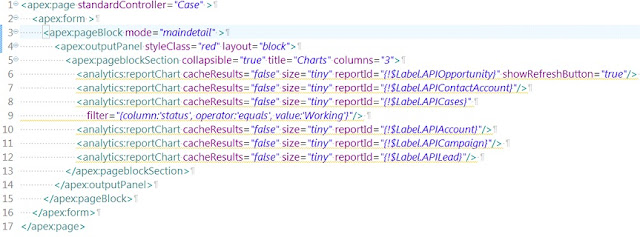
  • filter: In order to get the API name of the field that we need to filter and the operator, we need to make a describe request via the Analytics REST API. For example, I used the Status field of the Case object in my filter condition, the details of which were retrieved as shown below.


Reporting API: a Walkthrough


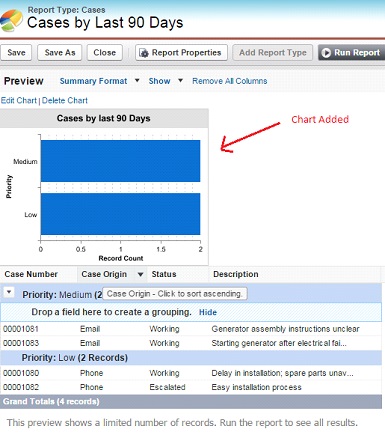
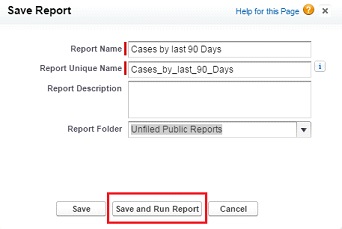
Creation of a Report


Note: 
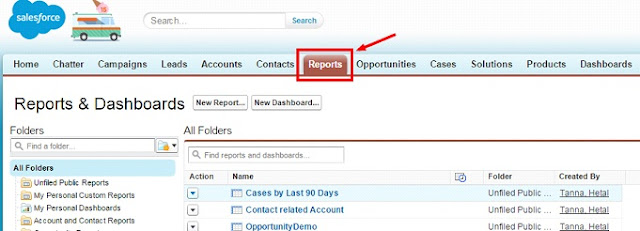
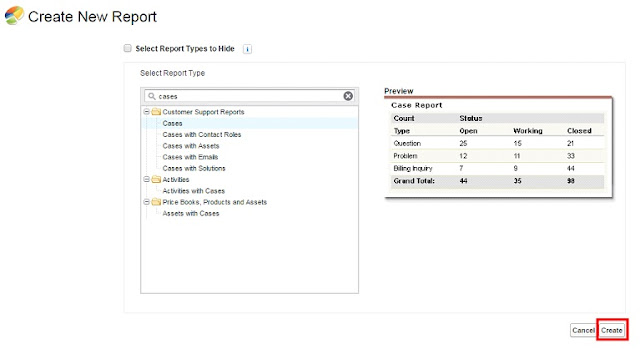
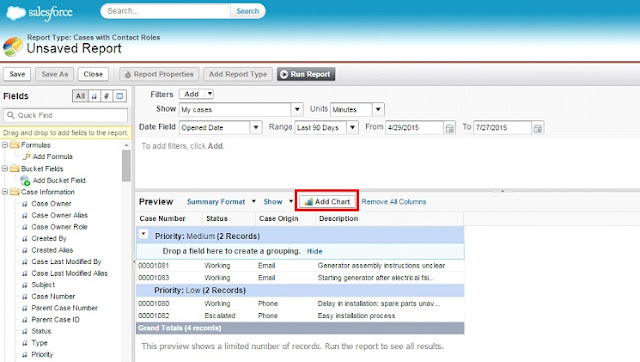
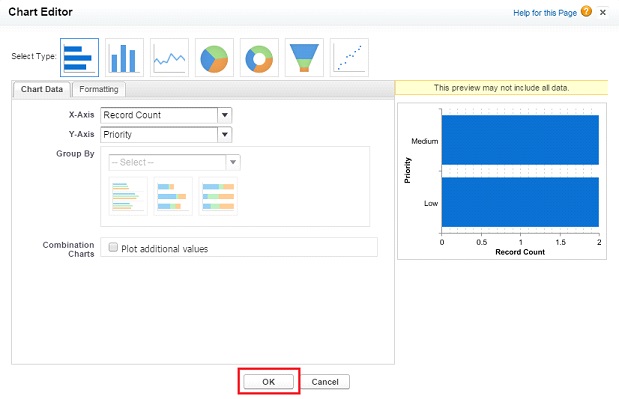
  • Reporting API supports Summary and Matrix reports. Apply filter criteria and add field for column grouping, if needed, and click on Add Chart.
  • Use the following tag in a Visualforce page: <analytics: reportChart cacheResults="false" size="small" reportId="00O90000007fzQc"> where reportId will be the ID of the report you created.

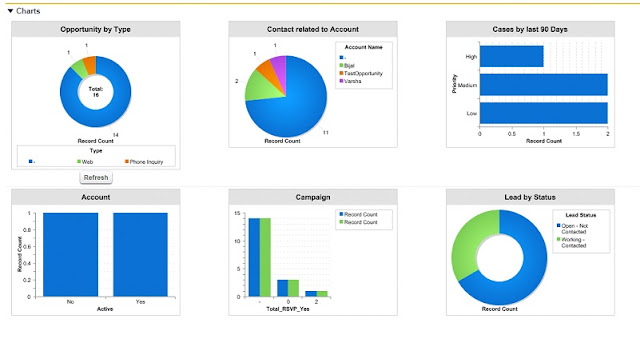
This will display the report chart associated with your report in the page, thus allowing you to create a custom dashboard.


Done! Our Visualforce page is displayed with report charts, as shown below:


Disadvantages 


Reporting API comes with its own share of drawbacks. I have listed a few of them below:
  1. Reporting API supports only Summary and Matrix reports type
  2. You can pass only the Report IDs as the parameter, and not the Dashboard IDs
Its disadvantages notwithstanding, Reporting API has proved great for implementations with strict time constraints, which require an effective UI for displaying reports dynamically in Salesforce. Give it a try and let me know how was your experience.


Written by Hetal Tanna, Salesforce Developer at Eternus Solutions
Read More »

Monday, 27 July 2015

Forms Based Authentication with External ADDS


Hello SharePoint Administrators!

Tired of Searching for Form-based Authentication (FBA) with external ADDS? Look no further!

As a SharePoint Administrator, you are likely to face a lot of issues while configuring FBA. You might get a lot of information over the internet for configuring and troubleshooting the FBA with SQL as well as ADFS, but you are unlikely to gather any information about External ADDS. Considering all the hardships that I faced during my project, I thought of sharing my knowledge about FBA with external ADDS.

Before we proceed any further, let’s quickly recap what FBA is and when can it be used.

FBA in SharePoint

Form Based Authentication (FBA) provides us a mechanism to use our own authentication method using a web form. A large number of organizations use FBA as a way of extending a site for non-Active Directory (AD) users.

FBA is a claims-based identity management system based on ASP.NET membership and role provider authentication. It can be used in different scenarios where credentials are stored in an authentication provider, such as:
  • Active Directory Domain Service (ADDS)
  • SQL Server database
  • Lightweight Directory Access Protocol (LDAP)
  • Data store such as Novell eDirectory
  • Novell Directory Services (NDS), or Sun ONE

How I Conquered My Rome

In my case, the SharePoint site was supposed to be accessible for both internal as well as external users. External users were not supposed to have access to any internal resource and could access the site only through custom login procedure.

Here’s how I implemented it:
  • We had an External AD (Domain B) and an internal AD (Domain A).
  • The internal domain users were using Windows Authentication. For External domain users, we needed to configure Form Based Authentication.
  • As external users would have access to the Internal farm Extended Web application only (no other resources should be available), SQL with FBA was not appropriate for the above requirement.

Farm Design

  • Two Zones (Default, Internet)
  • Default Zone – Windows Authentication Internal ADDS
  • Internet Zone – FBA with External ADDS.
  • 3-tier Architecture.


Figure: Farm Design

Farm Components

  • Application Server/Internal web front end (WFE) server

    Role: Acts as an application server to run and manage multiple service applications. In the current farm structure, Application Server was also configured as internal Web Front End.
  • External web front end server

    Role: Handles web page requests from External users.
  • SQL Server
    Role: Stores content and configuration databases for all the sites and service application.
  • Internal ADDS(Domain A)

    Role: Active Directory for the internal users.
  • External ADDS(Domain B)

    Role: Active Directory for the External users.

As you can see in the above diagram, all the farm components except External ADDS were in Domain A which was created on Internal ADDS.

Now we needed to configure the Web application for FBA authentication.
  • Using Central Administration, we created a web application with windows authentication enabled in default zone.
  • As the next step, I needed to extend the web application to the internet zone. Once the Web application was extended, I then needed to change the authentication provider for the Internet Zone from Windows to Forms Based Authentication.

Since the site was ready for external users, we proceeded with the FBA configuration!

Configuration of the FBA


Enable FBA from Central Administration

As the first step, I enabled the FBA through the following 5-step process:
  • Go to central administration and select your application
  • Click on Authentication link, you will see two zones: Default and Internet
  • In order to enable FBA, click on Internet zone and click the checkbox next to it
  • Once the FBA is enabled, you need to add the membership Provider name and Role manager name as shown in the following figure

I have used MembershipP for membership provider and RolesP for roles provider. You can provide the names as per your choice.

Note*: Please make a note of the provider names given by you as we would be using these names in the Connection string for external ADDS.


Figure: Farm Design

Great! You have successfully enabled FBA on the internet zone! Now you need to check the accessibility of Domain B from External WFE.

To check this,
  1. Go to the external WFE and open the command prompt
  2. Try to ping the external ADDS
  3. If you get a reply from Domain B, you are just a few steps away from completing the configuration!

Note*: In this configuration, we are going to make some changes in the web.config file of our web application on Application server and Web front end server.

A recommended practice is to take a backup of the original web.config file before making any changes in it so that they can be reverted, if needed.

Changes to Web.config File on the WFE Server

Follow the steps listed below to make changes in the web.config file on the WFE Server. You need to be very careful with the following changes, as even a single comma or space in the web.config can create problems.

Step 1

  • On Web Front End Server, Open IIS site - > Right Click on the extended Web application and Click on Explore
  • Open the web.config file of our web application and search for <membership> tag
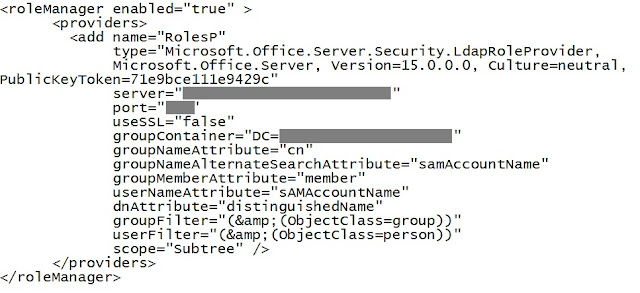
  • Add membership provider and role manager connection strings as shown below:


  • Now, search the PeoplePickerWildCards tag and add the below entry so that People Picker is able to find other domain users


  • Save and close the web.config file

Step 2

  • Open the web.config file of Security Token Service application
  • Add membership provider and roles manager connection string as shown below:


Done! We have completed the web.config changes on WFE Server.

Changes to Web.config File on Application Server

Follow the steps listed below to make changes in web.config file on Application Server.
  • Go to application server and open the web.config file of Central Administration application
  • Add membership provider and roles manager in the web.config file


  • Now, search the <PeoplePickerWildCards> tag and add the entry as shown below:


Note : The provider’s connection string should match as shown in the image above

The configurations are now complete.

Now cross your fingers and start the testing ☺

Testing

  • Go to the WFE server and browse your web application
  • For multiple authentication, a dropdown is displayed to select the authentication type for login as shown below:


  • Select Forms authentication and enter Domain B user’s credentials

You might get a message that the Site is not shared with you, which means that the Domain B\user has been successfully authenticated but the user does not have the permissions to access the site.

In this case, the Site Administrator can add the external users (Domain B\user) to the site by using Central Administration.
  • Go to Central Administration and select your web application
  • Click on User Policy from the top ribbon and Add the Users


And…we are done! I hope next time you need FBA, you won’t need to tear out your hair in despair! ☺


Written by Shrikant Mane,  SharePoint Champion at Eternus Solutions
Read More »

Friday, 24 July 2015

What Nobody Tells You About Outsourcing


“We have outsourced before and did not like the quality of the deliverables, hence we will no longer outsource!”

“Any outsourced work item almost takes twice the number of hours otherwise taken by my in-house team. Cost-effective Outsourcing is a myth.”

These are common statements I hear when I initiate a conversation with my overseas prospects. Over the years, I have realized that there are a lot of myths about Outsourcing. A lot of people who could otherwise benefit a great deal from outsourcing refrain from it, only because of a lack of knowledge around outsourcing.

Outsourcing is a piece of Cake!

Suppose you went to a bakery and bought a chocolate cake which did not quite turn out to taste like you expected it to. Would you stop buying cake altogether or would you search for a different bakery?

Often, companies refrain from outsourcing because of a past bad experience with their service provider. Well, outsourcing is a tad different from a cake and one bad experience doesn’t make outsourcing a taboo!

Having said that, I wouldn’t agree with those either, who say everyone should outsource. So the pertinent question is…

Who should outsource?

Let’s go back to my example. You have to throw a birthday party, make arrangements for guests, put the decorations on, buy gifts… you know the routine. Now with so many things going on, you obviously won’t have the time to bake a cake or even if you do plan on baking it yourself, you would have to hunt for the right ingredients to go in it. Solution? Voila! A Bakery! Not only do you get the options in the flavours and sizes but also you save a lot of time, energy and money by just buying the cake off a bakery.

Similarly, companies who are in a completely different business line, cannot look to hire resources for their IT needs and then keep them on bench. That would not only cost them a lot but their focus would waver time and again to manage the operational cost of those needs. Whereas, in an outsource/offshore company, one can find a pool of resources having expertise on various technologies. Talk about going to a one-stop shop to get all your needs sorted! Doesn’t that sound wonderful?

When should IT Companies outsource?

I explained who should ideally outsource their work. But that does not imply that IT companies themselves cannot outsource to get the work done. I am sure most of us have faced at least one of the following situations:
  • When you don't have a particular skill required to get the job done:
    How many times have we faced this? I bet a lot! Sometimes a project comes in with requirements that fit your expertise, except for maybe one teeny tiny part that is out of your expertise and therefore you are forced to let go of that project with a heavy heart.
  • When projects are coming in but you are understaffed:
    Similar to the previous situation, if you don’t have the resources to work, you again end up letting go of the project. Doesn’t situations like these make you wish you had more resources or skills sets available on hand? Of course it does, BUT let’s not forget, YOU would be the one paying for the infrastructure and salary cost for them, and if they are on bench, well, you are staring at huge overheads.

    Often business owners face a situation where they are at crossroads to decide whether to hire a new resource or outsource. Because humans are hard wired to play it safe, most of us would go with the former option and hire someone. And as I quote Mark Zuckerberg “The biggest risk is not taking any risk. In a world that’s changing really quickly, the only strategy that’s guaranteed to fail is not taking risks”, the ball is in your court!

Why should you Outsource?

IT or non-IT, all organizations are set to reap some serious benefits if they choose to outsource.
  • Focus on Your Core Business: Once you have a trusted, dedicated outsourcing team managing your IT needs, all you need to do is to get a daily or a weekly update from them. This would ensure you spend your time and energy focussing on your core business, therefore positively impacting your top line.
  • Technology Expertise: Thanks to the rapid speed with which technology keeps changing, in-house expertise is often insufficient for your growing and ever-changing needs. A good outsourcing vendor will always have expertise in Cross platform integrations, expertise on diverse frameworks and APIs, ensuring your needs are fulfilled.
  • Business Understanding: Good outsourcing companies have a clear vertical focus, ensuring that they have skilled SMEs who understand your business needs and guide you through the correct processes and operations.
  • One-stop shop: Why hunt all over the place for resources with experience in different technologies and spend resources on hiring and managing them, when you can just send the requirements to a company with all these expertise under one roof?
  • Delivery Quality focus: There’s a beautiful quote by Jim Rohn which says, “One customer well taken care of could be more valuable than $10,000 worth of advertising”. If an outsourcing company has to compete in today’s world, it has to focus on the quality of services delivered. And if a company has retained clients over the years, that itself speaks enough about the quality of work they provide.
  • Global Delivery Centre (GDC) and Savings on Infrastructure cost: Many companies are offering this as one of the engagement models for their clients where it is a win-win for both the parties. If you are looking to open a GDC, why not save a huge chunk of budget on the infrastructure cost and partner with an outsourcing vendor instead who can serve as your GDC?
  • Pay for what you use, therefore save on infrastructure & operations cost: One of the perks of using Outsourcing as a service is that you only pay for the hours of service that you utilize and it gives you the flexibility of scaling the team as per your needs. Add the factor that you do not spend on the infrastructure and it’s a win-win deal you’ve got yourself!
  • Cost benefits: You can save money by not outsourcing at all, but when you’ve got to accomplish something, outsourcing makes for a worthwhile investment. Efficient and quality delivery services reduces costs, improve your company’s effectiveness and boost your bottom line.
  •  24X7 Support: Engage with a quality outsourcing partner and ensure that your systems are take care of round the clock. You never have to lose your sleep over the maintenance and upkeep of your systems anymore!

If done in the right way and with the right partner, outsourcing can and will work wonders for the growth of your organisation.


Written by Sahebkour Kung, Account Manager at Eternus Solutions

Read More »