Thursday, 31 March 2016

10 Commandments of Force.com Programming

Howdy Force.com programmers? Programming in a multi developer ecosystem like Force.com is nothing less than a band of musicians playing in an orchestra. Different instruments produce vivid tones, but exist in harmony, churning out a beautiful melody. Similarly, keeping the originality of each developer intact, yet ensuring the code adheres to common basic protocols, is of prime importance. Adding a method to the madness is required here!

After going through multiple articles concerning the best practices around Force.com programming, I deduced that although a lot of those struck the right chord, some, however, seemed to lack practicality while writing code.

This led me to the idea of writing of this blog to share an exhaustive checklist that ensures uniformity through basic standards  and is practical to use while programming on Force.com.

I call them the "Ten Commandments of Force.com Development" and here they are....


#
Thou Shalt...
Practice
1
NOT CODE unless it is really required. Use Workflows, Approval process, Validation Rules, Roll up Summary fields, Formula fields, and Process builder etc. to accomplish the requirement.
2
Always ensure general coding sanity.
  1. Don’t hard code IDs or String values. Use custom settings, Constants (static final variables) or Custom Labels instead.
  2. Always check for nulls within code. Use String.isBlank() or  list.isEmpty().
  3. Use String.equalsIgnoreCase() instead of equality operators(== or ===).
  4. Use meaningful naming conventions for variable, class, test class, trigger and page names. e.g. (MAX_ATTEMPTS, isActive, commissionControllerTest, AccountTrigger, viewCommissions).
  5. Document your code using class and method level comments.
3
Not use SOQL statement or DML operation within loops. Always use Lists, Sets, Maps to your code. Use SOQL for loops wherever applicable.
4
Always use nested or Inner SOQL queries to fetch parents and associated child records Use selective SOQL Queries using appropriate WHERE clause, filters on indexed fields (Name, Id, Unique fields) to fetch appropriate result set optimally.
5
Ensure creating only one trigger per object Use the Trigger Handler Framework to ensure execution control, Trigger Context Variable, Recursion checks.
6
Optimize Visualforce page view state for performance. Use transient variables, minified Javascript files, Streaming API, Standard Set controllers, and remove unused variable.
7
Always ensure error logging and reporting within your code. Use try, catch or email to catch and report errors within your code.
8
Always enforce security in code. Use with sharing, FLS checks, CRUD checks, Escape URL parameters to ensure authorized access.
9
Always write unit tests based on test cases. Use Test Data creation framework along with the @isTest, test.startTest() test.stopTest(), System.assertEquals(),bulk test data, different users / Profiles, WebServiceMock, 90% code coverage and check for limit uses.
10
Always ensure modularity and reusability in code
  1. Refactor method having > 45 lines of code into smaller methods, merger multiple line of code into a single line.
  2. Remove unused variables, System.debug(), alert().

In addition to using these 10 Commandments as a guideline, Force.com programmers performing code review can use this as a tool to patrol their Force.com implementations.

Happy Coding and “May the force be with you!!”


Written by Parmanand Yadav, Salesforce Champion at Eternus Solutions
Read More »

Wednesday, 30 March 2016

Your Live Agent Adventure Begins Here..


Salesforce gives me a chance to fall in love with it again and again when I come across the splendid features it dispenses. Less did I know that I will be able set up an application that would help me interact with people from worldwide? Yes, I have done it! And even you can do it. How? The solution is LIVE AGENT.

Live Agent enables, support agents to talk to their customers in real time. It is a remarkable feature provided by Salesforce that facilitates us design WEB CHAT which is a faster and a more personal way for you to engage with your customers. So, in a nutshell, live agent helps us do our favorite act i.e CHAT!

Setting up Live Agent is a piece of cake. Following are some noteworthy points that one must consider while setting up live agent.

1) SKILLS

A skill is an ability to do something well. In Live agent, we are provided with a facility to configure skills. A skill is required so that the chats are routed to the right agent at the right time. If there are support agents who are proficient at answering technical queries related to a product, then a skill can be configured for such agents. Once we create a skill, we have an option to assign users to this skills.


2) LIVE AGENT CONFIGURATIONS

This amazing facility enables us to control the features that will be available to the agents and supervisors in the Service cloud console. Supervisors are the ‘agents’ who can monitor the ongoing chats. Features like notification sounds, supervisor management are all configured in live agent configuration. So, one can configure it as required.


3) CHAT BUTTONS AND AUTOMATED INVITATION

A chat button enables us to configure buttons which are to be placed on the site from where chats can be initiated. Every chat button has an associated skill with it and after configuring it, a button code is generated. Buttons allows us to control how to route the chats to the agents, which prechat and post chat pages must be used, what should be the agent queues lengths etc. Along with chat buttons we have another type of button “automated invites”. These are animated buttons which can popup on sites.


4) CHAT DEPLOYMENTS

When we configure a chat deployment, live agent generates a script for us which is to be included in a HTML page along with the chat button. This is the HTML code which should be hosted on the site in order to initiate chat sessions. Additionally, we can also control chat window branding and pre chat API access through chat deployments.


After we configure all the above there a challenge that, SF withholds us from adding one user to multiple live agent configurations at a time.

Consider a plot, where an agent is proficient in "Customer Service" as well as "Technical Support". Such an agent will have a mandate to be present in 2 "live agent configurations".

SF disallows this! If you assign the same user to a second live agent configuration, the system removes that user from the first live agent configuration without warning you.


HOW TO deal with this?
  1. Configure 'SKILLS' in such a way that the agent is included in both Customer Service and Technical Support
  2. Configure 'BUTTONS' for both the skills
  3.  Configure a 'LIVE AGENT CONFIGURATION' that includes the Mathematical UNION of the above skills.


Woo-hoo! That solves it!

To learn more:


https://developer.salesforce.com/docs/atlas.en-us.workbook_service_cloud.meta/workbook_service_cloud/service5_intro.htm


Written by Neha Sonawane, Salesforce Developer at Eternus Solutions
Read More »

Thursday, 10 March 2016

My Experience with the Salesforce Platform Developer I Certification

While soaking in the glory and accolades of my peers after passing the Platform Developer 1 Certification, quite a few people asked me for preparation tips. And suddenly it struck me! My experience could be of value to a lot of guys out there! Result… this blog, where I share my preparatory regime, experience and some tips (if you can call them that!) to help you appear and pass the certification exam.

Platform Developer I: a little Background

Last year, Salesforce announced changes to their Salesforce Developer Certification roadmap. The previous structure of the developer certification track was from Dev – 401 certification to Dev – 501 certification. However, from September 2015, Salesforce no longer offers Dev – 501 credentials to new applicants. The new certification structure enables an individual to advance through the Salesforce track in a step - by - step manner, from the Dev – 401 certification to Developer I (Programmatic) & Developer II (Advanced Programmatic) certification.


Former Structure

New Structure


Note: There are no changes in the syllabus; Salesforce has simply split the entire syllabus into two parts:
  • Platform developer 1 exam (Basic apex concepts)
  • Platform developer 2 exam (Advanced apex concepts)

Exam Format

You will find a lot of similarities here with the 401 exam but a little more time! ☺
  • 60 multiple-choice questions  
  • 105 minutes allotted to complete the exam (i.e. you have a little less than 2 minutes per question!)
  • The passing score is 68%, meaning you have to get at least 41 correct answers out of 60, which in turn leaves you with a margin of getting up to 19 questions wrong! Trust me, this was one of the most comforting factors!)
  • Registration fee: USD 200; Retake fee: USD 100
  • Delivery Option: Proctored exam delivered onsite at a testing center or in an online proctored environment, as mandated by Salesforce
  • Result: Provided immediately upon submission of exam as an on-screen text and by email.

Preparation

The Salesforce Certified Platform Developer I credential is for individuals who have knowledge, skills, and experience of building custom applications on the Force.com platform. This credential covers the fundamental programmatic capabilities of the Force.com platform to develop custom business logic and interfaces to extend Salesforce using Apex and Visualforce.

Anyone who's been working on the Salesforce platform for a while and has substantial experience on the OOTB (Out of the box) as well as custom development areas, can easily clear this exam by just revising the topics listed in the certification guide.


Topics

The questions are pretty much taken from the topics listed in the certification guide and the % of questions from the topics are similar to what is mentioned in the guide.

Sr. No.

Topics

Weightage (%) as per Salesforce Guidelines *

Weightage as per My Experience

1

Multi-tenant environment

3

Low

2

MVC architecture

3

Low

3

AppExchange

3

Low

4

Data Model & Management

12

Medium

5

Logic and Process automation

46

High

6

Visualforce (User Interface)

6

High

7

Lightning

4

Low

8

Testing

12

Medium

9

Debug & Deployment

10

High


Multitenant Environment

Tips:
  • Read benefits & constraints of sharing a single instance with multiple clients, and how enforcing limits helps to share the resources between the clients
Topic Content:
  • Benefits & constraints of sharing a single instance with multiple clients

MVC Architecture

Tips:
  • Questions simply ask which part of the Salesforce platform is related to Model / View / Controller
Topic Content:
  • Model / View / Controller architecture concepts

AppExchange

Tips:
  • A thorough understanding of managed and unmanaged packages, along with their usage covers most of the bases for this topic.
Topic Content:
  • Uses of managed package vs unmanaged package

Data Model & Management

Tips:
  • Questions were scenario based but quite simple. Concentrate more on object relationships (i.e. Master-Detail / Lookup) and different scenarios around them.
Topic Content:
  • Lookup and master detail relationships and security information
  • Usage of External ID fields
  • Import / Export data concepts
  • Operation (Create / Delete) of Schema builder
  • Evaluate the impact of schema design and its modifications, on Apex development

Logic and Process Automation

Tips:
  • Almost all questions will be scenario based or code snippet based!
  • Save execution order of apex triggers (Very very important!!). Questions will be tricky.
Topic Content:
  • With sharing and without sharing concepts (Container class / Inner class)
  • Container class, inner class and interfaces
  • Describe call information
  • Representation of picklist, multi-select picklist values in Apex
  • Exception handling
  • Sharing setting information with Anonymous block execution
  • Use of collections – List, Set, Map
  • Best practices of development, such as avoiding queries inside a loop; and avoiding DML operations inside a loop
  • Usage of normal DML operations/Database DML operations
  • Error handling concepts
  • SOQL and SOSL -  return type of both queries
  • DML statements and associated query limits
  • Workflow rules, validation rule, roll-up summary field, formula field, process builder (Note:  Using process builder, we have the ability to update child records!)

Visualforce (User Interface)

Tips:
  • Force.com page execution life cycle: basic questions would be there around what executes first
Topic Content:
  • Visualforce email template tags
  • Usage of standard controller, standard set controller, custom controller, custom extension and sharing information
  • Usage of Controller constructor or component constructor
  • Usage of Controller constructor or Apex: page action method
  • Merge fields, data binding between your VF page and Controller properties and methods
  • Usage of custom setting

Lightning

Tips:
  • If you have completed your trailhead badges on basic lightning experience, you are good to go! If not, well, what are you waiting for?
Topic Content:
  • Controller logic
  • Resource bundle
  • Benefits of lightning components

Testing

Tips:
  • Scenario and code snippet based questions
  • Best practices of test code development
Topic Content:
  • Considerations for test code development while carrying out production deployment of apex code
  • Test code for an inbound email handler class
  • Access modifiers of test classes, importance of @istest, @istestvisible, startTest and stopTest methods
  • Creating & Accessing Pricebook and product data in test methods
  • Process to store test data and load them in test method for bulk testing
  • Different places to run test classes and check their results

Debug & Deployment

Topic Content:
  • Usage of Sandbox and different types of Sandbox
  • Different ways for Deployment
  • Go through the log filters, know how to set the filters on apex classes & triggers
  • Usage of checkpoint window and debug log tab in Developer console
  • Possible source & destination in a change-set, deploy / rollback in a change-set, deployment connections

Important Reference Links


There are both scenario based questions as well as code snippet based questions. Most of the code snippet based questions were fairly straightforward without much twists.

Pro Tip: If you get stuck, try to reverse engineer from the answers available and match it back to the flow of code to see which option is the right fit for the given code.

Out of 105 minutes, it took me close to 75 minutes to complete all the 60 questions. I took 15 minutes to revise all the answers, ensured I didn't leave any question unanswered, and focused on the questions I had marked for review. Please make full use of the time available to review and confirm your correct answer.


What’s Next?


This exam is prerequisite to the Salesforce Certified Platform Developer 2 exam so I have already started my preparation for that! Be assured folks, I am going to keep you posted!

ALL THE BEST :)


Written by Yogesh Sharma, Salesforce Developer at Eternus Solutions
Read More »

Thursday, 29 October 2015

“A commit in Time, Saves Hours Nine!”


“Version Control”


The ultimate boon for software engineers! Why? Suppose you have a demo scheduled with your client. You are a hardworking programmer, just like me, and you successfully complete the functionality well in time for the demo. Everything is fine, dandy! Until you decide to play with the code, doing a code review yourself, beautifying and rectifying the bugs within. Minutes before the demo and you finish the code review fixes as well; kudos, good going mate!!! Now you get a cup of coffee and rehearse the demo, already playing how smoothly it would go. Here comes your worst nightmare live in action, the code has broken! In reality, the rectification process ended up being a disaster and that too minutes before the demo! Say goodbye to coffee and peace, you will be left scratching your head to find out what went wrong! Safe to say that your client ain’t going to be too gung-ho about it!

This is where Version Control comes to your rescue, like a knight in shining armor, just like those superhero movies! With version control, incremental versions of the files are stored, so that in times of desperate measures such as this, you can quickly switch to one of the previous versions and turn everything back to normal; almost like a piece of magic!!! And the magic does not stop here. With advanced version control tools such as Github, BitBucket and Apache Subversion (SVN), you can even sync your local files with the cloud so that you can quickly access them even if you are on the go or do not have access to your machine. Amazing, isn’t it?

One of the most popular methods of version control is Github. In a few simple steps, I’ll show you how you can set-up version control using Github and say goodbye to all last minute glitches.

What you need

  1. A Github account, which you can create for free at https://github.com/join
  2.  Git shell which you can download and install on your machine from https://git-scm.com/downloads

Let’s get it rolling!

Step 1: Initializing a Repository

A repository or simply a repo is a common storage place for all the documents in the version control system. It maintains the version for every file that you have added to it.

To initialize the repository, you need to use the git init command.


This would initialize an empty repository in the folder you are currently working on.

Step 2: Adding files to the Repository

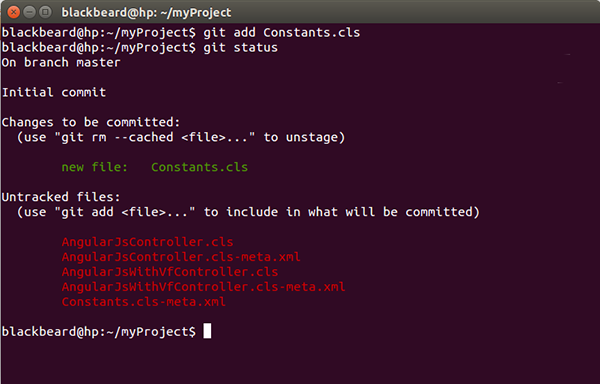
The next step is to add the files to the repository in order to maintain versions. It is necessary to specify the files whose versions you need to maintain to git. You need to use the git add * command for the same. The ‘*’ specifies that every file in the current folder is to be added to the repo. You can also mention the names of the files that you want to keep a track of. Suppose you want to track the file Constants.cls only, the command would now need to say git add Constants.cls

You can also view the status of the files in the repo by running the git status command.


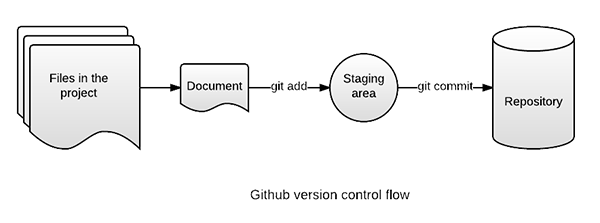
Github has its own way of recording the changes to the files. Once you have added the files to track, it stores the files in a staging area where all the changes to the file are recorded as snapshots.
Now that you have successfully added files to your repository, the version control system is up and running and already has started tracking the changes you save to your files.

Step 3: Committing the changes

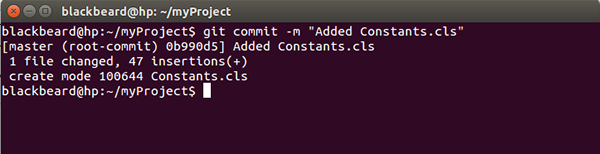
What is the use of only tracking the changes to the file and not saving them? Committing the changes ensures that every change that you did prior to the commit has been recorded and stored on the version control system.

If you are likely to make mistakes, committing your files is the way to stay safe.

git commit -m <commit_message> command does the trick for you. The arguments -m <commit_message> are used to record the commit messages. Commit messages are a way to document the changes done in the current version of the files.


As a cardinal rule, it is always a good practice to add meaningful commit messages. In case you need to revert back to a previous version of the file, it’s a lot easier to identify the version from its commit message.


What next?

Now that you have set-up version control using Github, you can have that cup of coffee even if the recent changes affect your code negatively. The only thing that you need is to revert back to the commit where everything was working as expected. In order to do that, git checkout -- <file_name> is the command for you. This would return the specified file to the previous version and discard all the uncommitted changes.

But it all comes at a cost…

  • Though Github allows you to create a free repo, it remains public; which means anyone can view your files and their revisions when stored on the server. But worry not, if you want a private repository, you can just purchase it. Or you can also switch to other service providers such as BitBucket, which allows you to create a private repo with a single user.
  • Uncommitted changes once lost, are lost forever
  • Storing large amount of data on the cloud is not very efficient as it takes a lot of data and resources to publish a file or to download it
  • As the number of users increase for your private repo, the cost also increases

It doesn’t stop right here though…

There is a lot more to explore in the git world, such as branches, pulls, merging, pull requests etc. Things that make software development a lot easier and collaborative. You can find the online tutorials at https://guides.github.com and make software development easier and more collaborative for yourself and those around you!

But make sure you commit your files before you get started with those tutorials, because you know it too well now “A commit in time, saves hours nine!!!”

References


Written by Saket Joshi, Salesforce Developer at Eternus Solutions
Read More »

Friday, 23 October 2015

What Dreamforce 2015 taught me about Sales Productivity: Part 2

In my previous post, I talked about how Dreamforce laid great stress on Social Selling, Sales Enablement and Accurate Forecasting. Well, that wasn’t all. Salesforce also laid emphasis on the significance of a healthy pipeline, sales coaching, setting the right goals and most importantly, prioritization, as the key focus areas for achieving greater sales productivity.

Do NOT Sideline your Pipeline

A healthy Sales pipeline is the key to your Sales performance. Not only does it signify that you have a healthy sales process that is obviously reaping benefits for you, it clearly translates into more revenue. A large number of Dreamforce sessions reiterated on spending more time in refining your pipeline that has more qualified prospects than suspects, and training your Sales team to achieve the same. However, it’s easier said than done!

Gartner reports have listed ‘healthy pipeline’ to be the second most important thing that Sales Leaders desperately need and do not get. The truth is, a lot of sales reps start out not being good at pipeline refinement and management but only the best ones master the art. So what’s the key to pipeline management?

Clichéd as it sounds, the key to a dream pipeline is an effective sales process in place. Statistics show that a dedicated sales process leads to as much as 18% increase in revenue growth through effective sales pipelines. Trained Sales reps are another big contributor towards a favorable pipeline (covered at length in subsequent sections), leading to 9-24% increase in annual revenue growth. Bottom line: revere thy pipeline and hold it in good stead!

Sales Coaching

Dreamforce revealed that the key to sales productivity is in pipeline management. But that does not happen on its own accord; you need to train your sales reps for that. Which brings me to the next pertinent aspect of sales productivity: sales coaching.

Sales reps need to be constantly coached with the right content that would help them close deals faster. This is achieved through a three-pronged process: Identification of ‘coachable’ activities, defining and detailing the coaching methodology and establishing a coaching rhythm that brings the best out of your sales reps.

Sales Coaching involves three key aspects that lead to setting the right goals:
  • Breakdown of sales goals and how they will be measured
  • Focus on the critical activities that lead to success
  •  Focus on fewer goals done well rather than too many goals done poorly

Statistics reveal that organizations have seen up to 80% increase in revenue when sales reps are coached the right way. Dreamforce sessions certainly got this one right!

You need PRIORITY and NOT more time

The final yet the foremost thing that Dreamforce taught me! Any sales guy who tells you he wishes he had 48 hours in a day clearly isn’t on top of his game. The smartest of sales people are the ones who prioritize their prospects and deals, who know how to spend more time with the prospects that are more likely to give them business and Dreamforce could not have laid more emphasis on this fact. A lot of sessions in Dreamforce were targeted at increasing sales productivity through prioritization, and how spending more time with fewer prospects actually holds the key to productivity.

Your time is precious, and as a sales rep, even more so. Identify the prospects who are ‘mobilizers’ and engage with them through commercial insights, instead of mere leadership perspective. Take them through the stages of a verified and validated pipeline and monitor their progress. You will find that they are likely to give you more business than the ones who did not qualify.

Transforming your Sales Productivity: Where do you begin?

In a pyramid of sales productivity, your sales reps form the base. Only ones the sales reps are efficient and effective can they translate and provide value to their teams, organizations and customers, in that order. Therefore, for any organization that is looking to enhance the productivity of its Sales team needs to start at the base: with their sales reps, coaching and enabling them to achieve their targets. Once your army is ready and raring to go, it’s only a matter of time that the world will be at your feet!


Written by Nupur Singh, Pre-Sales & Marketing Expert at Eternus Solutions
Read More »

Monday, 19 October 2015

Development Environment with Continuous Integration

Have you ever had to work on the same Apex class or Visualforce page as the guy sitting beside you and wait for him to finish his work? Does your team often work on the same development cycle across multiple instances? Would it help if you could find out bugs before you signed off the build for testing? If the answer to any of these questions is a ‘yes’, Continuous Integration aka CI is the thing for you!

CI: The Evolution…

Originally developed by the Salesforce Foundation to support the Non-profit Starter Pack 3.0, CI is currently being used for Salesforce Foundation’s Cumulus project. It is also available as an open source software to reuse in your own managed package development efforts.

Prerequisites to using CI

Before you can begin using CI, you need to ensure that you have checked all items off the following checklist:
  1. Install Eclipse and Setup the environment variables for Cumulus CI
  2. Download Ant, which allows for easy command-line deployment, and follow steps given at http://www.salesforce.com/us/developer/docs/daas/Content/forcemigrationtool_install.htm to install the Force.com Migration Tool.  Migration tool is a Java/Ant-based command-line utility, which helps ANT based migration by executing Ant scripts.
  3. Create your local development org by visiting https://developer.salesforce.com. It is recommended that you populate some test data.
  4. Download Git, which is the most powerful source code repository and widely accepted amongst the developer communities
  5. Installing the Source tree is optional.  A Source tree provides UI for operations such as Pull, Push, Merge and Commit, instead of using commands.
  6. Install Jenkins on your local machine by downloading the Java Web Archive (.war). Go to the directory where you have downloaded the file and execute java -jar jenkins.war command. If you open http://localhost:8080/ URL in your browser, you can see Jenkins is running on your local machine.

CI: Coding Intelligently!

CI works on the principle of constant flow of development changes and unit testing, in order to detect conflicts and errors within the development cycle itself. The diagram below gives more clarity on this:

  1. As a developer, you need to create a feature branch and pull the master branch in this local development org to get the most recent version of the code, including the changes done by any other developer of your team
  2. Once you are ready to submit the new code version, including your changes, you need to commit those changes and push the branch into Git
  3. Once the changes are committed, Jenkins will launch the build process
  4. The CI server will get the code from the repository and unit testing will be executed by the CI server to find out test class methods, if any
  5. The files will then be packaged into distributable units and deployed onto the test server. Automated functional tests will be executed to validate the package and its basic functionality.
  6. User acceptance testing will be done by CI by deploying the same package on the testing environment. The same package will be deployed on the production server once the acceptance tests are successful.
  7. After running all the tests, the results will be sent back to the developer. If there are any failures, the developer can fix them, commit those changes, and push the same branch into Git.
  8. Your QA team can take the pull of that branch and test it. If any code changes are required, you will need to follow the same process starting from pull till push.
  9. The entire development is done within the feature branch. Once the development is complete, feature branches are merged into the master branch and all other branches can then be destroyed.
  10. A Master branch is a single, persistent branch maintained in the repository to avoid any ambiguity. Once you create a pull request, any commits that you make to your branch requesting to merge, are also included in the pull request. You can use comments on pull requests to explain the issue or solution in brief.
  11. The entire development is done in feature branches (e.g feature/<BranchName>) and all releases are managed through Git tags (e.g uat/1.0-beta3 or prod/1.0).

Benefits of using CI

  1. The quality of a release can be improved significantly by identifying and resolving issues in the earlier stages of the development lifecycle
  2. CI helps developers to run automated tests and also in ensuring the required code coverage. It is helpful for a developer to find out the issues and bugs during unit testing which he may have overlooked during development.
  3. CI process helps to resolve shared development issues. Multiple developers can update the same metadata at same time within the development organization, without any worries.

There you go! You are all set for development using Continuous Integration. In case you need more information, you can also refer to the following links:

  1. CumulusCI Introduction
  2. How To Use Git, GitHub and the Force.com IDE with Open Source Labs Apps 


Written by Jyoti Chouthai, Salesforce Lead Developer at Eternus Solutions
Read More »

Monday, 12 October 2015

What Dreamforce 2015 taught me about Sales Productivity: Part 1

It’s been a while that Dreamforce 2015 concluded but the delirium lives on! There’s still so much buzz around the different products and services Salesforce introduced over the 4-day event. However, a CRM no matter how extensive and useful comes into play only when you have a great customer base and an extremely healthy pipeline. Add to that the fact that Salesforce recently posted revenues upwards of USD 5 billion, the first time they touched that number! Therefore, I was hoping that Dreamforce 2015 would cover sessions and trainings around Sales Productivity, as who better to teach you about Sales productivity than the elite member of the 5 billion club? Much to my pleasure, Dreamforce covered Sales Productivity at length and I learnt a great deal of new things!

Social is the new selling wand!


Here’s where you would expect me to write something like ‘Move over traditional sales, social selling is the way to go!’ Well, that ain’t happening! Fact is, social selling has always been there, much before you and I, much before cloud computing, Facebook, internet, anything that you can think of! Confused? Haven’t you always purchased groceries from the pleasant guy next block? Did you purchase your first bike from the guy recommended by your friend? Isn’t your dentist the one your colleague recommended you? These are all examples of social selling! You ask your peers and friends for recommendations, and don’t shy away from dishing feedback.

Same applies for selling anything using Social Media. The opportunities are simply enormous! Thanks to the networked markets, people know more about your products and services than some of your own folks. Use it to your advantage. Reach out to people over Twitter and LinkedIn, engage them in a conversation and help them know how you can solve their problems. Gain real time insight into what your customers are discussing online. You’ll be able to understand their needs (both individually and more broadly across the market). Build relationships and trust, and you’ll be able to engage them with useful, timely information to help.


Image Courtesy www.wsi-digimedia-marketing.com


Investment in Sales Enablement pays big time!


Your people are your assets! By that definition, your sales people are your most valuable assets. Therefore it is logical to invest in their enablement, helping them adapt to the ever-changing world of sales. Educate your sales teams to deliver the right message at the right time to prospects. When sales people are on message, they convert leads and close opportunities faster.

Invest time and money on their skill growth, so that they are aligned to the customers’ needs rather than focused on Why Choose Us. Encourage open communication and easy integration between team members and integrate this Sales Enablement process across the organization, ensuring a team approach towards right sale to the right client. Remember, successful Sales Enablement is 10% tactical and strategic contribution and 90% alignment towards a common agenda.


Image Courtesy: Salesforce.com

Accurate Forecasts is a must


I cannot possibly stress enough on the significance of Accurate Forecasting. However, a lot of sales people lay great stress on the accuracy of a forecast, often without realizing or finding where they are wrong. The trick is to break the forecasts into a series of assumptions that can be referred to later. But if you have ever been a Sales guy, you know this is easier said than done. So how do you make accurate forecasts?

The foremost thing to do is to enable your Sales reps with technology. Let technology do the numbers for them, find insights that they can use to engage prospects in meaningful conversations and guide them through the lifecycle. Use a software or an application that comes with an audit trail, so that you can note any changes to the deal value, customer or probability of cracking the deal and take necessary actions. Bottom line, let your sales people do sales and leave the data and accounting to your technology.

Accurate Forecasting is an art mastered with practice, one that needs your people trained to yield the desired results. Train them to identify the signs that help them identify a good deal from a bad one, enable them to focus on pipeline exceptions and analyze the cause behind them to take corrective action wherever required, and teach them how to constantly refine their forecasts.

With great power comes great responsibility and it is no different for your sales people. Let them know what is expected of them, give them complete autonomy but also make them accountable. Set aside time to review the forecasts, discuss action items for any exceptions and plan the way ahead. Reviewing the numbers together gives multiple views around the same potential problem, enabling the team to find a solution that is most suitable.

It is important to understand and acknowledge that Sales productivity is actually a series of keys that unlock the big prize that Sales productivity is. In my next blog, I will talk about how setting the right goals, sales coaching, a healthy pipeline and prioritizing go a long way towards enhancing the Sales productivity. Till then, happy selling!


What Dreamforce 2015 taught me about Sales Productivity: Part 2


Written by Nupur Singh, Pre-Sales & Marketing Expert at Eternus Solutions
Read More »