As a Sales Rep or a Strategic Account Manager, I am sure you have felt the need to understand who are your most popular Customers or Opportunities. This information is invaluable and opens up a heap of avenues which can be leveraged to build a better strategy in nurturing the relationship with them, thus resulting in a mutually rewarding situation. In this blog series, I will help you track your most popular Accounts based on page views and hence get a little more out of your Salesforce CRM. We would leverage Google Analytics in conjunction with your Salesforce org to accomplish our goal. However, before we jump hoops, I will first demonstrate how to configure your Google account and Salesforce orgs for achieving the same. In this first part, I will explain the configurations you need to make to your Google account, while subsequent posts will explain the configurations you need to make to your Salesforce org to track your most popular accounts.
Prerequisite: a Google Analytics account
Before we begin, you need to create a new free Google Analytics account. Visit http://www.google.com/analytics/ for the same. You can also use an existing analytics account, if you have one.

Setting up a property in the Google Analytics account
Once your Google Analytics account is ready, you need to create a new Property to generate a Google Analytics tracking ID and tracking code.
You will need to specify a Property Name and Default URL for the property.
Make sure you use the https:// protocol for your URL. The URL should be in the same format as your Salesforce login URL i.e. https://{yourServerName}.salesforce.com
You will need to specify a Property Name and Default URL for the property.
Make sure you use the https:// protocol for your URL. The URL should be in the same format as your Salesforce login URL i.e. https://{yourServerName}.salesforce.com
Creating a New Property
To create a new property, simply follow the steps given below:
- Go to the Google Analytics Admin section and click on Create new property.

- Once you click on Create new property, a property settings page opens. Fill the required details as shown below

- Once you click on Get Tracking ID, you will be redirected to the Tracking Info page where you will get your Tracking ID in the UA-xxxxxxxx-X format along with the Tracking Code script.

We are going to use this tracking ID and code in our Salesforce org or site.
Creating a Salesforce Account
In the highly unlikely scenario that you do not have a Salesforce developer org already, you can create a new one by visiting https://developer.salesforce.com/signup
Creating a Static Resource File
- For creating a Static Resource file, we need to create a JavaScript file with the generated Google Analytics tracking code and tracking ID. This file will be uploaded as a Static Resource on your Salesforce org.
Once you have uploaded it on your Salesforce org, you can reference it as and when you need it through a custom home page narrow sidebar component, which I will show in subsequent sections of the blog. - Copy and paste the JavaScript code given below on a file on your local machine named GoogleAnalytics.js.
- Replace the tracking ID UA-xxxxxxxx-X on line 7 with your Google Analytics tracking ID. Remember to exclude your JavaScript start and end tags, i.e. <script> or </script>.

- Upload the GoogleAnalytics.js file to Salesforce
by going to Setup | Build | Develop | Static Resources

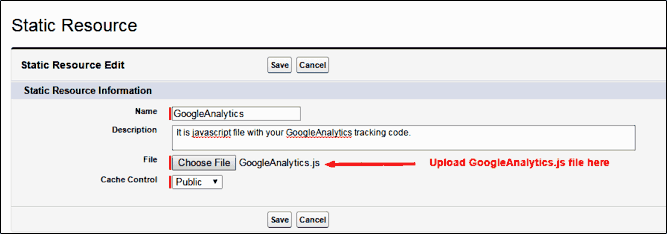
- Click on the New button
- Name the static resource as GoogleAnalytics
- Click Browse and select the JavaScript file that you created recently
- Set Cache Control to Public
- Click on Save
Salesforce has a limitation that Custom Link Home Page components do not have access to the $Resource merge fields, so you need to know the actual URL of the JavaScript file that you uploaded (for more information on this, see https://success.salesforce.com/ideaView?id=08730000000KRuxAAG). - Click on View file on the Static Resource page and copy the relative path from the browser (it would be in a format like: /resource/1428508522000/GoogleAnalytics.js). The numerical part in the URL is actually a date timestamp that Salesforce uses for caching purposes.

Note: If you want to see the JavaScript file and the relative path URL, you simply need to click on View file.
In the next part of this blog, I will explain the required configuration that you need to do to your Salesforce org, which includes creating home page custom link and component, adding the component to the home page layout and showing the custom sidebar components on all the pages. Till then, keep your Google Analytics account ready!
Analyzing Salesforce data with Google Analytics: Part 2
Written by Arun Kumar Bharati, Salesforce Developer at Eternus Solutions
This comment has been removed by the author.
ReplyDelete@ Arun : Such a great depiction of the process, Waiting for the part 2, could u plz tell when part 2 will be available ?
ReplyDeleteThank you
Thank you for showing your interest in this blog. The next part of this blog series will be published very soon.
DeleteSocial Media icons are very important for a website .Mostly In two ways one is seo and other is design. your top followers instagram
ReplyDeleteSEO Company in Chennai