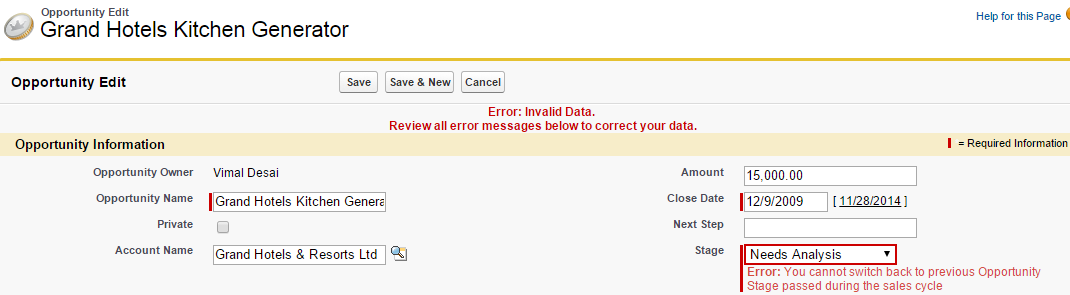
As a programmer, one of the most common problems I face during data migration is the diverse forms that data comes in, rendering import of that data into SQL Server quite a cumbersome task! In fact, last week itself I was working on data import from as much as five different sources, all in their own disparate formats! Importing data through code was killing my project!!! That’s when I came up with the idea of OPENROWSET method through stored procedure in SQL Server. Now I can import tons of data using OPENROWSET method within a fraction of seconds!
Let me show you how to easily import data from Excel files, .xls or .xlsx into SQL, using a stored procedure.
Once we have all this, we need to prepare the environment for data import.
Note that there are two versions of this package: AccessDatabaseEngine.exe for x86 platform and AccessDatabaseEngine_x64.exe for x64 platform, so choose a version suitable to your platform.
To enable Ad Hoc Distributed Queries configuration I used the following query.
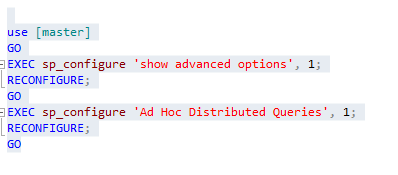
Ad hoc distributed queries configuration will be effective only after the execution of the reconfigure command, as shown above.
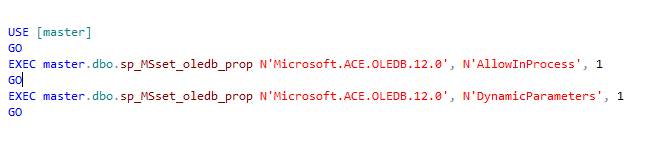
In order to get permission required to use the OLEDB Drivers, link stored procedure with Microsoft.ACE.OLEDB.12.0 provider in SQL Server using AllowInProcess & Dynamic parameters. I used the following query.
To perform other tasks for data manipulation, you should ideally always load the data into the database. You can insert data on existing table or else you can create new table.
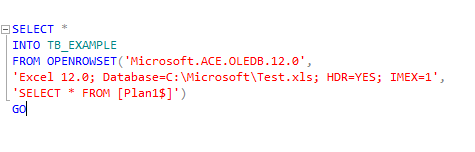
I used the following query to use OPENROWSET method
It's also important to check if the SQL Server Service user has access to the Windows directory where the Excel files are stored.
1. As the first step, you need to pass three parameters to the stored procedure:
2. Once the above parameters are passed, you need to provide the following validation for table and excel Sheet:
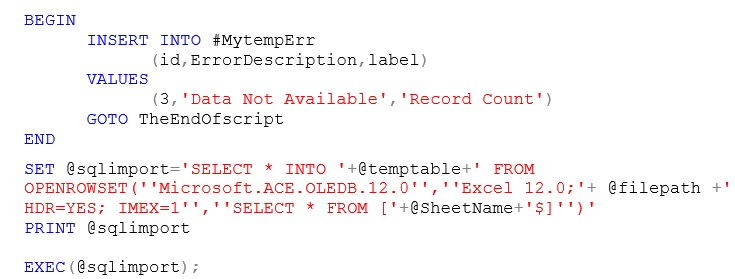
3. Once you have provided the validations, you then need to read the count of records from Excel sheet and store it into a variable. If the count is zero, you need to raise an error message in excel sheet that says Data Not Available; if the data is available, you need to read the data from the excel sheet and insert it into a temporary table, as shown below:
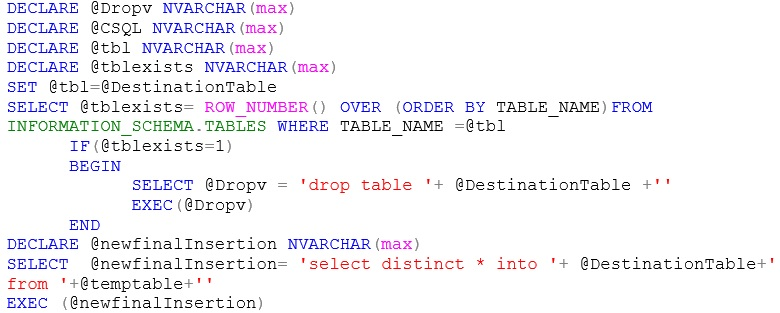
4. If the physical table exists, you need to drop the existing table and insert the records of the temporary table (excel sheet) into the physical table. Alternatively, if the physical table does not exist, you need to directly create and insert the data from the excel sheet into the physical table, as shown here:
5. Once this is done, you need to get the count of successfully inserted records into the physical table. In order to show the message, use the code given below.
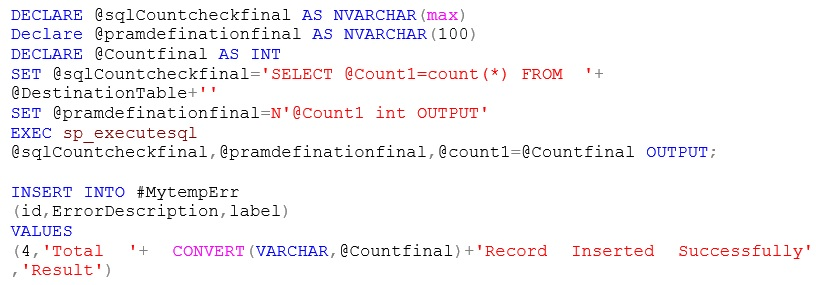
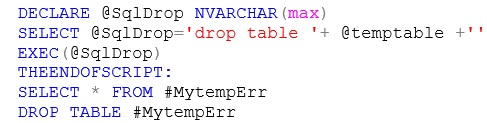
6. After getting the count into the physical table, you need to drop the temporary table. You can use the following sample code for the same.
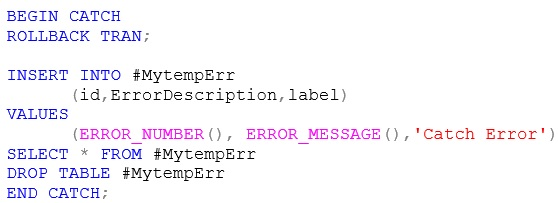
7. In this example, I have used Transaction within my stored procedure. The data can be rolled back in case of any error. Each transaction lasts until either it completes without errors and COMMIT TRANSACTION is issued to make the modifications a permanent part of the database, or errors are encountered and all modifications are erased with a ROLLBACK TRANSACTION statement.

8. In order to conclude this process, you need to handle all errors within the Catch block and store the errors into the error table, as shown below
Reference: Importing an Excel Spreadsheet into a SQL Server Database
Let me show you how to easily import data from Excel files, .xls or .xlsx into SQL, using a stored procedure.
T-1: Prerequisites for Data Import
For this data import, we need to:- Create an Excel file to import sample data
- Configure Windows Server, installing the necessary components
- Configure the necessary permissions to the SQL instance from where we need to obtain data files
- Stored procedure to read excel sheet and import data into the table with validations
Once we have all this, we need to prepare the environment for data import.
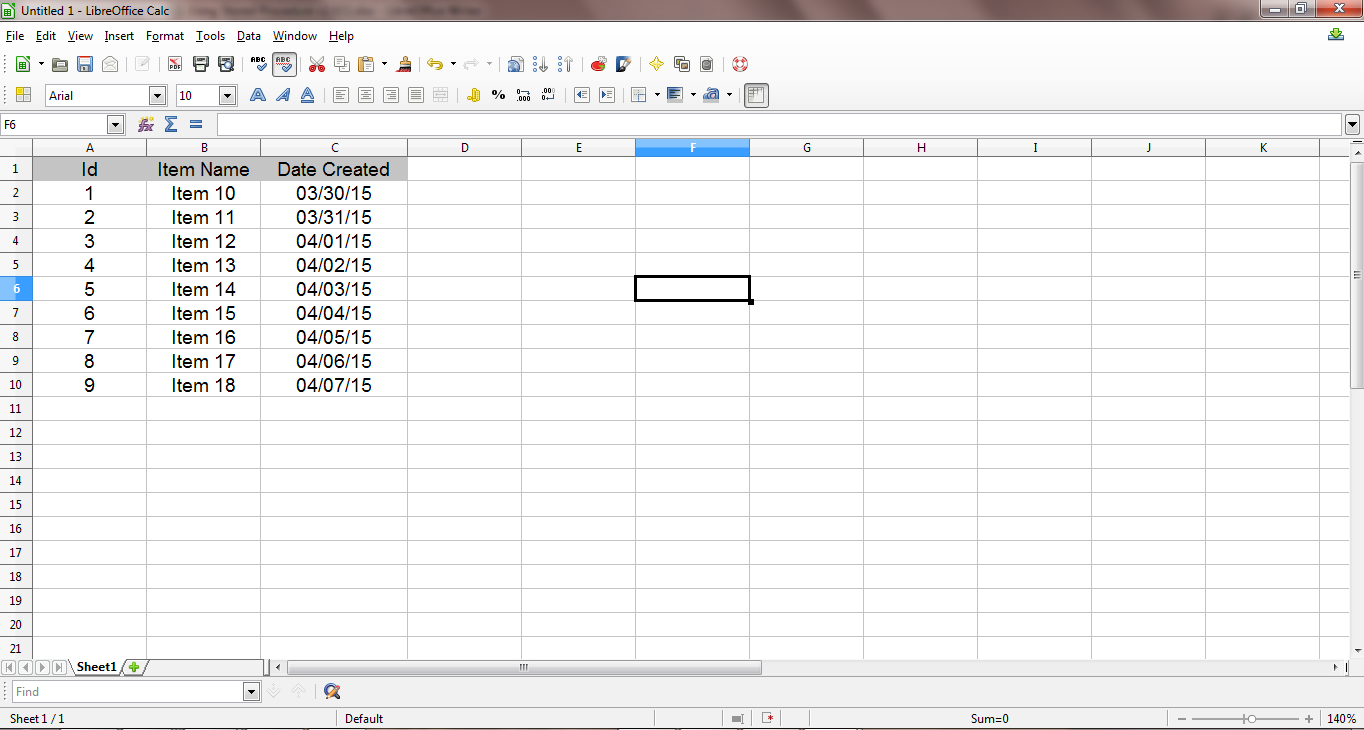
1. Creating an Excel File
The first step involves the creation of an Excel file sample with a few rows of data for demonstration purposes. We need to add a header row to explicitly define the data: ID, Item Name and Date Created. It is important that you note that the data sequence is only for facilitating the visualization of the content that is being manipulated.
2. Installing the necessary providers
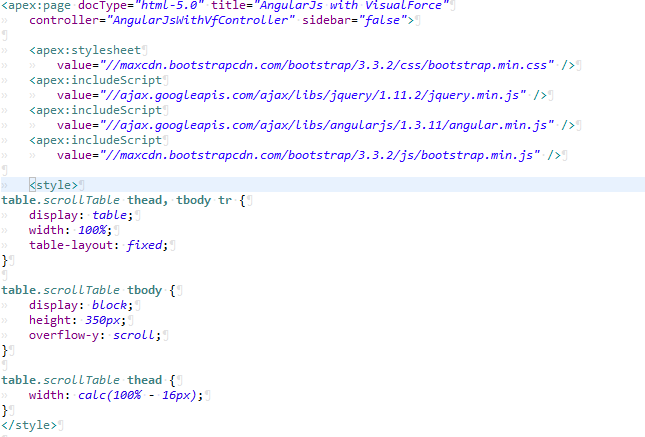
As the next step, we now need to get the data through a query inside the SQL Server using an OLEDB Data Provider. I used Microsoft.ACE.OLEDB.12.0 Data Provider which is available free of cost, and provided all ODBC and OLEDB drivers.Note that there are two versions of this package: AccessDatabaseEngine.exe for x86 platform and AccessDatabaseEngine_x64.exe for x64 platform, so choose a version suitable to your platform.
3. Enabling SQL Server Instance to Read File
The execution of stored procedure using OPENROWSET is only possible when the SQL Server instance has the AdHoc Distributed Queries configuration enabled. By default every SQL Server instance keeps this configuration disabled.To enable Ad Hoc Distributed Queries configuration I used the following query.
In order to get permission required to use the OLEDB Drivers, link stored procedure with Microsoft.ACE.OLEDB.12.0 provider in SQL Server using AllowInProcess & Dynamic parameters. I used the following query.
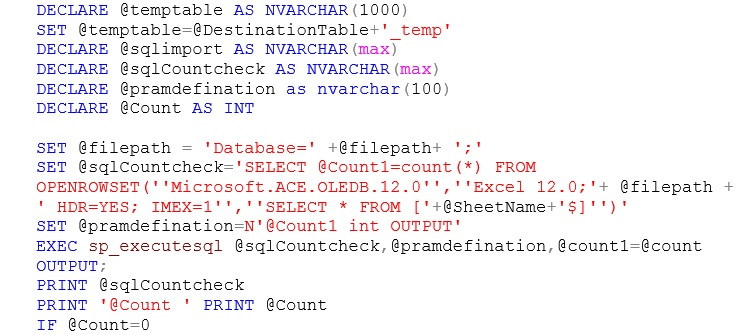
4. Using OPENROWSET method in stored procedure
Now we will query to read excel sheet data using OPENROWSET method. We need to pass some essential parameter to this method:- Data Provider: Microsoft.ACE.OLEDB.12.0
- Options: File Version; File path; Header (HDR); Import Mode (IMEX)
- SQL statement with or without clauses to filter data
To perform other tasks for data manipulation, you should ideally always load the data into the database. You can insert data on existing table or else you can create new table.
I used the following query to use OPENROWSET method
Getting in the Groove: Importing excel template into the physical table through Stored Procedure
Now comes the real deal, importing excel template into the physical table with the help of a stored procedure. I have listed below the simplified, 8-step process, along with the query.1. As the first step, you need to pass three parameters to the stored procedure:
- Destination Table Name
- File Path
- Sheet Name
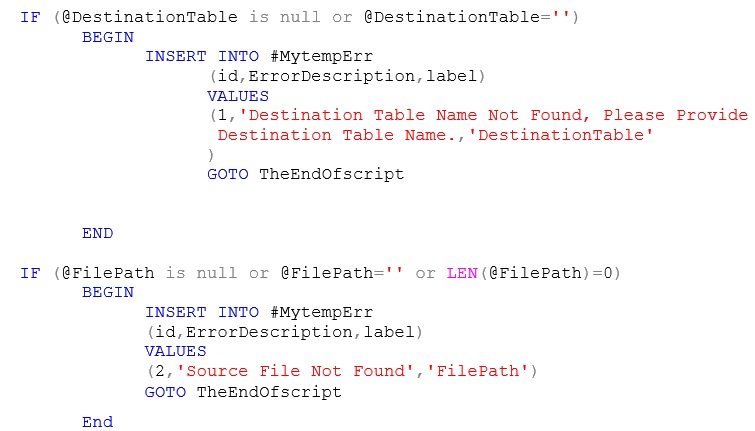
2. Once the above parameters are passed, you need to provide the following validation for table and excel Sheet:
- Destination Table Name cannot be null or Empty, you have to provide the table name
- File Path cannot be null or Empty, you have to provide the File Path
6. After getting the count into the physical table, you need to drop the temporary table. You can use the following sample code for the same.
7. In this example, I have used Transaction within my stored procedure. The data can be rolled back in case of any error. Each transaction lasts until either it completes without errors and COMMIT TRANSACTION is issued to make the modifications a permanent part of the database, or errors are encountered and all modifications are erased with a ROLLBACK TRANSACTION statement.
8. In order to conclude this process, you need to handle all errors within the Catch block and store the errors into the error table, as shown below
Time is Money!!!
There are alternate methods to import data but if you are in a Catch-22 situation like me, importing data through SQL Server is your best bet. Remember, timely access to data is as important, if not more, as access to data itself.Reference: Importing an Excel Spreadsheet into a SQL Server Database
Written by Piyush Ostwal, .Net Champion at Eternus Solutions