Wednesday 23 September 2015

Activity Reminders on Dashboard For Microsoft Dynamics CRM


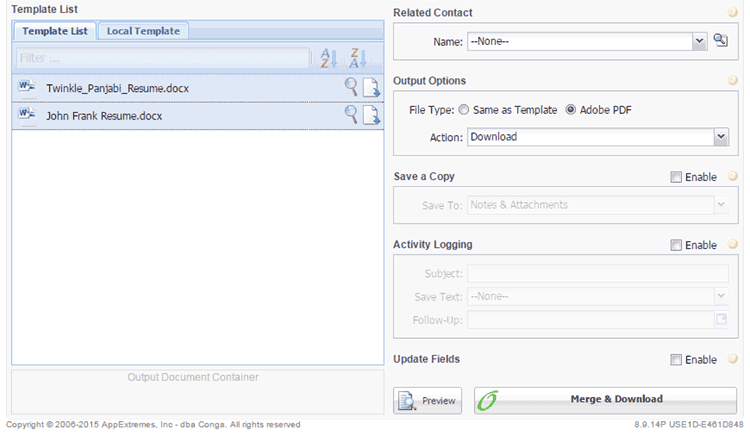
Interactions with customers through phone call, emails and recording the same form a vital part of any CRM application. As a Microsoft Dynamics CRM user, you can create phone call, tasks, emails, fax and letters through Activities which appear on an entity record or you will find your records in the activity entity.

But what if I wanted the due date of my Activities to appear on the dashboard like reminders? For a recent requirement, I needed to do just that. One of my favorite clients wanted his activities to show up as reminders as per their due dates. For this, I decided to create a new dashboard, as shown below.


Customizing Activity Reminders


The dashboard needed some customization for creating activity reminders.

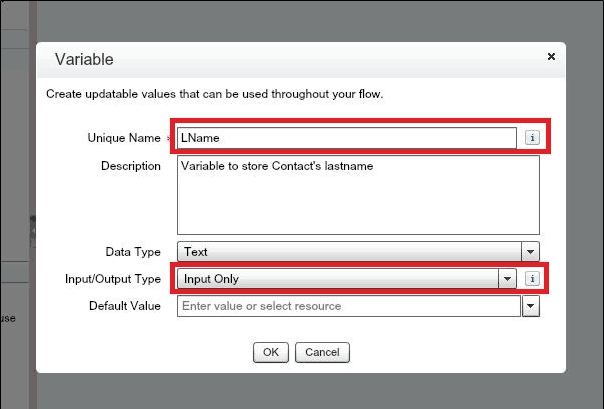
Step 1: Create Dependency Files

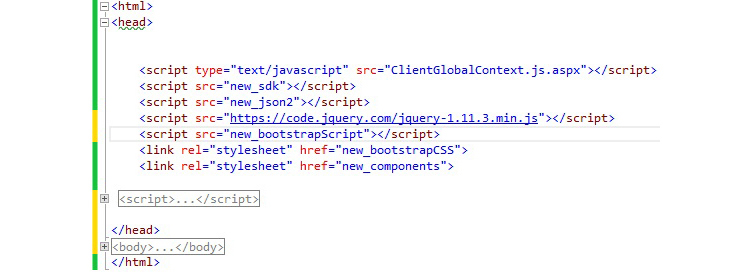
Create a web resourse, say, RestSDK and browse to your respective directory to find the SDK.REST.js. I have used some bootstrap CDNs for my page, however, you can download bootstrap files from http://getbootstrap.com/ and create web resources of bootstrap.min.js, bootstrap.min.css and bootstrap-theme.min.css respectively and add them into your html file.

You also need to download the latest jquery.js and json and add them to your file. Alternatively, a CDN of jquery will also suffice. I have used my own .css file for the purpose of customization. Likewise, you can add your own .css files, as per your requirement

You will find the SDK.REST.js file in Microsoft Dynamics CRM SDK 2015, usually downloaded from https://www.microsoft.com/en-in/download/details.aspx?id=44567


Step 2: Create a .html Web resource for Phone Call,Appointment and Task


The preview page of PhoneCall.html looks like:


You need to create a grid or an HTML table which will display your record.


On load of your page, you need to write a function as shown below to retrieve the phone call entity record. Here, SDK.REST.retrievemultiple() retrieves the phone call entity record.


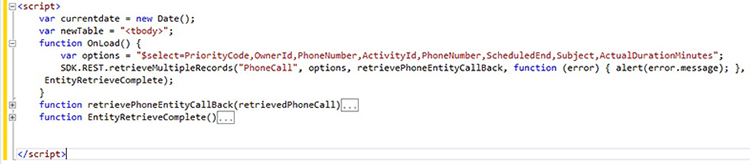
Next, you need to add rows to the table that you have created. With the help of clientglobalcontext.js, it is quite easy to access the Logged-In User. I have used Mscrm.GlobalContext.prototype.getUserName() to filter and retrieve the records I need. You can also click on the record to view the entire information using  Mscrm.GlobalContext.prototype.getClientUrl() which gives the application URL and entity type code of the entity.


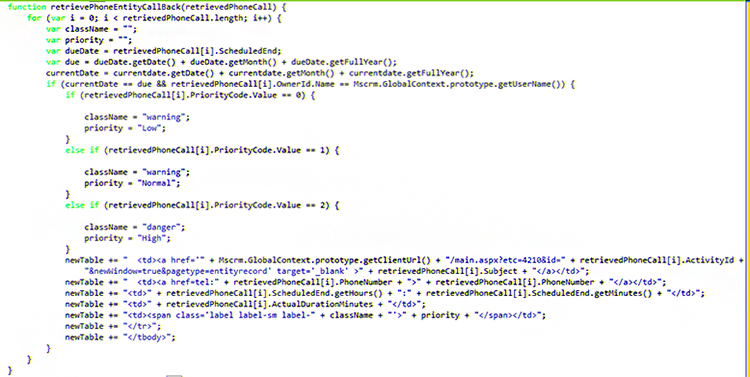
Finally, the rows are added to the created table using the EntityRetrieveComplete() function.


Likewise, you can create the appointment.html and task.html in the same way.

The preview of  appointment.html is shown below.


The preview of task.html is shown below.


Step 3: Creating Activity Reminder Dashboard


I have created a 3-Column overview Dashboard wherein I need to insert into each column the web resource I have created .

There! Your Activity Reminder Dashboard is created!


So what’s the big deal about Activity Reminder Dashboard?

The best thing about an Activity Reminder Dashboard is that the next time you are assigned a task, a phone call or an appointment, you just need to login to view your reminder dashboard which will provide you with necessary details, like scheduled time and priority of the activity.If you do not have your outlook integrated with your CRM, this is almost God-send! So goodbye missing out on important appointments! Hello, Activity Reminder dashboard!


Written by Neethuanna Matthew,  Microsoft Dynamics CRM Champion at Eternus Solutions
Read More »

Wednesday 16 September 2015

Analyzing Salesforce data with Google Analytics: Part 4

Welcome to the anchor leg!  Are you geared for crossing the line today? Till now, we have successfully configured our Google Analytics account (Part 1) as well as our Salesforce org (Part 2) , and also created the custom variables (Part 3) in the previous posts. Let’s now put the final piece of the puzzle together and create the custom dimensions, and once done, we will then go about tracking the most popular Accounts based on page views, using what we have learnt so far.


Creating Custom Dimensions


Custom dimensions allow you to combine Google Analytics data with non-Google Analytics data, e.g. CRM data. For example, if you want to store the Geo-location of signed-in users in your CRM system, you could combine this information with your Google Analytics data to see Page-views by Geo-location.


Limits of custom dimensions


There are 20 indices available for different custom dimensions in each property. Premium accounts have 200 indices available for custom dimensions. Custom dimensions cannot be deleted, but you can disable them.

Step 1

Go to the Admin section of your Google analytics account and then click on the Custom Dimensions link under the Custom Definitions drop down menu:


Step 2

Click on the New Custom Dimension button.


Step 3

Enter the name of your new custom dimension, select its scope as Hit and then click on the create button.


Every custom dimension has got four scopes: Hit, Session, User and Product. Hit is a call to the GA/UA server by a JavaScript library (like ga.js, analytics.js etc). A hit can be a pageview, screenview, event, transactions, item etc.


  1. When a custom dimension has hit level scope, its value is only applied to the hit with which the value was sent
  2. When a custom dimension has Session level scope, its value is applied to all the hits in the current web session
  3. When a custom dimension has User level scope, its value is only applied to all the hits in the current and future web sessions of a user, until the value changes or the custom dimension is made inactive.
Note: You can’t delete a custom dimension or metric once you have created it. All you can do is then make it inactive if you don’t need it.


Step 4

Once you click on the create button, you will be shown the sample code for your custom dimension. Just click on the Done button for now.


You have now created your first custom dimension as shown below:


Step 5

You will need the help of a developer now. Forward the following example code for your custom dimension to your developer, so that he can use the same to track your website.


Note: You can get these example codes by clicking on the name of your custom dimension.


My Final Google Analytics Script!!!


My final google analytics script including custom variables and custom dimensions can be seen below:


You can also see the custom dimensions in the Google analytics site, by going to Reporting Tab > Behavior > Site Content > All Pages and choosing the secondary dimension as given below:


After choosing the custom dimension User Name, it looks something like:


Tracking the Most Popular Accounts based on Page Views


Go to Reporting Tab > Behavior > Site Content > All Pages and filter out as shown below:


Tadaa! You now have your most popular accounts based on page views! You can use similar logic for other use cases and in turn, get more out of your Salesforce org, just as I promised.


Analyzing Salesforce data with Google Analytics:  Part 1, Part 2, Part 3


Written by Arun Kumar Bharati,  Salesforce Developer at Eternus Solutions
Read More »

Monday 14 September 2015

Lightning and Nonprofits: Best of both worlds!


This is the age of mobility! Users need access to real-time data on their fingertips. Deals are signed quicker because sales reps have access to the data on their mobiles and can take necessary actions really fast! It has become pertinent for information to be available on mobile; it is a necessity, no longer a luxury!

Same is the case with nonprofits and fundraising. Nonprofits constantly need a view of their donation pipelines, along with all donation details till date, in order to plan proactively for their fundraising and constituent activities. The user should also be able to see the donors along with donation details on a map to get a real time visualization of total donations within a region and to be able to trace and locate the donors.

For this last week and a half, the world has truly been struck by Lightning! Salesforce introduced the new Lightning Experience combining the powers and prowess of Lightning Design System, Lightning App Builder and Lightning Components to facilitate modern, seamless apps that focus on usability and user experience. Salesforce promised that apps would be built at a lightning speed and I decided to test that. And what better way to test it than Lightning and Map components? Result? True to Salesforce’s promise, my app was ready at an ultra-quick pace!

Donation Manager App

The Donation Manager App is a mobile app that gives a list of all donors categorized by user-defined regions, along with donation summary and detailed information in a single click.

It should be noted that before you start building any Lightning Component, you must enable the Lightning Components in Salesforce1 (BETA). You can do this by navigating to Setup and search for Lightning Components.

While I was designing the architecture of my app, I decided to do a few tweaks to make it more optimized.
  1. Built as a 100% pure lightning app, Donation Manager App essentially consists of a single page to dispense the requisite information, making it extremely simple to use and navigate.
  2. In order to save on the development efforts and timelines, I reused the Salesforce 1 detail page
  3. I also leveraged the standard Salesforce objects (Opportunity object became my Donation object and Account object became my Donor object) in order to save on time and reuse the out of the box functionality as much as possible.
  4. Additionally, it also enabled me to leverage the Parent-Child relationship between Account and Opportunity and leverage functionalities like roll-up summary fields

The Map Component

First things first, I needed to develop a map component. The app opens to a map interface, showing a list of all donors, existing and prospective, in the vicinity and enabling your user to get directions to reach them, if need be! The locations are depicted in the form of pins, as shown in the first image below. The app also comes with color-coded donor details, giving you a clear picture of who your most generous donors are.


Once you click on any pin, the app displays the summary of all donations for that donor, as shown above. I have used the standard functionality of a roll-up summary field to depict the same.

However, developing this was not easy. Each time I used a Google map API, I was getting the following error:

Content Security Policy: The page's settings blocked the loading of a resource at http://maps.google.com/maps/api/js?sensor=false ("script-src https://ap1.lightning.force.com https://ssl.gstatic.com chrome-extension: 'unsafe-eval' 'unsafe-inline'").

I kept trying different things and failing until I found the Leaflet.js library for maps! Thank you, Christophe Coenraets, I owe you one!

Finally, I could begin building my app!

Building my App!

  1. I created a new lightning component within my org by navigating to Setup – Lightning App Builder – New
  2. I navigated to the developer console in order to develop my custom components. As per your business requirement, you can leverage the standard components provided by Salesforce: Filter list, Recent Items, Report Chart, Rich Text and Visualforce.
  3. I dragged and dropped the components I needed on the App screen
  4. As soon as my custom components were created, I got a component page (.cmp), a component controller (.js) and a helper (.js). In order to interact with Salesforce or use the Apex functionality, I now needed to create a class.
  5. I also had to provide the @AuraEnabled annotation to my methods which I needed to access within my custom components.

Developing my Component Page

  1. I needed to include name of the controller, force:apphostable and flexipage interfaces. For details on this, please refer to Salesforce’s documentation on Lightning.
  2. Thereafter, I had to include the CSS and JavaScript libraries that I needed within the static resource. Don’t forget to include the URL for the same within your component page with the help of ltng:require tag.
  3. I added the dependencies, handlers and attributes which I would require with the help of aura tags.

    It should be noted that sometimes navigation does not work if you do not include dependency resource markup://force:navigateToSObject

    Now I had to design my HTML as per the need.
  1. I now had to make a space for my map which will be loaded through leaflet.js file.
  2. Design your markers and pop-ups as needed. In my case, I was fetching Account details and links to Opportunity by calling controller functions.
  3. The controllers were called by using {!c.<function name>} 


    Let’s tweak this a little and add Opportunity and related Account details from the pop-up below our map to enhance the functionality of our app!
  1.  c.GetOpportunity () function will bring Account and related opportunity details from my Salesforce org. We will discuss this function a little later.
  2. In order to access Salesforce objects inside our HTML, we usually call the Salesforce object in the following manner:
    {!acc.Name}
However, when you want to use the objects and fields within the HTML tags, you need to use them a little differently.


My app now looked like:


 Once you click on View Details, the details of all donations made till date for that particular donor, along with the basic donor details, are listed in a chronological order, as shown above. Basic donor details include Account Name, phone number, address and email, meaning that if you need to contact the donor immediately, the information is readily available for you.

Developing my Controller & Helper

But none of these functionalities will run on their own. I needed to create a controller and helper to execute them.
  1. As you know, init() is the first function to load, even before page load. With the help of my init () handler, my doInit() function was loaded on the controller page, calling my function for retrieving the accounts.
  2. getAccountOnMap()  helper method interacted with my class and fetched the account details, which are set in the view with the help of component.set() function
  3. For my requirement, I needed to color code the markers based on the value of the roll-up summary field. For this, I used simple marker tags with appropriate conditions in the logic, and attached them to the billing address of the account on the map.
  4. For view details, I used the getOpportunity() function in my controller which calls two helper methods: one to fetch the account details and the other to fetch the donation details. You can add your own functions as per you requirement


    Let’s move on to my helper class.
  5. The getAccountOnMap() function is called from the controller and it fetches data from my Salesforce class, including all the modifications, data parsing, markers and popup details which are populated on the map.


  6. You can add functionality as per your requirement. I have added conditions for markers and set the attributes for map as shown below.

  7. Once the user clicks on View Details, he should see the Account and donation information. For this, I called two helper functions from my controller.
  8. Do not forget to add actions and pass parameters in setParam() method. In my case, I needed to pass the Account ID and call my Apex class.
  9. The response from Apex class would be passed back in the setCallback() method.
  10. I needed to set all the results which I required with the help of component.Set () method and pass to view using v.attribute() to my component page.
  11. Finally, I needed to enqueue your action


Last, but not the least…

Don’t forget to use annotation @AuraEnabled  to fetch any details from your apex class.

Tadaa! I can now deploy my app and see the power of lightning unfold into a beautiful app!

Deploying the App

  1. Go to Setup – Lightning App Builder – Create New App
  2. Add your components as per the requirement. I added two reports, discussed later in this blog.
  3. Save your settings and hit Activate.
Your app is good to go!

The App works because…

  • Lightning-quick: It is built 100% using Lightning Components, leading to faster, client-side execution.
  • All the information is within a single page! Say goodbye to navigating back and forth for information!
  • Rapid Development cycle, leading to greater productivity and enhanced ROI
  • Reusable: You can pick up this component and reuse anywhere with minimal tweaks! The power of Lightning!
  • No dependency on any browser or device. Thanks to the Lightning Component, the app is responsive and has a seamless interface.

Lightning enables you to build amazing apps real quick which can be purchased and sold on AppExchange. A new beautiful world of amazing apps beckons you, deep dive into it today!


Written by Ashwini Singh, Salesforce Developer at Eternus Solutions
Read More »

Friday 11 September 2015

May the Financial(Force) be with you!

Want to cut down your invoicing time from weeks to days? Frustrated entering the same set of data into multiple systems? Dread trying to make different systems interact with each other? Existing ledger systems do not support your expansion plans? Is there a single magical wand to solve all your Accounting woes?

Yes, there is! FinancialForce Accounting is the answer to your prayers! This FinancialForce application provides Salesforce users with a wide range of accounting functionality. Here are 9 ways in which FinancialForce Accounting on Salesforce helps you streamline your accounting process.


1. Nativity

   FinancialForce applications are built on the Force.com platform and reside alongside your Salesforce CRM. This eliminates the need to maintain a sync between your external systems since the Accounts Payables/Receivables, Customer Information, Invoice data are all available via Salesforce.

   Additionally, the inconvenience of maintaining multiple logins for different systems is done away with since FinancialForce uses the same set of credentials as the Salesforce credentials. Incredible, isn’t it?

2. Cloud based

   FinancialForce Accounting is one of the few, comprehensive cloud based accounting solutions available in the market. Traditional on premise solutions have organizations relying on IT infrastructure installation and upgrades, IT security, scaling the server and network capacity, when the need arises, and a horde of expenses associated with these.

   With FinancialForce Accounting, these concerns can be offloaded to the cloud solution provider and you can have more time to focus on your core business functions.

3. Consolidated ledger

   The unified ledger allows users to perform deep financial analysis. It also handles multi-currency and multi-company transactions. Drill downs to origination transactions can be easily performed and it also facilitates faster closing of books. The tedious task of maintaining sub ledgers and time consuming period close processes is also eliminated. I’m telling you, your Finance team is going to love it!

4. Single-click order generation

   An Order can be created via an Opportunity or Quote with the help of FinancialForce in just a single click! This feature eliminates the possibility of errors caused by manual data-entry operations. The Opportunity to cash process is streamlined, order cycle time is vastly improved and cash flow is immensely optimized. Moreover, it also allows the generation of Recurring Payments for scenarios requiring monthly/quarterly invoices or invoices generated over regular intervals.

5. Mobility

   Businesses located across the globe require 24/7 access to the system due to different time zones. The system provides a great deal of flexibility since it can be accessed via mobiles, desktops, laptops etc. which helps eliminate the time zone complication and is a boon for a mobile workforce.

6. Real time information

   There is a general ledger consisting of the payables and receivables details, which is updated real time. Accounting teams can have access to Profit and Loss statements online from any location and any device. Electronic invoices and in-built templates increase the accounting teams’ productivity by reducing manual intervention and data entry efforts that would be required in the traditional invoicing process.

7. Integration

   FinancialForce.com provides Application Programming Interfaces (API) that allow developers to customize the application according to their business requirements and integrate with a multitude of other applications like PaymentConnect etc.

8. Collaboration

   Since all the applications are on a single cloud, we can make use of all the Chatter capabilities provided by Salesforce. It allows collaboration between accounting, sales and service teams for situations such as tracking missed/delayed payments, unpaid invoices etc. Chatter groups can also be leveraged by accounting teams for collaborating on audits etc.

9. Analytics

   360ยบ view of your customers’ orders, payments, invoices, opportunities and cases is available in a single, centralized location. Standard Salesforce reporting and analytics can be utilized for viewing current status of Payables, receivables and any discrepancies in the same, enabling seamless and informed decision-making.


If you have been considering moving away from your entry level accounting system having outgrown it or an on premise system from the medieval era, the lure of FinancialForce Accounting with its feature rich package is quite hard to resist! Like I said it in the beginning FinancialForce is a force to reckon with!

To explore FinancialForce Accounting, click here.


Written by Saba Shaikh, Salesforce Developer at Eternus Solutions
Read More »

Wednesday 9 September 2015

Non Profit Starter Pack Unlocked


It would be easy to mistake Salesforce only as a business – to – business application that enhances the business and in turn the profits of the organizations. I mean, sure, it does that, but is that all to Salesforce? The answer, thankfully, is no. Salesforce has much more to it, one of which is the Non Profit Starter Pack (NPSP).

Nonprofit organizations have a unique set of needs and requirements. NPSP dispenses packages that help run the functioning of a nonprofit and gets them started on the right foot, as they embark on their journey to help the world. In simpler words, NPSP helps you help the world!

 Assuming you are familiar with standard Salesforce objects and their purpose, let me take you through the various objects that make up the NPSP and show how they are related.

HOUSEHOLDS


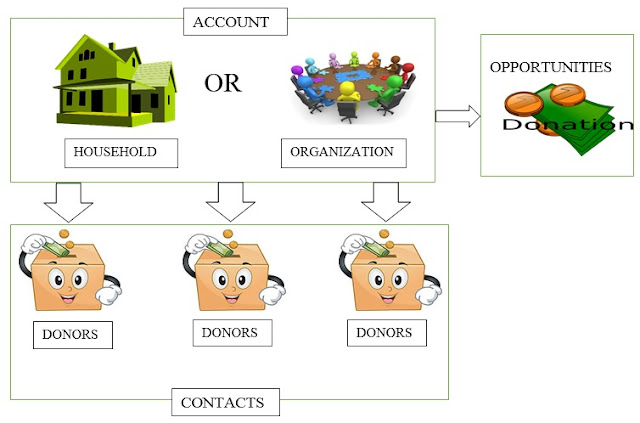
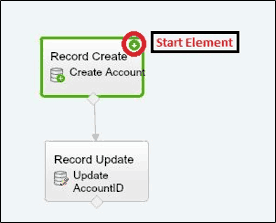
You are probably aware of the standard Account object in Salesforce, which is associated with contacts and opportunities. In the nonprofit world, this Account objects is termed as a HOUSEHOLD.

Essentially, the family with which the nonprofit organization works with is termed as a household.

Whenever we create a contact, a household automatically gets created for it, provided we leave the account Name field blank. You can also customize household names, merge households, split households, as the need be.


ORGANIZATIONS


Organization too, is equivalent of an account. So, how is it different from a household?

ORGANIZATIONS are not individual entities but are companies, foundations, corporations or other nonprofits who support, sponsor and partner to help households. One can create organization accounts and keep a track of the organizations that they work with.


DONATIONS


Unlike normal business deals, nonprofits do not have deals but have donations that are to be tracked.

Hence the Opportunity standard object in your Salesforce is acknowledged as DONATION in NPSP. Usually, donations come from individuals. There are 5 types of opportunities/donations in NPSP, namely: donation, grant, major gift, matching donation and membership.


AFFILIATIONS


Another object provided in NPSP is affiliation. Affiliations are created in order to connect contact records to organization.

They represent the ongoing or past association between contacts and organizations.

A single organization can be designated as the primary affiliation for multiple contacts. However, a contact can only have one associated primary affiliation record.


RELATIONSHIPS


Just as relationships are important in our personal life, they are important in NPSP too!

The basic significance of relationships is to keep a track of how someone is connected to whom. Relationships can be created between the same household, between different households and between contacts and organizations.

Before we sign out for the day, let’s see how the objects within your Salesforce map to objects within the NPSP


Mapping of CRM Object Model to Object Model in NPSP


What’s best about NPSP that it consists of a number of packages, each having their own functionality and usage and you have the option to choose the packages you need and leave the rest. These packages enable Nonprofits to get a quick start, use other Salesforce functionality without worrying about the complexities within and get a real visualization of how all entities are linked within. And if you are a nonprofit and still not sold on NPSP, Salesforce offers ten free licenses to get you up and running!  So what are you waiting for?

For additional information, you may also refer to this post.


Written by Neha Sonawane,  Salesforce Developer at Eternus Solutions
Read More »

Monday 7 September 2015

Hack of the Day: Simplified Document Merging with Conga & Visualforce

We have all gone through the phase of writing an impressive resume and applying for jobs. Did we ever think how tiring it is for the recruitment teams in these companies to download our attached resume and consolidate the information within into their HR systems or merge it? Probably not. But it is, and that’s where we Salesforce developers come to their rescue!

Recently, I had a requirement to merge information from the attached documents using Conga, where I needed to configure Conga through a Visualforce page. I needed to pass multiple IDs through the Conga button to generate attachment corresponding to those IDs. At first I was skeptical because the integration of Conga with Visualforce and Apex (or other programming languages) is not supported owing to the complex nature of supporting programmers and programming languages. But I was ready to scale my Everest, no matter what. My goal was simple: pass a set of IDs to customize the magical button which would give me the merged document/attachment with the related data. Before we see how I did that, let me quickly introduce Conga to you.


Conga Composer: Merging Data for a Simple Life!

Conga is a fantastic tool for merging data from Salesforce to a predefined word document template. It provides you a document with arranged and formatted, sophisticated-looking data. As an icing on the cake, you have the option to choose various data formats:  Word, Excel, PowerPoint, HTML, email & PDF, depending on your requirement.


Required Flow of Events


In my case, the user needed to navigate to the Requisition Tab. Once there, the user then needed to Click on the record. Once he would click on the View Candidate Button, he would be able to see multiple candidates related to the requisition.

The user would need to Select the candidates whose resume he wished to merge or review, and then click on the Conga button.


Configuration

Let me now take you through the 3-step configuration process.

Step 1:
I created a Visualforce Page and an Apex Controller which would fetch all the records related to my requisition ID on the button click from the requisition record, as shown below.


Step 2:
Once the candidate was selected, the IDs of the respective candidates would pass to the Conga button. To fetch the attachments related to the candidates, I needed to match the SOQL query with the candidate IDs. And what’s better than a conga query?

I traversed to Conga Composer (App) -> Conga Queries(Tab) -> Click New and created the following query.


Step 3:
Finally, I generated a script to create a dynamic URL for conga composer. Here is the screenshot for the same.


And we are done! I can hear the recruiters around the world sighing with relief. Yes, we Salesforce developers are an awesome lot!


Conga is God’s Gift for Document Merging!

  • Merging the documents or consolidating the information from within the attached document into your systems was never so easy before
  • The solution can be applied to both standard and custom objects of Salesforce


Just a little catch…

This solution requires Apex and Visualforce and is not possible to achieve through mere point and click. So, you need to have basic knowledge about Apex and Visualforce development. But hey, that’s what we are there for, right?


A Final word from a Conga fan...

Conga is a great tool for merging documents from various file formats and storing the information within at a centralized location. So go ahead and merge your documents with Conga. Trust me, life was never this simple before.


Written by Twinkle Panjabi,  Salesforce Developer at Eternus Solutions

Read More »

Lightning Fast Parent-Child Updates

Recently, I had to migrate some 36 million patient records of an NGO where the details were in the form of Contacts spreadsheet and the data needed to be migrated to the NGO’s Salesforce instance. However, it was not that simple. For manipulating and organizing data on the instance, I needed an Account record for every Contact. In simpler words, I needed to traverse in the reverse direction, in order to create an Account for the corresponding Contact, a task simple only in words!


The Game Plan

I decided to keep it simple: the Account Name would be the Contact’s Last Name, as both were required fields. I also finalized on using the Salesforce Process Builder to accomplish my goal, wherein I defined a process to create an Account while creating a Contact with the Name. But all was not hunky dory! I was able to create an Account for the corresponding Contact but unable to link them, i.e. the field AccountID on Contact was not updated.

This is where integrating Flows with Salesforce Process Builder came to my rescue.


Creation of Account through Flows & Process Builder


Step 1

I created a Contact with Process Builder while its corresponding Account was created through Flows and linked to the contact. You can find the Flow option within Workflow & Approvals. Once you click on New Flow, a Flow Designer appears where we users create variables.


Step 2

Next, I needed to create another variable named AccID to store AccountID. For replicating this, simply click on Create Record in the Palette tab, provide a name, select the Account object and give values to the field Name through the variable LName and store AccID, as shown below.


Step 3

Once this is done, click on Update Record and provide the object whose fields need to be updated, along with the fields, as shown below.


Step 4

Next, link both Data Palettes by dragging an arrow and set the first one as Start Element.


Step 5

Finally, save the flow as Flow_Demo with AutoLaunch type and activate the flow.


Integrating Flows with Process Builder

You need to integrate this flow with the Process Builder in order to update the Account ID on corresponding Contact records. This is a simple 5-step process.

  1. Create a process named Create Contact.
  2. Add an object Contact and process should run on while creating the record. There is no need for adding a criteria in my scenario but you may add one if required.
  3. Now, add an Immediate Action if the condition is true. Select Flows as Action and provide a unique name to it.
  4. Add the flow Flow_demo and set the variable values.


  5. Activate the process and create a contact whose corresponding Account is created.
And that, ladies and gentlemen, is our simple solution, sans any code! Not only is it simple and effective, but also saves a hell lot of time!


The Alternative Solutions…

There are many other ways to accomplish this scenario. You can write an Apex trigger on Contact but it requires extensive coding with handler and test classes. Another alternative is to have the Non Profit Starter Pack installed on your Salesforce instance which incurs cost.


But this one’s the best because…

Using Salesforce Process Builder and Flows is an effective solution for such scenarios as you do not need to bother about syntax of codes, access rights for packages, incurring any additional costs or the code coverage of the test classes. This simple point-and-click solution is an apt illustration of Salesforce’s philosophy of solving business problems with clicks and not code.


Written by Stuti Gupta,  Salesforce Developer at Eternus Solutions

Read More »

Friday 4 September 2015

Struck by (Salesforce) Lightning!

Salesforce launched something big last week! In what is being touted as the biggest reengineering in Salesforce history, Salesforce has decided to do away with its existing UI and instead introduce a redesigned Lightning Experience. Here’s a list of 9 most important things you should know about Salesforce Lightning.

1. Navigation Bar Approach

As against the older tabbed interface, Salesforce has opted to go for a navigation bar approach in the newer version, a change I feel quite overdue! This new approach enables Salesforce users to move quickly between functions, enhanced manifolds by the new Search functionality, but more on that later. Undoubtedly more attuned to a mobile and responsive UI, the navigation bar approach is aimed to increase productivity by including newer and varied visualizations.

2. An Interface that Comes Alive

The new look of Salesforce is hallmarked with a clean, responsive interface that is compatible for laptops, PCs, mobiles and even Apple Watch, ensuring its customers can see the important information in a glance. The interface is designed such that it ensures that the user gets pertinent information quickly, therefore boosting his productivity manifolds.

3. New Home Screen

Probably one of the very first changes a Salesforce user will notice is the new home screen. There is a goal chart which shows overall goal, open and closed deals. These goals have key insights to help the Sales reps and with a few clicks, they can also see their progress being reflected in the chart.

There is an Assistant section meant to bring in intelligence to the Sales Cloud, enabling the users to see assigned leads, overdue tasks, and opportunities with issues. The Assistant is capable of alerting the users as required through configured notifications.

4. A Sales dashboard just the way you want

We got what we voted for! Salesforce now comes with a 4-column dashboard, meaning we can now view open and closed sales amounts, as well the deals by closed date, resizing or moving the components in the dashboard. Talk about A-grade UX!


5. Opportunities get a makeover!

It’s a given that if Salesforce is bringing in major changes, opportunities will get a makeover too! You can now get a detailed view of each individual opportunity and also see what you need to do next in the lifecycle of that opportunity. Users also have visibility around the past actions completed for each opportunity, with all emails being logged for simplified tracking.

Furthermore, all of a user’s opportunities are listed in a grid format under the Opportunities section in the My Opportunities tab, where they are displayed under their relevant stage in the deal lifecycle and listed along with their relevant tasks. Each opportunity is now manually movable by a simple drag-and-drop interface, updating the sales forecast automatically in the process. As the icing on the cake, alerts are displayed as yellow-colored triangles for new tasks pertaining to each opportunity. Collaboration and lead management simplified like never before!

6. A brand new app store

Customers can build and deploy widgets and third party integrations built on the Lightning platform and sell it through the AppExchange. Building components was never this easy before, and if you do not have enough time to build one yourself, AppExchange provides a large number of components that will fit your need to the tee.

7. The Pipeline View

Remember how you wanted to see the progress of your deals real-time? The pipeline view turns that wish into reality, with a clear view of all opportunities at a particular stage neatly stacked, along with their business value and alerts, if any. Not only does it enable you to keep a track of opportunities at every stage, but also closely monitor the action items and the commercial value attached with them.

8. Fast and Furious Productivity

As many as 25 brand new features and functions are being introduced by Salesforce to speed up the path to customer productivity.  Sales Path, which was previously available only for mobile, now finds itself as a key element of the enhanced productivity suite. Additionally, you can send files and emails to contacts from within Salesforce and say goodbye to all external apps. And this is just within the Sales Cloud, as Salesforce looks to introduce the Lightning experience to Service Cloud and other products soon.

9. Powerful Search

Built on the collective feedback of 150, 000+ users and an experience that exceeds a decade and a half, the Search functionality within the Salesforce Lightning is more powerful than ever before! Its search bar strengthened by predictive intelligence allows you to quickly navigate to the information that you seek, and is present on every screen that you navigate to.

Although the Salesforce Lightning experience will be fully unveiled in October and customers will be directed towards adopting it, it appears at this moment that Salesforce will continue to support its classic UX indefinitely. So if you fear the change, well, you really have no reason to.  The lightning has truly struck the Salesforce world, and this lightning is all good!


For more information on Salesforce Lightning, you can also refer to this informative post from TechRepublic.


Written by Nupur Singh, Pre-Sales & Marketing Expert at Eternus Solutions
Read More »