Hello SharePoint Administrators!
Tired of Searching for Form-based Authentication (FBA) with external ADDS? Look no further!
As a SharePoint Administrator, you are likely to face a lot of issues while configuring FBA. You might get a lot of information over the internet for configuring and troubleshooting the FBA with SQL as well as ADFS, but you are unlikely to gather any information about External ADDS. Considering all the hardships that I faced during my project, I thought of sharing my knowledge about FBA with external ADDS.
Before we proceed any further, let’s quickly recap what FBA is and when can it be used.
FBA in SharePoint
Form Based Authentication (FBA) provides us a mechanism to use our own authentication method using a web form. A large number of organizations use FBA as a way of extending a site for non-Active Directory (AD) users.FBA is a claims-based identity management system based on ASP.NET membership and role provider authentication. It can be used in different scenarios where credentials are stored in an authentication provider, such as:
- Active Directory Domain Service (ADDS)
- SQL Server database
- Lightweight Directory Access Protocol (LDAP)
- Data store such as Novell eDirectory
- Novell Directory Services (NDS), or Sun ONE
How I Conquered My Rome
In my case, the SharePoint site was supposed to be accessible for both internal as well as external users. External users were not supposed to have access to any internal resource and could access the site only through custom login procedure.Here’s how I implemented it:
- We had an External AD (Domain B) and an internal AD (Domain A).
- The internal domain users were using Windows Authentication. For External domain users, we needed to configure Form Based Authentication.
- As external users would have access to the Internal farm Extended Web application only (no other resources should be available), SQL with FBA was not appropriate for the above requirement.
Farm Design
- Two Zones (Default, Internet)
- Default Zone – Windows Authentication Internal ADDS
- Internet Zone – FBA with External ADDS.
- 3-tier Architecture.

Figure: Farm Design
Farm Components
- Application Server/Internal web front end (WFE) server
Role: Acts as an application server to run and manage multiple service applications. In the current farm structure, Application Server was also configured as internal Web Front End. - External web front end server
Role: Handles web page requests from External users. - SQL Server
Role: Stores content and configuration databases for all the sites and service application. - Internal ADDS(Domain A)
Role: Active Directory for the internal users. - External ADDS(Domain B)
Role: Active Directory for the External users.
As you can see in the above diagram, all the farm components except External ADDS were in Domain A which was created on Internal ADDS.
Now we needed to configure the Web application for FBA authentication.
- Using Central Administration, we created a web application with windows authentication enabled in default zone.
- As the next step, I needed to extend the web application to the internet zone. Once the Web application was extended, I then needed to change the authentication provider for the Internet Zone from Windows to Forms Based Authentication.
Since the site was ready for external users, we proceeded with the FBA configuration!
Configuration of the FBA
Enable FBA from Central Administration
As the first step, I enabled the FBA through the following 5-step process:- Go to central administration and select your application
- Click on Authentication link, you will see two zones: Default and Internet
- In order to enable FBA, click on Internet zone and click the checkbox next to it
- Once the FBA is enabled, you need to add the membership Provider name and Role manager name as shown in the following figure
I have used MembershipP for membership provider and RolesP for roles provider. You can provide the names as per your choice.
Note*: Please make a note of the provider names given by you as we would be using these names in the Connection string for external ADDS.

Figure: Farm Design
Great! You have successfully enabled FBA on the internet zone! Now you need to check the accessibility of Domain B from External WFE.
To check this,
- Go to the external WFE and open the command prompt
- Try to ping the external ADDS
- If you get a reply from Domain B, you are just a few steps away from completing the configuration!
Note*: In this configuration, we are going to make some changes in the web.config file of our web application on Application server and Web front end server.
A recommended practice is to take a backup of the original web.config file before making any changes in it so that they can be reverted, if needed.
A recommended practice is to take a backup of the original web.config file before making any changes in it so that they can be reverted, if needed.
Changes to Web.config File on the WFE Server
Follow the steps listed below to make changes in the web.config file on the WFE Server. You need to be very careful with the following changes, as even a single comma or space in the web.config can create problems.Step 1
- On Web Front End Server, Open IIS site - > Right Click on the extended Web application and Click on Explore
- Open the web.config file of our web application and search for <membership> tag
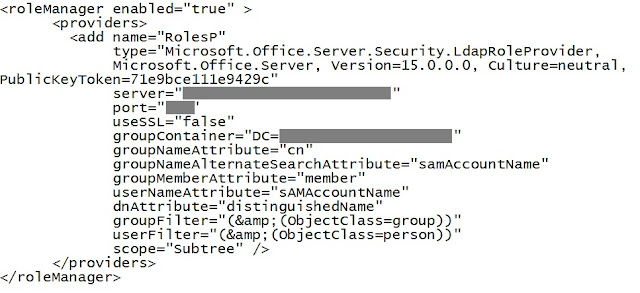
- Add membership provider and role manager connection strings as shown below:


- Now, search the PeoplePickerWildCards tag and add the below entry so that People Picker is able to find other domain users

- Save and close the web.config file
Step 2
- Open the web.config file of Security Token Service application
- Add membership provider and roles manager connection string as shown below:

Done! We have completed the web.config changes on WFE Server.
Changes to Web.config File on Application Server
Follow the steps listed below to make changes in web.config file on Application Server.- Go to application server and open the web.config file of Central Administration application
- Add membership provider and roles manager in the web.config file


- Now, search the <PeoplePickerWildCards> tag and add the entry as shown below:

Note : The provider’s connection string should match as shown in the image above
The configurations are now complete.
Now cross your fingers and start the testing ☺
Testing
- Go to the WFE server and browse your web application
- For multiple authentication, a dropdown is displayed to select the authentication type for login as shown below:

- Select Forms authentication and enter Domain B user’s credentials
You might get a message that the Site is not shared with you, which means that the Domain B\user has been successfully authenticated but the user does not have the permissions to access the site.
In this case, the Site Administrator can add the external users (Domain B\user) to the site by using Central Administration.
- Go to Central Administration and select your web application
- Click on User Policy from the top ribbon and Add the Users
And…we are done! I hope next time you need FBA, you won’t need to tear out your hair in despair! ☺
Written by Shrikant Mane, SharePoint Champion at Eternus Solutions
No comments:
Post a Comment