This is the age of mobility! Users need access to real-time data on their fingertips. Deals are signed quicker because sales reps have access to the data on their mobiles and can take necessary actions really fast! It has become pertinent for information to be available on mobile; it is a necessity, no longer a luxury!
Same is the case with nonprofits and fundraising. Nonprofits constantly need a view of their donation pipelines, along with all donation details till date, in order to plan proactively for their fundraising and constituent activities. The user should also be able to see the donors along with donation details on a map to get a real time visualization of total donations within a region and to be able to trace and locate the donors.
For this last week and a half, the world has truly been struck by Lightning! Salesforce introduced the new Lightning Experience combining the powers and prowess of Lightning Design System, Lightning App Builder and Lightning Components to facilitate modern, seamless apps that focus on usability and user experience. Salesforce promised that apps would be built at a lightning speed and I decided to test that. And what better way to test it than Lightning and Map components? Result? True to Salesforce’s promise, my app was ready at an ultra-quick pace!
Donation Manager App
The Donation Manager App is a mobile app that gives a list of all donors categorized by user-defined regions, along with donation summary and detailed information in a single click.It should be noted that before you start building any Lightning Component, you must enable the Lightning Components in Salesforce1 (BETA). You can do this by navigating to Setup and search for Lightning Components.
While I was designing the architecture of my app, I decided to do a few tweaks to make it more optimized.
- Built as a 100% pure lightning app, Donation Manager App essentially consists of a single page to dispense the requisite information, making it extremely simple to use and navigate.
- In order to save on the development efforts and timelines, I reused the Salesforce 1 detail page
- I also leveraged the standard Salesforce objects (Opportunity object became my Donation object and Account object became my Donor object) in order to save on time and reuse the out of the box functionality as much as possible.
- Additionally, it also enabled me to leverage the Parent-Child relationship between Account and Opportunity and leverage functionalities like roll-up summary fields
The Map Component
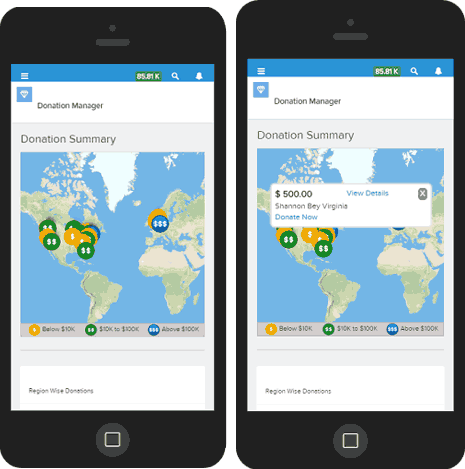
First things first, I needed to develop a map component. The app opens to a map interface, showing a list of all donors, existing and prospective, in the vicinity and enabling your user to get directions to reach them, if need be! The locations are depicted in the form of pins, as shown in the first image below. The app also comes with color-coded donor details, giving you a clear picture of who your most generous donors are.
Once you click on any pin, the app displays the summary of all donations for that donor, as shown above. I have used the standard functionality of a roll-up summary field to depict the same.
However, developing this was not easy. Each time I used a Google map API, I was getting the following error:
Content Security Policy: The page's settings blocked the loading of a resource at http://maps.google.com/maps/api/js?sensor=false ("script-src https://ap1.lightning.force.com https://ssl.gstatic.com chrome-extension: 'unsafe-eval' 'unsafe-inline'").
I kept trying different things and failing until I found the Leaflet.js library for maps! Thank you, Christophe Coenraets, I owe you one!
Finally, I could begin building my app!
Building my App!
- I created a new lightning component within my org by navigating to Setup – Lightning App Builder – New
- I navigated to the developer console in order to develop my custom components. As per your business requirement, you can leverage the standard components provided by Salesforce: Filter list, Recent Items, Report Chart, Rich Text and Visualforce.
- I dragged and dropped the components I needed on the App screen
- As soon as my custom components were created, I got a component page (.cmp), a component controller (.js) and a helper (.js). In order to interact with Salesforce or use the Apex functionality, I now needed to create a class.
- I also had to provide the @AuraEnabled annotation to my methods which I needed to access within my custom components.
Developing my Component Page
- I needed to include name of the controller, force:apphostable and flexipage interfaces. For details on this, please refer to Salesforce’s documentation on Lightning.
- Thereafter, I had to include the CSS and JavaScript libraries that I needed within the static resource. Don’t forget to include the URL for the same within your component page with the help of ltng:require tag.
- I added the dependencies, handlers and attributes which I would require with the help of aura tags.
It should be noted that sometimes navigation does not work if you do not include dependency resource markup://force:navigateToSObject
Now I had to design my HTML as per the need.
- I now had to make a space for my map which will be loaded through leaflet.js file.
- Design your markers and pop-ups as needed. In my case, I was fetching Account details and links to Opportunity by calling controller functions.
- The controllers were called by using {!c.<function name>}

Let’s tweak this a little and add Opportunity and related Account details from the pop-up below our map to enhance the functionality of our app!
- c.GetOpportunity () function will bring Account and related opportunity details from my Salesforce org. We will discuss this function a little later.
- In order to access Salesforce objects inside our HTML, we usually call the Salesforce object in the following manner:
{!acc.Name}


My app now looked like:

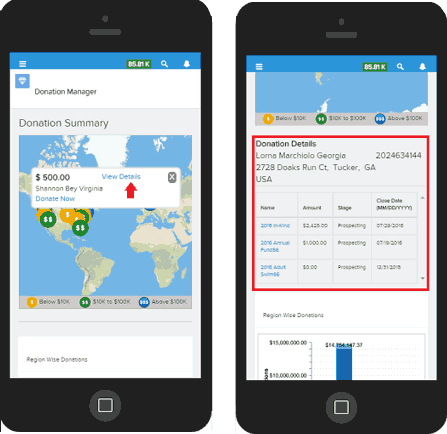
Once you click on View Details, the details of all donations made till date for that particular donor, along with the basic donor details, are listed in a chronological order, as shown above. Basic donor details include Account Name, phone number, address and email, meaning that if you need to contact the donor immediately, the information is readily available for you.
Developing my Controller & Helper
But none of these functionalities will run on their own. I needed to create a controller and helper to execute them.- As you know, init() is the first function to load, even before page load. With the help of my init () handler, my doInit() function was loaded on the controller page, calling my function for retrieving the accounts.
- getAccountOnMap() helper method interacted with my class and fetched the account details, which are set in the view with the help of component.set() function
- For my requirement, I needed to color code the markers based on the value of the roll-up summary field. For this, I used simple marker tags with appropriate conditions in the logic, and attached them to the billing address of the account on the map.
- For view details, I used the getOpportunity() function in my controller which calls two helper methods: one to fetch the account details and the other to fetch the donation details. You can add your own functions as per you requirement

Let’s move on to my helper class. - The getAccountOnMap() function is called from the controller and it fetches data from my Salesforce class, including all the modifications, data parsing, markers and popup details which are populated on the map.

- You can add functionality as per your requirement. I have added conditions for markers and set the attributes for map as shown below.

- Once the user clicks on View Details, he should see the Account and donation information. For this, I called two helper functions from my controller.
- Do not forget to add actions and pass parameters in setParam() method. In my case, I needed to pass the Account ID and call my Apex class.
- The response from Apex class would be passed back in the setCallback() method.
- I needed to set all the results which I required with the help of component.Set () method and pass to view using v.attribute() to my component page.
- Finally, I needed to enqueue your action

Last, but not the least…
Don’t forget to use annotation @AuraEnabled to fetch any details from your apex class.Tadaa! I can now deploy my app and see the power of lightning unfold into a beautiful app!
Deploying the App
- Go to Setup – Lightning App Builder – Create New App
- Add your components as per the requirement. I added two reports, discussed later in this blog.
- Save your settings and hit Activate.
The App works because…
- Lightning-quick: It is built 100% using Lightning Components, leading to faster, client-side execution.
- All the information is within a single page! Say goodbye to navigating back and forth for information!
- Rapid Development cycle, leading to greater productivity and enhanced ROI
- Reusable: You can pick up this component and reuse anywhere with minimal tweaks! The power of Lightning!
- No dependency on any browser or device. Thanks to the Lightning Component, the app is responsive and has a seamless interface.
Lightning enables you to build amazing apps real quick which can be purchased and sold on AppExchange. A new beautiful world of amazing apps beckons you, deep dive into it today!
Written by Ashwini Singh, Salesforce Developer at Eternus Solutions

Eternus solutions is ultimate company for salesforce lightning experience with various best hosting plans and ideas for growing business and salesforce community.
ReplyDelete