Have you ever had to work on the same Apex class or Visualforce page as the guy sitting beside you and wait for him to finish his work? Does your team often work on the same development cycle across multiple instances? Would it help if you could find out bugs before you signed off the build for testing? If the answer to any of these questions is a ‘yes’, Continuous Integration aka CI is the thing for you!
There you go! You are all set for development using Continuous Integration. In case you need more information, you can also refer to the following links:
Written by Jyoti Chouthai, Salesforce Lead Developer at Eternus Solutions
CI: The Evolution…
Originally developed by the Salesforce Foundation to support the Non-profit Starter Pack 3.0, CI is currently being used for Salesforce Foundation’s Cumulus project. It is also available as an open source software to reuse in your own managed package development efforts.Prerequisites to using CI
Before you can begin using CI, you need to ensure that you have checked all items off the following checklist:- Install Eclipse and Setup the environment variables for Cumulus CI
- Download Ant, which allows for easy command-line deployment, and follow steps given at http://www.salesforce.com/us/developer/docs/daas/Content/forcemigrationtool_install.htm to install the Force.com Migration Tool. Migration tool is a Java/Ant-based command-line utility, which helps ANT based migration by executing Ant scripts.
- Create your local development org by visiting https://developer.salesforce.com. It is recommended that you populate some test data.
- Download Git, which is the most powerful source code repository and widely accepted amongst the developer communities
- Installing the Source tree is optional. A Source tree provides UI for operations such as Pull, Push, Merge and Commit, instead of using commands.
- Install Jenkins on your local machine by downloading the Java Web Archive (.war). Go to the directory where you have downloaded the file and execute java -jar jenkins.war command. If you open http://localhost:8080/ URL in your browser, you can see Jenkins is running on your local machine.
CI: Coding Intelligently!
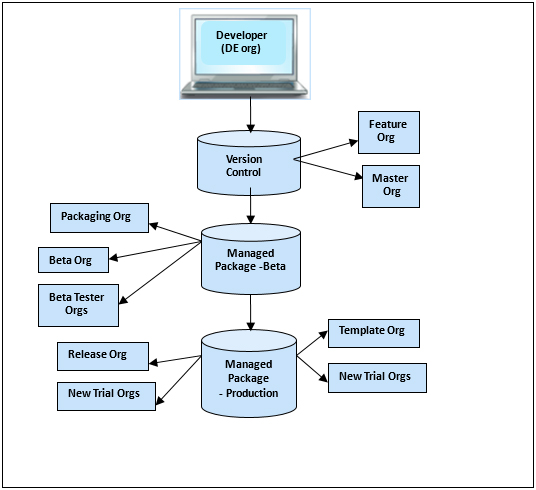
CI works on the principle of constant flow of development changes and unit testing, in order to detect conflicts and errors within the development cycle itself. The diagram below gives more clarity on this:
- As a developer, you need to create a feature branch and pull the master branch in this local development org to get the most recent version of the code, including the changes done by any other developer of your team
- Once you are ready to submit the new code version, including your changes, you need to commit those changes and push the branch into Git
- Once the changes are committed, Jenkins will launch the build process
- The CI server will get the code from the repository and unit testing will be executed by the CI server to find out test class methods, if any
- The files will then be packaged into distributable units and deployed onto the test server. Automated functional tests will be executed to validate the package and its basic functionality.
- User acceptance testing will be done by CI by deploying the same package on the testing environment. The same package will be deployed on the production server once the acceptance tests are successful.
- After running all the tests, the results will be sent back to the developer. If there are any failures, the developer can fix them, commit those changes, and push the same branch into Git.
- Your QA team can take the pull of that branch and test it. If any code changes are required, you will need to follow the same process starting from pull till push.
- The entire development is done within the feature branch. Once the development is complete, feature branches are merged into the master branch and all other branches can then be destroyed.
- A Master branch is a single, persistent branch maintained in the repository to avoid any ambiguity. Once you create a pull request, any commits that you make to your branch requesting to merge, are also included in the pull request. You can use comments on pull requests to explain the issue or solution in brief.
- The entire development is done in feature branches (e.g feature/<BranchName>) and all releases are managed through Git tags (e.g uat/1.0-beta3 or prod/1.0).
Benefits of using CI
- The quality of a release can be improved significantly by identifying and resolving issues in the earlier stages of the development lifecycle
- CI helps developers to run automated tests and also in ensuring the required code coverage. It is helpful for a developer to find out the issues and bugs during unit testing which he may have overlooked during development.
- CI process helps to resolve shared development issues. Multiple developers can update the same metadata at same time within the development organization, without any worries.
There you go! You are all set for development using Continuous Integration. In case you need more information, you can also refer to the following links:
Written by Jyoti Chouthai, Salesforce Lead Developer at Eternus Solutions
Such a clear view on how Salesforce is related to Cloud Computing, hope your blog will reach more visitors who are all searching for the Cloud and Salesforce related updates.
ReplyDeleteRegards:
Salesforce Training Chennai
salesforce developer training in chennai
clear concept very useful for us
ReplyDeleteBest software testing training in chennai
Good to read the post
ReplyDeletesoftware testing training with palcement
Thank you very good article!
ReplyDeleteSalesforce Training | Online Course | Certification in chennai | Salesforce Training | Online Course | Certification in bangalore | Salesforce Training | Online Course | Certification in hyderabad | Salesforce Training | Online Course | Certification in pune