GoClipse is an Eclipse plugin that adds Eclipse’s IDE functionality to Google’s Go programming language. The purpose of GoClipse is to create an environment in which development using Go is easy for a rookie user. Often, rookie Go developers like you and me, truly struggle to install GoClipse in any of the Eclipse versions, and it is this effort which inspired me to write this post. Here, I have listed down a step-by-step procedure to install GoClipse easily and run your first Go program for Google App Engine.
And it’s done! You have installed GoClipse and run your first project successfully. Was a cakewalk, wasn’t it? In my next blog post, I will take up a few common problems faced by Go programmers. Till then, Happy Gophering!
Written by Sonali Dalvi, Google Developer at Eternus Solutions
Prerequisites on your machine
Before you get started, you need to ensure you have the following installed on your machine.- Eclipse 3.6 or later
- Java 1.6 or later
- Python 2.7.5 or later.(For running Google AppEngine simulator)
- You can download the latest Google appengine SDK from the internet. I used https://cloud.google.com/appengine/downloads to download the SDK. Along with the SDK, you also need to have Python 2.7.5 installed on your machine. Downloading the SDK is a 3-step process
- Select the GAE SDK for Go
- Select the platform machine by clicking on the appropriate link. The download will start. The downloaded file will be in a compressed format
- Uncompress the SDK into the directory.(I am storing it in C:\go_appengine)
Getting Started…
- Start Eclipse, then select Help > Install New Software
- In the dialog that appears, enter the updated site URL into the 'Work with' text box. The site URL to be entered is http://goclipse.googlecode.com/svn/trunk/goclipse-update-site/ (this is specifically for Juno version). Click on the Add button
- Leave the Name text box blank (the name will be retrieved from the updated site). Click OK

- In the Install dialog, the center box should be filled with the category: GoPlug-in for Eclipse(GoClipse). Select the checkbox

- Follow the steps that are given for installation
- You will be prompted to set the workspace. The workspace should be where your SDK resides. (in my case, it would be C:\go_appengine as I have stored my SDK here)
- You are ready to create a Go Project. Click on File > New > Project. Select the Go Project from the tree. Click Next
- Enter the name of the project in the Project name text field. Click Finish
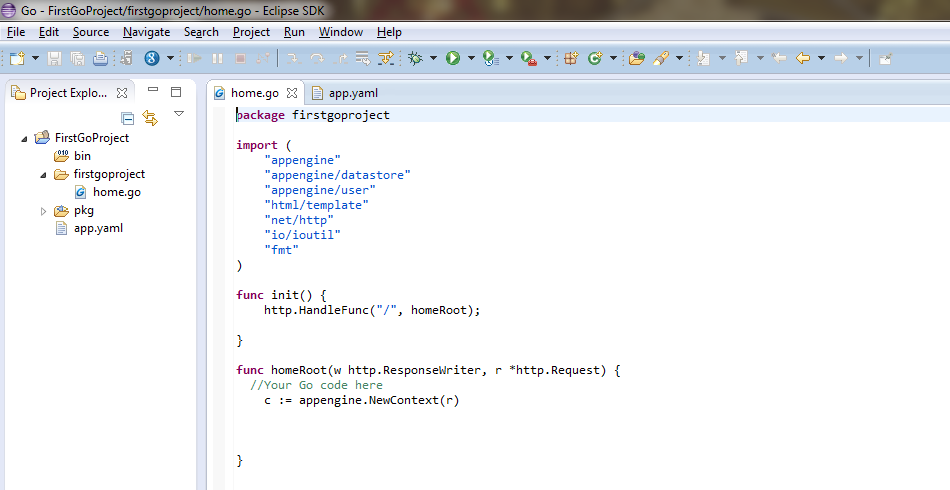
- You can check the project created in the workspace for yourself!
…You’re not done yet!!!
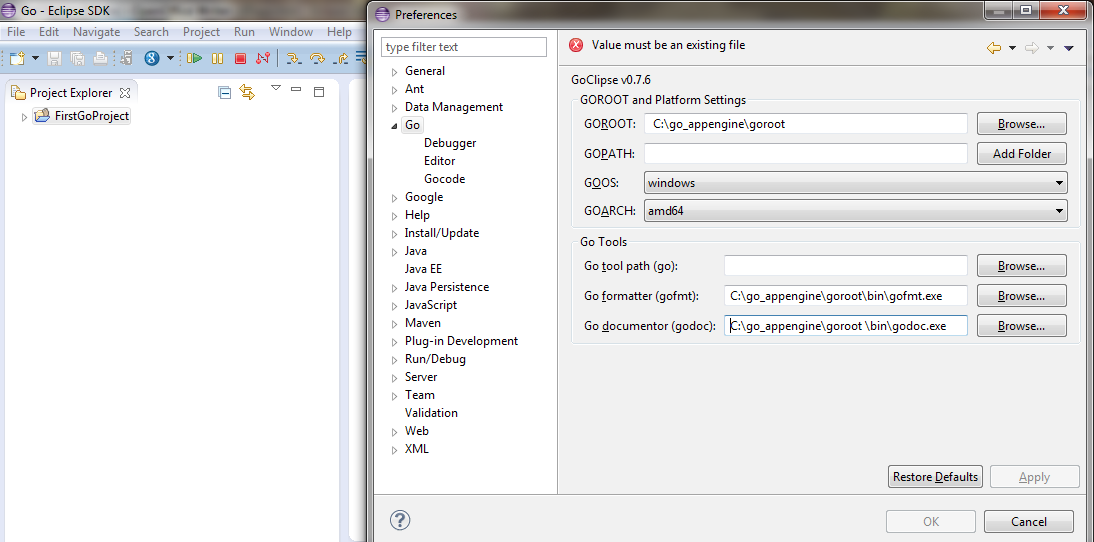
That's not all!! Now that you have successfully created your first Go project for Google App Engine environment, you have to set the Go root path.Setting the GOROOT path
- Select Windows>Preferences>Go
- Set the GOROOT path to the target directory (in my case C:\go_appengine\goroot )
- Let the GOPATH be blank
- Select the GOOS and GOARCH accordingly(in my case it is GOOS:windows and GOARCH:amd64)
- The Go formatter and Go documenter will be filled in automatically
- Apply the changes and click on OK button
Now it’s time to run the project!
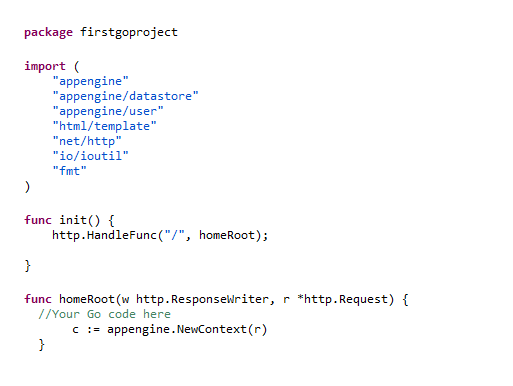
Create your GO file
- Define packages and import necessary functions
- Write your Go functions in your Go file
- Under init() provide mapping for URL and functions. Please refer below image
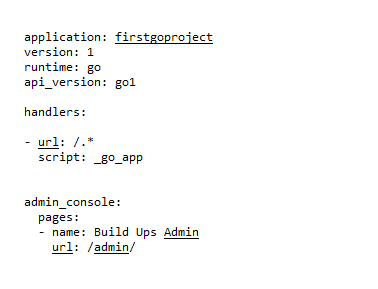
Create your YAML file
Creation of a yaml file is a 3-step process as listed below:- Create app.yaml file in the main folder of your project
- It should consist of the following fields:
- application: application-name(this name is used by appengine to identify your project,in my case:firstgoproject)
- version: version number(depending on your project version)
- runtime: go
- api_version: go1(latest stable version)
- handlers:(they redirect your URLs to the respective functions)
- The URL for your project would be "http://application-name.appspot.com/"
The last piece of the puzzle: Running your project
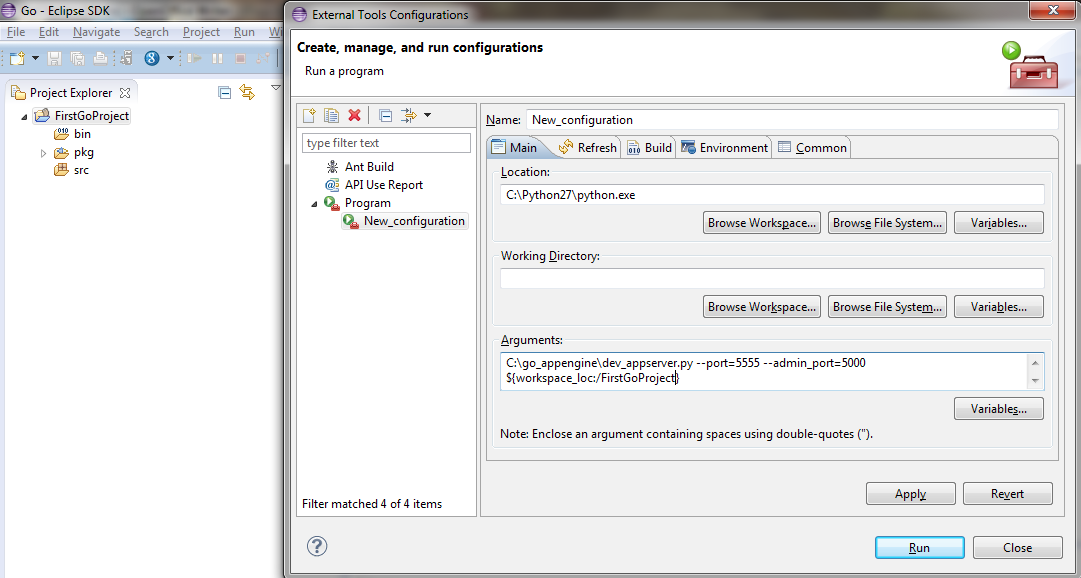
- Click on the External Tools button> External Tools Configurations >Program>New Configuration
- In the location text field, set the path where your python 2.7.5 is installed
- In the Working directory text field, click on Browse Workspace and select the desired project
- In the arguments text field, fill out the arguments as shown above. Here port 5555 will host your project and port 5000 is the Google Appengine datastore
- Type localhost:5555 in your browser to load your project and localhost:5000 to view the Google Appengine for the same. It is important to note that 5555 & 5000 are any random port numbers
Written by Sonali Dalvi, Google Developer at Eternus Solutions
Helpful ... :)
ReplyDelete